S3crets Revealed: Automating Keys in Nutanix Objects
Intro
I make it a habit to write things down when the same question pops up a few times.
Recently, several folks asked how to automate user creation, key retrieval, and access rights for Nutanix Objects users and buckets.
Here’s the short version: it’s possible, it’s cleaner than it looks, and it saves a lot of clicking. Let’s walk through it step by step.
The Key Problem (pun intended)
When you create users in the Objects UI, it all looks simple. Open the Objects app in Prism Central, go to the Access Keys tab, and click Create User. Right there, you can make a new user and generate a key pair.
Now, if you check the Objects v4 API docs, you’ll notice something missing. There’s no direct way to handle IAM user management through that API. The UI can do it, but the API can’t.

User creation workflow in the UI
That’s because Nutanix “splits” user management between Prism Central IAM and Objects. It’s odd, since the UI lets you create a user and keys that don’t even show up in the IAM user list. But that’s the workflow we must reproduce if we want to automate it.
The Solution
Now that we know the gap, let’s look at what the APIs can do for us. The IAM v4 API lets us create users in Prism Central. After that, the createUserKey API can generate the access and secret keys we need. I used Postman to build and run these requests. It’s great for breaking APIs into small pieces and showing the matching code samples.
Let’s go through an example. I created a user called postmantest (creative, I know).The user type is LOCAL, since it’s not coming from a directory service. Because this is the first time we’re adding the user, we also need to set a password.

Curl representation of the createUser API call
If you explore the createUser API, you’ll notice a long list of optional fields. For this test, I only used the ones that are required for a successful call. No need to overcomplicate it.
Next, we call the createUserKey API to get an Access Key for our new user. To do that, check the API response from the previous call and note the value of the extId field. That’s the unique identifier for our user and what we’ll use in the next request.

CreateUser API return, highlighted the extID
The call syntax is https://{pc-ip}:9440/api/iam/v4.1.b1/authn/users/{userExtId}/keys - replace {userExtId} with the extID field value from the return of the createUser API.

CreateUserKey example
In this call, you’ll see a few optional fields like name and description for the key. More importantly, there’s the keyType field in the data section. Since we’re generating credentials for use with Nutanix Objects, set this field to OBJECT_KEY.
If everything went well, you’ll get a response that includes a new key pair, consisting of an accessKey and a secretKey. The secretKey is only shown once, and there’s a reason it’s called secret, so make sure to store it safely.

CreateUserKey response, highlighted the key pair
That’s it! We now have a user and a working access key pair ready to use with Nutanix Objects.
I got a user, now what?
The next question I usually get is, “How do I automate permissions for my buckets?”. Once you know how to create a user and retrieve the access keys, you’ll hit another small surprise. When you create a bucket, the user who creates it automatically gets full access. Everyone else gets nothing. That’s by design, but it matters if you plan to script the whole setup.
To apply permissions on S3 buckets, we use standard S3 APIs. That’s one of the nice things about Nutanix Objects being S3-compatible. But those APIs need valid access and secret keys. Here’s the catch: the Prism Central admin account doesn’t have those keys by default. Well, probably the admin has a key pair, but it is not accessible to us.
That means if you create a bucket as admin, you can’t automate permission assignments until you give another user an access key and secret key first. The simple fix is to create a service user that you use for automation. That user holds the keys, creates buckets, and applies permission changes. If you prefer stricter control, create a unique user for each bucket and assign access that way.
We’ll walk through another quick example. We’ll take the access and secret keys from our postmantest user and grant another user full access to a bucket called apidemo. First, we create a JSON policy file. I called it policy.json because naming things is hard.

JSON policy file with s3 permissions
The policy describes what actions a user can perform and which resources they apply to. In this case, it grants “Full Access” to our target IAM principal for the apidemo bucket. This is a standard representation of privileges on a bucket for S3 compatible storage. Pro Tip: AI is generally fantastic at writing these. For a simple full access it’s not needed, but for least-privilege models, this comes in very handy.
Next, we apply the policy. I used the AWS CLI for this example, but any S3-compatible tool works the same way. Run the command and point it to your policy file:

PutBucketPolicy example
Like many lab setups, mine doesn’t use proper certificates. So, I include --no-verify-ssl to skip certificate checks. You shouldn’t do that in production, but it helps for testing. Also note that “file://policy.json” will look for the file in the local working directory of the terminal.
And that’s it. Our IAM user now has full access to the apidemo bucket.

Successful user privilege assignment
Lessons learned (and mildly ranted about)
I shared some feedback internally on how this workflow could be smoother. A few fields in the UI don’t match the API names, which can confuse first-time users. It also feels strange that the UI can create users and keys while the API needs two separate steps. Still, once you understand the logic, the automation is simple.
Creating users, generating keys, and assigning permissions becomes fast and reliable. It takes a few calls, but it’s consistent once you script it.
Big thanks to my colleagues who asked the right questions and inspired this post!
Nutanix Objects Replication: High availability, low drama
As always, we start with the obligatory “it’s been a while since my last post”. This time we blame some writing obligations for a publisher in Germany, which should release a few things in the upcoming months. Keep an eye open for those announcements on LinkedIn!
Anyway, back to the topic at hand:
If you hung around for a while, you’ve probably read my first blog on Nutanix Objects and already know i have a soft spot for terrible puns. This time we’re going a little deeper: objects streaming replication. All the availability within a cluster is impressive, but what if things go really sideways? Objects got you covered, highly available, with low drama.
For this little adventure, I’ll use a demo environment with limited scale. This is a single cluster with 4 physical nodes, running 1 Prism Central and multiple object stores. No worries, everything you'll see here also works across multiple clusters and Prism Centrals. We also have a locally running HAproxy, because it was easy to spin up on a Mac and only needed a couple of lines of config. We’ll go about this in two steps. First, we’ll peek under the hood at streaming replication. Then we’ll see how failover plays nice with our HAproxy and the Multi-FQDN feature. By the end, we should be able to query “the same” bucket from a client's perspective, even as we bounce between Object Stores.
The Copy + Paste that never sleeps
First, let us review what “Streaming Replication” means in Nutanix Objects. This technology replicates an object as soon as a S3 PUT request finishes. The setup happens at the bucket level. So, from a setup perspective we have one or more object stores running, in which we create buckets. Those buckets can then be given replication rules, and once that happens, the Objects service wathces for new object being added and streams them to the target.

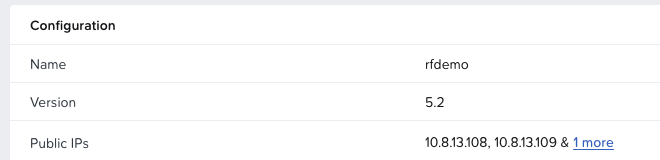
The object store in this case is called “rfdemo” and the FQDN is rfdemo.prism-central.cluster.local. For a little proof of concept I needed to create lots of objects across multiple buckets, just to see how quickly we could delete large sets of them. That’s why I set up three buckets in here, called “objectsdeletedemo”. To make life easier, I configured replication so that objectsdeletedemo automatically replicated to objectsdeletedemo2 and objectsdeletedemo3.

Here is where it gets interesting. The streaming replication rules are always configured as outgoing replication rules and allow for flexible setups, like 1:n replication. You can “fan out” from one source bucket to as many as three destinations in the current release. Each rule is independent as well. If for some reason I only want to replicate to bucket “objectsdeletedemo3”, I could pause replication to objectsdeletedemo2 while keeping replication active to objectsdeletedemo3. Another neat trick: you can configure bi-directional replication. So if I wanted every new object from “objectsdeletedemo2” to be replicated to “objectsdeletedemo”, I would just add another outgoing replication rule in the opposite direction. To put this to the test, I generated 10,000 objects in the first bucket and watched streaming replication pick them up. In here we can see the details view of an individual outgoing replication, which showed a queue of 167 objects at one point.

In this example, I created 10,000 objects at about 763 objects per second. The main reason that this isn’t higher is latency. The Python script was running on a client in Germany while the Object store was sitting in Nevada. Still, the streaming replication keeps up very well. The effective recovery point objective (RPO) is close to zero. This brings us to another point worth mentioning: RPO expectations. This is not synchronous replication with a guaranteed RPO of 0. Since we only pick up objects once they are done uploading to the first bucket, there will be some delay before the object is done replicating to the second site. In most cases, this is within seconds, but depends on various factors like available bandwidth and object size. Think of it as “RPO-close-to-zero.”
After the script created 10,000 objects, increasing the total count in the bucket to 110k objects, both destination buckets showed the same object count almost immediately afterward.

All of this is great, but how do we access the bucket and how do we switch between object stores? Nutanix Objects supports both S3-style path formats:
https://rfdemo.prism-central.cluster.local/objectsdeletedemo
https://objectsdeletedemo.rfdemo.prism-central.cluster.local
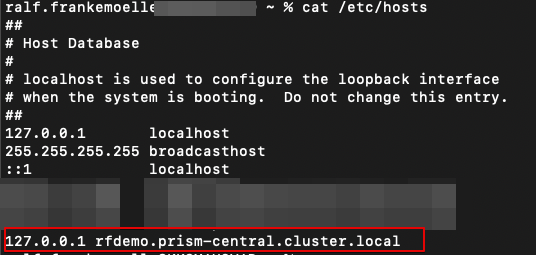
We will use the first style, for a very simple reason. I am running this on a Mac without a sophisticated local DNS server, and the host file does not support wildcards. As a fellow lazy admin, I just edited /etc/hosts to point to the HAproxy instead of setting up dnsmasq.
Onwards we go to explore failing over between two Object stores, without touching the client.
When One Store Naps, Another Wakes
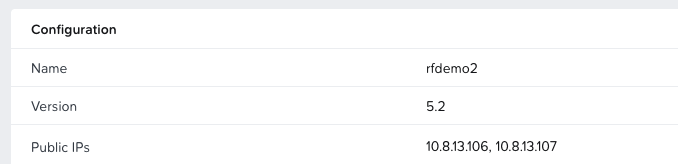
For this part of the blog, we set up a second object store. This one has the creative name “rfdemo2”, with the same style of fqdn (rfdemo2.prism-central.cluster.local) as the first. When our client is resolving “rfdemo.prism-central.cluster.local”, it usually returns one of the Load Balancer public IPs (see the original Objects post for a refresher on those LBs). The client connects to that public IP and the request is handled, for example a GET on an object in the “objectsdeletedemo” bucket. However, since we want the client to not realize it has been redirected to a different Object store, our configuration looks slightly different. Our HAproxy is listening on the localhost IP (127.0.0.1), so the hosts file has been edited to resolve rfdemo.prism-central.cluster.local to 127.0.0.1.
In a real environment, a DNS server entry for the Object store FQDN would point to actual Load Balancers instead of HAproxies bound to localhost. Our client now queries HAproxy instead of the Object store directly. But how do we make that transparent? The second store has a different name (remember, it is rfdemo and rfdemo2). This is where the Multi-FQDN feature in Nutanix Objects comes in. You can navigate to the Object stores and hit the “Manage FQDN & SSL Certificates” button.

In this configuration, we add the new FQDN we want, click “Add FQDN”, and save. Our lab does not have a CA, so we ignore the little red warning on the newly added FQDN. Nutanix Objects checks for valid SSL certificates on all FQDNs. Since this Object store was created as rfdemo2.prism-central.cluster.local, the self-signed certificate only includes the original hostname. In the lab we can skip validation, but do not do this in production.

With this done, our second Object store can now listen on the same FQDN. We are almost there. Now we just need to configure HAproxy to load balance between the Object stores. In the lab we run an active/passive setup, but production environments could run both sites active at the same time.
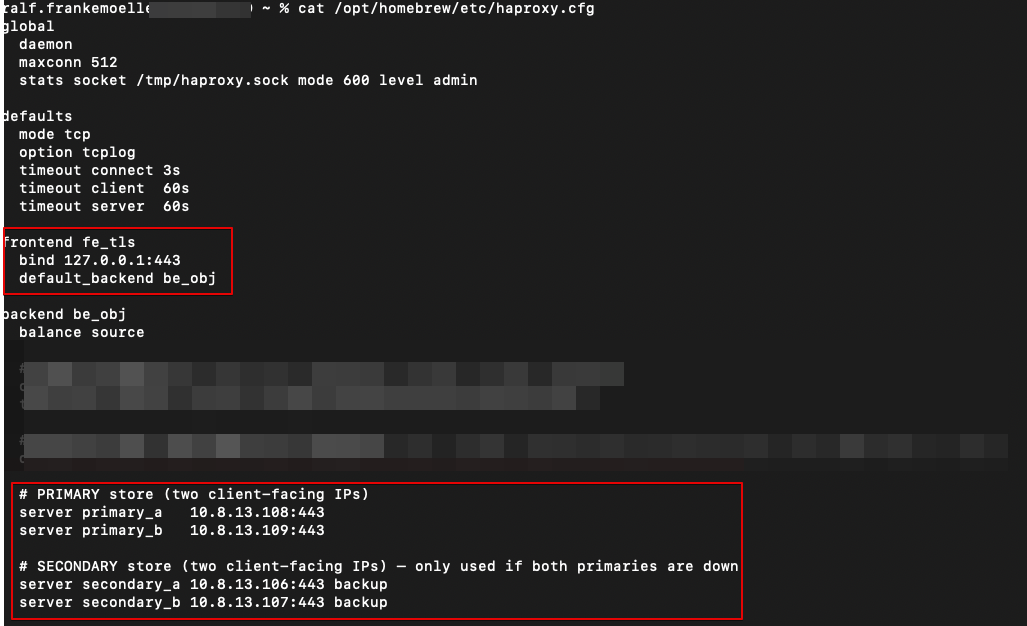
The config is fairly simple: one frontend referring to one backend. The frontend describes the IP and port HAproxy listens on. In this case it is 127.0.0.1:443. As described above, the FQDN rfdemo.prism-central.cluster.local resolves to 127.0.0.1. Since we use HTTPS as the transport for the S3 API calls, requests end up at 127.0.0.1:443. HAproxy then sends them to its backend named “be_obj”. A backend is just a list of IPs or hostnames across which HAproxy can distribute traffic. Here we define primary addresses (the Load Balancer public IPs of rfdemo) and secondary addresses (the Load Balancer public IPs of rfdemo2).
Now for the interesting part. If we query the bucket objectsdeletedemo on rfdemo.prism-central.cluster.local, we should see a file called site1.txt, which indicates we are on the first site represented by the original rfdemo Object store. For reference, we can also check the file in the web client.

Next, we run a query via the terminal against our Object store. This will return anything with a name starting with site.In our case, it simply returns site1.txt, just as we saw in the Object browser before.

To simulate failover, we can either shut off the rfdemo Object store or disable the primary addresses in the HAproxy backend. Since this is a lab and I do not want to wait for the Object store to restart, we disable the primary interfaces and repeat the AWS CLI command. To deactivate, we use these commands:
echo "disable server be_obj/primary_a" | sudo socat - /tmp/haproxy.sock
echo "disable server be_obj/primary_b" | sudo socat - /tmp/haproxy.sock
Yes, not the most elegant, but it gets the job done. To show I am not cheating, I ran the command in the same terminal without clearing the screen. After deactivating the interfaces, the query now returns site2.txt.

Simply reactivating the interfaces will return us to the first site. This demo runs on one cluster and one Prism Central, but the same logic applies across multiple Prism Centrals and Nutanix clusters.
The Buckets that always answered
So, there you have it. Last time in Objectsively Awesome we just dipped our toes in. This round we went full swim class: streaming replication, HAproxy tricks, Multi-FQDN, and a failover that keeps clients blissfully unaware of the chaos backstage. Nutanix Objects proves that high availability really can be low drama.
Now go forth and replicate!

VMware by Broadcom Explore Las Vegas Network & Security Sessions 2025
VMware Explore US will taken place in Las Vegas from 25th of August until 28th of August 2025. The european conference will not been taken place anymore in Barcelona:-( Instead of it there will be several VMware Explore Tours in Mumbai, London, Paris, Sydney, Tokyo and Frankfurt, please check this link for more informations.
I provide recommendations within this blog post about some technical sessions related to Network & Security topics for the Explore event in US. I have excluded certifications, Hands-on-Labs and Meet the Expert Roundtable sessions from my list. I have focused on none 100 level sessions, only in case of new topics I have done some exceptions.
Pricing
A full event pass for VMware Explore costs $ 1.995 dollar for the Las Vegas event. If you register onsite it costs $ 2.195 dollar. The full event pass has following advantages:
Full Event passes provide the following benefits:
General Session Access
Access to the Meeting center, needs to be scheduled as needed for attendees by a Broadcom representative.
Session & LAB Access
Session & LAB Scheduling
On-Demand Sessions
Certification Exam (includes one coomplimentary VCF certification voucher)
The Party
Event Meals
Explore Backpack and T-Shirt
VMware Explore Session Recommendations
Now I come to my session recommendations which are based on my experience and some very good known speakers from the last years and about topics which I am interested from Network and Security point of view. But first I have to say that every VMware Explore session is worth to join and customers, partners and VMware employees have taken much efforts to prepare some very good content. For me the VMware Explore sessions are the most important source to get technical updates, innovation and training. All sessions can be also watched after VMware Explore. Some hints to the session ID`s, the letter in bracket like NSLT1545LV stands for N = Network, S = Security, L = Load Balancing and T = Track. LV indicated that it is a session in Las Vegas.
General Solution Key Note
Application Network & Security (ANS) Solution Key Note
Security Sessions
Security Reference Design For VMware Cloud Foundation [NSLB1836LV]
From Zero to Hero: VMware vDefend Advanced Threat Prevention Deployment Best Practices [NSLB1869LV]
Unified Security Policy Orchestrator For Self-Service With Governance [INVB1440LV]
Safeguard Your Containers And VMs With VMware vDefend in VMware Cloud Foundation [NSLB1552LV]
Ready To See What Happens When Zero Trust Just Clicks? [NSLB1193LV]
Demystifying VMware vDefend Distributed Security Within VMware Cloud Foundation [NSLB1076LV]
VCF Sessions - Networking related
Adopting VMware NSX With VMware Cloud Foundation The Easy Way [CLOB1579LV]
Easy Set Up Networking in vCenter With VPC - Watch It Live In Action [CLOB1511LV]
New To VMware Cloud Foundation Networking With VMware NSX? [CLOB1512LV]
VMware Cloud Foundation Networking Operations And Troubleshooting Best Practices [CLOB1892LV]
VMware AVI Load Balancer related
Avi Load Balancer Integration With VCF 9: Driving Private Cloud To New Heights [NSLB1723LV]
Avi, AKO, and AMKO: Easy Way to Build Load Balancer Services for Kubernetes Clusters [NSLB1677LV]
Self-Service Automation With VMware Avi Load Balancer [NSLB1194LV]
VCF Compliance Sessions
Faster Audits: Regulatory Compliance With VMware Cloud Foundatio 9.0 [CLOB1260LV]
What Is New In VMware Cloud Foundation 9.0 Security And Compliance [CLOB1261LV]
Networking & Security Session AI related
Generative AI: Addressing Security And Resiliency Concerns [NSLP2051LV]
Elvate Threat Investigation For vDefend VCF Workloads With The GenAI Intelligent Assist [NSLB1596LV]
Unlocking Innovation In Regulated Industries: Sovereign Clouds And Private AI [CLOB1464LV]
Will AI Really Revolutionize Network Operations? [CLOB1883LV]
Network & Security Operational related
”Dogfooding” Broadcom Software For Internal Security [NSLB1820LV]
VMware vDefend Distributed Firewall Operational Overview [NSLB1623LV]
Rightsizing Your Private Cloud For Maximum Economic Value [CLOB1236LV]
Summary
Please take into account that there are a lot of other interesting VMware by Broadcom Explore sessions, also for many other topics like VCF 9, AI, cloud, Edge, Container, vSphere, etc.
Feel free to add comments below if you see other mandatory sessions in the Network & Security area. I wish you a lot of Fun at VMware by Broadcom Explore 2025 in Las Vegas! HAPPY NETWORKING!
Modern Apps and Trusted Storage
During the German .next on Tour in November I gave a talk called “Nutanix Unified Storage – Data Services for the modern age”. The talk was about how NUS (but also Nutanix in general) gives us all the data storage services we need for even the newest kind of applications.

The talk walks through a journey of a cluster running VMs on AHV + AOS, to running an AI chatbot application on the same cluster, just by leveraging K8s and NUS. While the talk was well received, 45 minutes are not enough to cover all of persistent storage for modern applications. However, multiple blogs posts can 😊
Modern Applications, Cloud Native, K8s
What do we mean with modern apps, cloud native, etc.? And more importantly, why do they matter? In our world where software powers everything from streaming our favorite shows to running AI applications, these terms represent the blueprint for building and running applications that can keep up with the pace of modern life.
Modern applications are all about being adaptable, scalable, and efficient. Gone are the days of only running big, bulky monolithic applications and servers (remember Windows Small Business Server anyone?). Today's applications are often built using microservices, small independent pieces that work together. This approach makes development oftentimes faster and lets apps grow and shrink to handle demand without breaking a sweat.
And then there’s “cloud native”, a term that often gets mistaken for “built in / for the public cloud”. In my opinion it’s not that. Being cloud-native is a way of designing apps to be flexible, automated and portable across any environment – whether it is a private data center, a public cloud (aka someone else's server), or a mix of both. It emphasizes using modern infrastructure without “being married to one”.
This is also where Kubernetes (“K8s”) comes in. K8s is the enabler behind these cloud-native apps. Think of it as the conductor of an orchestra, making sure every container (the building blog of modern apps) works together in harmony. Though it is the leading container orchestrator today and supports many different types of applications, it started out focused on running stateless apps.
The Past – Overcoming Early Kubernetes Storage Hurdles
K8s is all about managing containers. From the beginning, it provided a straightforward way to deploy and scale stateless apps, where containers could spin up, do their job, and disappear without worrying about saving data. For developers focused on apps like web servers, this worked perfectly. However, enterprises require data to persist for other application services like databases.
In those early days, K8s did not have a native way to handle storage. If your app needed to store data, you had to provision storage manually. This meant creating and configuring storage systems yourself, then finding ways to connect them to your containers. I have been told it worked, but wasn’t smooth, and certainly not automated.
The introduction of Persistent Volumes (PVs) and Persistent Volume Claims (PVCs) helped by separating storage from workloads, but the process was still static – storage had to be pre-allocated. Dynamic provisioning improved things further, allowing Kubernetes to create storage on demand, but integration remained an issue. Each storage vendor needed custom plugins, leading to complexity and maintenance headaches.

kubelet talking to external storage with vendor plugins in the k8s core
The turning point came with the Container Storage Interface (CSI), a standardized API that allowed vendors to build plugins compatible with almost any Kubernetes environment. CSI simplified integration, making it easier to use dynamic, scalable storage across systems.
With these advancements, Kubernetes grew from supporting only stateless apps to becoming a platform capable of handling stateful workloads. These incremental improvements transformed Kubernetes into the foundation for modern applications.
The Present – Kubernetes Storage All Grown Up
Since its humble beginnings, K8s has grown into a platform that handles stateful workloads with ease. What once needed duct tape and manual effort is now part of its core functionality, thanks to advancements like the Container Storage Interface (CSI). CSI has simplified how K8s integrates with storage systems by moving volume provisioner plugins out of the K8s core. In the past, these “in-tree” plugins were tied to K8s versions, forcing storage vendors to keep up with K8s rapid release cadence. This slowed innovation and was messy to maintain. CSI solves this by creating a standardized interface that allows vendors to build and maintain plugins with reduced dependency on K8s releases.

K8s using csi drivers to communicate with storage
This evolution made K8s a reliable choice for stateful workloads. Tools like “StatefulSets” now give developers a native way to manage applications that need persistent data, such as databases or analytics apps.
K8s also shines in hybrid and multi-cloud setups. The storage abstraction allows workloads to use on-premises storage alongside cloud-based solutions. This flexibility means organizations can choose the best storage for each workload, while keeping everything under a single K8s umbrella.
Security and automation have stepped up, too. Features like encryption and replication (either built into CSI backed storage, or via 3rd party) ensure data is both safe and resilient. Tools like operators and Helm charts make deploying stateful apps with K8s easier than ever.
Today, K8s is not just a platform for containers – it is a full-fledged system for running modern applications, regardless of storage requirements.
The Future - A Glance Ahead
As K8s continues to evolve, the Special Interest Group Storage (SIG Storage, https://github.com/kubernetes/community/blob/master/sig-storage/README.md) is actively working on several initiatives to enhance storage (and surrounding) capabilities. Here is a look at the key project I am most excited about:
Change Block Tracking (CBT)
Well known for backup and virtualization admins, this crucial capability is still missing for Kubernetes. While some third-party solutions have implemented their own CBT mechanisms for specific use cases (e.g. VEEAM K10 and VMware CBT), these are platform specific and not natively K8s integrated. In general, CBT allows systems to process only the modified portions of data rather than entire volumes. By implementing CBT, K8s will improve data protection workflows, making backups faster and more efficient. It is worth noting that CBT is first planned as an alpha feature in v1.33, so it may take a few release cycles before it is production-ready.COSI – Container Object Storage Interface
COSI was introduced as an alpha feature in v1.25 in 2022 and is a standard for provisioning and consuming object storage in K8s. As far as I know, it still is an alpha feature, but some vendors already have plugins available. For example, Nutanix has a COSI driver for NUS Objects on GitHub: https://github.com/nutanix-cloud-native/cosi-driver-nutanix. The decision for a new storage interface was probably due to the big differences between file- and block storage vs object storage. While file/block storage returns volumes, mount paths, etc., object storage provides access and secret keys alongside a bucket path. This separation from CSI simplifies object storage integration in my opinion.
Persistent Storage as a Foundation for the Future
The journey of K8s from a platform for stateless workloads to a platform for modern applications has been remarkable (and one I should have followed closer sooner). Persistent storage has played an important role in this transformation, enabling K8s to support the evolving needs of stateful workloads like databases and our beloved AI Driven applications.
Looking ahead, technologies like Nutanix Kubernetes Platform and Nutanix Unified Storage are set to take these capabilities even further, making it even easier to handle modern workloads seamlessly. In a future post, we will look into how these technologies build on Kubernetes’ foundation to deliver trusted, scalable, and efficient solutions for the most demanding applications.
Stay tuned!
Erasure Coding: Resilient and Efficient
Since the first post got lengthy, I removed the section around storage efficiency and recovery performance from the first part here:
https://www.securefever.com/blog/erasure-codingnbsp-the-basics-of-smarter-data-resiliencenbsp
Striking the Perfect Balance: Resilience vs. Efficiency
In our first post, we introduced erasure coding as the modern solution to data redundancy – splitting data into blocks, calculating parity, and spreading it across nodes for resilience. But there is more to it than just "splitting and spreading." The real magic lies in the ratio of data blocks to parity blocks, which determines how efficiently storage is used and how well the system tolerates failures.
Think of it this way: more parity blocks equal greater fault tolerance but come at the cost of extra storage and computational overhead. Fewer parity blocks save space and resources but leave less room for error. Striking the right balance is critical, especially in large-scale distributed systems.
In this post, we’ll explore what these ratios – like 3+1, 4+2, and beyond – mean and how they affect performance, efficiency, and recovery, helping you understand the trade-offs behind different configurations.
How Erasure Coding Ratios Work: The Math Behind the Magic
Erasure Coding works by splitting data into blocks and calculating parity blocks to provide redundancy. The ratio of data to parity determines the balance between storage efficiency and fault tolerance. So, if we talk about 3+1, 4+2, 8+2, etc. what do we mean? Typically, the first number represents the data blocks and the second number the parity blocks. Other notations use “A, B” where “A” represents the total number of blocks and “B” the number of parities.
For example:
4+2 means, for every 4 data blocks, 2 parity blocks are added.
6,2 means 6 blocks in total, with two of them being parity. Making it equivalent to 4+2.
In this blog we stick to the first notation. Parity blocks are calculated using mathematical techniques like XOR (as shown in the first post), enabling the system to reconstruct missing data if blocks are lost. For simplicity, we will assume each block resides on a separate node (e.g. 4+1 means 5 nodes in total).
Here’s the trade-off when balancing the ratio:
More data blocks (e.g., 4+1): Better storage efficiency, but lower fault tolerance.
More parity blocks (e.g., 4+2): Greater fault tolerance, but higher storage overhead.
In a 4+1 setup, you have 4 data blocks and 1 parity block, meaning you can tolerate 1 failure. Storage efficiency is high at 80% usable capacity, but recovery is limited to single-disk failures. While 4+2 improves fault tolerance, recovering data after multiple failures may involve greater computational overhead and slower rebuild times compared to 4+1. With 4+2, you have the same 4 data blocks but with 2 parity blocks, allowing you to tolerate 2 failures. Storage efficiency drops to 66.6%, but fault tolerance significantly improves. In terms of overhead, 4+1 loses 1 out of 5 blocks (20%) to parity, while 4+2 loses 2 out of 6 blocks (33.3%), highlighting the trade-off in storage usage.
You can fine-tune the ratio to match your workload, ensuring the right balance of resilience, efficiency, and recovery performance.
Real-World Trade-Offs: Cost of Safety
The erasure coding ratio you choose isn’t just about math – it is about what your system needs to handle in the real world. Different workloads demand different balances between redundancy, efficiency, and recovery performance.
Small Clusters, High Performance: 3+1
For smaller clusters or performance-heavy workloads like transaction logs or hot data, a 3+1 setup provides fast access and minimal storage overhead. With 75% usable capacity, it’s efficient but limited to tolerating a single failure.
Balanced Resilience: 4+2
The sweet spot for many distributed systems is 4+2. It delivers solid fault tolerance, capable of handling two failures, while keeping storage efficiency reasonable at 66.6%. It’s ideal for general-purpose workloads where resilience matters, but storage costs are still a concern.
Massive Scale and Cold Storage: 10+4, 8+2
In large-scale systems or cold storage, where durability matters more than speed, configurations like 10+4 and 8+2 excel. These setups prioritize resilience while keeping storage overhead manageable.
10+4: This setup splits data into 10 blocks with 4 parity blocks, meaning it can tolerate up to 4 simultaneous failures. With 71% usable capacity, it ensures high fault tolerance for workloads like backup archives or regulatory compliance data that demand long-term durability with minimal risk of data loss.
8+2: With 8 data blocks and 2 parity blocks, this configuration tolerates 2 simultaneous failures while achieving 80% usable capacity. It’s a great option for slightly smaller systems or workloads that require both redundancy and efficiency.
These configurations shine in cold storage scenarios, where data is rarely changed but must remain safe across large clusters. While storage overhead increases with more parity blocks, the added peace of mind is often worth it.
Scenario-Driven Flexibility:
Pick the right ratio for your workload instead of overthinking the math.
Hot Data: Small ratios (e.g., 3+1) maximize performance for frequently accessed or time-critical workloads.
Cold Storage: Larger ratios (e.g., 10+4) focus on durability for rarely accessed but critical data.
Large Storage Devices: In hybrid scenarios (NVMe hot tier, HDD cold tier), you sometimes want to pick higher fault tolerances because recovering a single HDD takes really long, leaving the data at risk if you only tolerate a single failure.
Special Redundancy Mechanisms, Beyond Basic Ratios:
Distributed systems sometimes have specialized redundancy mechanisms like 2D1N to adapt requirements for large-scale deployments. In this setup, data is spread so the system can tolerate the failure of 2 disks or 1 node (hence 2D1N). Storage efficiency depends heavily on the hardware configuration (number of disks and nodes) as well as the data-to-parity block ratio.
The Recovery Perspective: What happens when things break?
Erasure coding isn’t just about storing data efficiently - it’s about ensuring it can be rebuilt when failures occur. Recovery performance depends on the erasure coding ratio, directly affecting speed, computational complexity, and the load on remaining nodes. Smaller ratios, like 3+1, are quick to recover. Losing one block often requires only XOR (see the first post for an example) operations across the three remaining blocks, making recovery fast and lightweight. This makes such setups ideal for workloads where speed is critical. Larger ratios, like 4+2 or 10+4, offer greater fault tolerance but take longer to recover. These setups often use advanced techniques like Reed-Solomon coding, which relies on polynomial math to reconstruct multiple missing blocks. While this adds computational overhead and recovery time, it ensures durability in scenarios like cold storage or archival systems.
We will not walk through an example of such calculations in this post because it would take an article on its own to explain and I am not good at math (lol).
Recovery generates extra load on the surviving nodes. Rebuilding data requires additional I/O and CPU resources, which can affect active workloads. Distributed systems mitigate this by spreading recovery tasks across multiple nodes, but higher ratios mean more nodes and resources are involved in the process. Choosing the right erasure coding ratio is about efficiency, fault tolerance and about how recovery affects your system. Smaller ratios prioritize quick recovery, while larger ratios trade speed for resilience, ensuring your system can withstand more significant failures. Understanding these trade-offs helps align recovery performance with workload priorities.
Balancing Redundancy for the Real World
The ratios you choose should align with your workload priorities, be it high performance, resilience, or cost efficiency. For hot data and smaller clusters, smaller ratios provide quick recovery and minimal overhead. For large-scale systems and critical workloads, larger ratios ensure durability, even in the face of multiple failures. Mechanisms like 2D1N or configurations like 8+2 show how redundancy can be tailored to meet specific needs, blending performance with resilience.
The beauty of erasure coding lies in its scalability. It adapts to your system’s growth, handling failures across disks, nodes, and even racks. By understanding the trade-offs of each ratio, you can fine-tune your system to maximize both safety and efficiency - future-proofing your storage to meet the demands of today and tomorrow.
Erasure Coding: the Basics of smarter Data Resilience
I wanted to write this for quite a while. Over the summer I revisited some fundamentals of RAIDs, erasure codes, parity calculations, etc., but never finished it, until Christmas time. While Nutanix HCI has EC-X, this post is not directly tied to any Nutanix technology. Hope you still enjoy the read!
RAIDs, Mirrors, Parities, Erasure Codes and Math
In the world of storage, we often hear about efficiency, resiliency, and recoverability as if they are some mystical trifecta. Depending on the vendor and their approach, the strategies can vary wildly. For example, traditional storage arrays lean heavily on RAID configurations – some more sophisticated than others – while modern distributed systems favor Erasure Coding.
But why the shift? And what exactly is Erasure Coding?
Let us dive into the fundamentals of RAID, the underlying principles of Erasure Coding, and how these approaches tackle the challenges of data resiliency and efficiency.
RAID Levels: From 0 to 6 and everything in between
Almost everyone in IT has bumped into RAID (Redundant Array of Independent Disks) at some point. Back in school, I had to learn the RAID levels: 0, 1, 5, 6, 10, 50, and 60.
All visuals are taken from the Wikipedia article on RAID levels since I learned them there and love the visualization 😊 (https://en.wikipedia.org/wiki/Standard_RAID_levels).
The core idea of RAID is simple: combine multiple storage devices into a logical unit that provides data redundancy and, in most cases, performance improvements.
RAID 0:
RAID 0 provides no redundancy, focusing entirely on performance. Data is striped across multiple disks at the block level, allowing concurrent writes and leveraging the combined throughput of all devices. For example, a 4-block file is split evenly across two disks, doubling write speeds. However, RAID 0 has no fault tolerance – if one disk fails, all data is lost. While it is useful for temporary or non-critical data, RAID 0 is rarely recommended for production environments due to its lack of resiliency.

RAID 1:
RAID 1 duplicates data across two or more disks, ensuring each disk contains an identical copy. Every write operation is mirrored, and the system can continue running seamlessly if one disk fails. This makes RAID 1 ideal for critical data where redundancy is more important than storage efficiency. However, the trade-off is that you only get 50% usable capacity, as one disk is a full mirror of the other. RAID 1 is simple and reliable but does not improve performance significantly and can only tolerate a single disk failure.

RAID 5:
RAID 5 combines striping for performance with distributed parity for redundancy. Data and parity blocks are spread across all disks, ensuring the array can recover from a single disk failure. For example, in a 3-disk RAID 5, parity is calculated using XOR and rotated among the disks. This provides better storage efficiency than mirroring, as only one disk’s capacity is reserved for parity. However, rebuilding a failed disk requires parity calculations and reading all remaining disks, which slows performance and increases stress on the array during recovery.

RAID 6:
RAID 6 extends RAID 5 by adding a second parity block, enabling it to survive two simultaneous disk failures. Like RAID 5, it stripes data and distributes parity blocks across all disks, but the second parity uses more complex calculation for added fault tolerance. This makes RAID 6 more resilient but also more resource-intensive during writes and recovery. The storage overhead is higher, with the capacity of two disks reserved for parity. RAID 6 is commonly used for large arrays or critical environments where recovery time and fault tolerance are top priorities.

The others (10, 50, 60) are combinations of the above. E.g. RAID 10 is striping across two RAID 1 volumes. Taking the increased throughput of striping (RAID 0) across redundant volumes by mirroring (RAID 1). 50 stripes across RAID 5 sets, 60 across RAID 6 – you get the idea.
Why Distributed Systems differ
Why do distributed systems not just stick with RAID? After all, RAID 5 and 6 already balance performance, redundancy, efficiency, and recoverability – what’s the issue? The short answer: distributed systems are playing a much bigger game. RAID is great for local arrays but does not scale or handle failures across entire nodes, networks, or data centers. Let us unpack why.
Distributed systems do not use RAID because their design does not fit RAID’s centralized approach. RAID relies on a controller managing disks in one array, while distributed systems spread data across nodes. This setup needs redundancy across the entire system, not just local disks, which RAID cannot handle.
Plus, distributed systems scale by adding nodes and / or disks, while RAID levels like 1, 5 and 6 scale by adding disks, where the total number of disks is often very limited. Erasure coding, which is software-based, is more flexible and handles larger-scale systems. Essentially, RAID is great for single arrays, but it cannot match the scalability and resilience distributed systems demand.
So, what is Erasure Coding?
Erasure coding (EC) is the solution that distributed systems turn to for redundancy and resilience. Think of it as RAID’s flexible, software-defined relative, designed to work across nodes instead of disks.
Here is the gist: EC splits your data into data blocks and adds extra parity blocks using mathematical techniques like XOR or Galois Fields (the same math is behind the second parity in RAID6 by the way). For example, in a 3+1 setup, your file is split into 3 data blocks, with 1 added parity block calculated. These 4 blocks are then spread across multiple nodes.
If one node fails, EC uses the remaining data, and parity blocks to reconstruct the missing pieces. Unlike RAID, which is tied to a physical array, EC scales beautifully with distributed systems, handling failures across disks, nodes, or even entire racks. It is all about resilience and efficiency at scale, making it the go-to redundancy method for modern infrastructure.
Let us walk through a theoretical example of XOR recovery. Imagine storing a (very small) picture of 4 KB called sunset.jpg in a distributed storage system using 3+1 erasure coding. Our made-up file is split into 1 KB (1.33 technically) blocks, Data 1 –3 (D1, D2, D3), and a 1 KB parity block (P1) is calculated for redundancy. The 4 blocks are then spread across different nodes in our distributed system.
The system now performs XOR operations across all three data blocks. To start that, we imagine our 1 KB block with the following binary values:
D1 = 1011
D2 = 1100
D3 = 0110
In Boolean math we use the ⊕ for XOR operations. XOR results in 1 only when the inputs differ (e.g. 1 and 0 or 0 and 1) and 0 when they match. So, the calculation for our Parity Block is:
P1 = D1 ⊕ D2 ⊕ D3
P1 = 1011 ⊕ 1100 ⊕ D3
P1 = 0111 ⊕ 0110
P1 = 0001
These blocks are spread across the 4 nodes in our distributed system. After a while, one of our nodes fail, and with it D2 (1100) gets lost. Our system still has D1 (1011), D3 (0110) and P1 (0001) on the remaining nodes to recover the failed piece of data. We replace our node, hook it up to the system and it starts the recovery:
D2 = P1 ⊕ D1 ⊕ D3
D2 = 0001 ⊕ 1011 ⊕ D3
D2 = 1010 ⊕ 0110
D2 = 1100
Voila! We calculated the lost block from the remaining data and parity blocks. Obviously, this happens at enormous scale (and is calculated faster than in my walk through) across many, many more nodes. However, I do hope that this example makes the concept easier to grasp.
Math, Magic and Modern Storage
Erasure coding is the backbone of modern distributed storage. By splitting data, calculating parity, and spreading it across nodes, it can deliver the perfect mix of redundancy, efficiency, and scalability. Whether a single disk fails, or an entire node goes offline, your data stays safe. Built for resilience and efficiency, erasure coding is a future-proof solution that continues to power reliable storage at scale.
More on efficiency on a follow-up post!
Object(s)ively Awesome
Nutanix Objects?
In August we talked about NUS Files and now it is time to talk about the newest kid on the block (pun intended): Nutanix Objects.
In the Files post we mentioned a study by IDC around the enormous amounts of data that will be created and consumed every day. The same article mentions that roughly 80% of that is expected to be unstructured data.
Guess what is perfect for unstructured data? Object Storage!
S3riously good – it all starts with one standard
While AWS didn’t invent object storage really, it definitely helped make it mainstream.
When S3 was released (2006 or so?), it revolutionized object storage as a concept. Besides the storage server itself, it was the S3 API that was a key differentiator. So much so that competitors and new challengers in the market adopt S3 compatible APIs for their own object storage (that includes Nutanix and the likes of Google, MinIO, etc.).
The S3 API gave developers a universal, programmatic way to store and retrieve data using simple HTTP requests, abstracting away complexity and setting a standard for compatibility across platforms.
Object-Oriented: The Basics of Nutanix Objects
The Object Storage of NUS is another part that is integrated into the overall offering. No other subscription or license is needed, just the used capacity per TiB in NUS and you are good to go.
Just like files, it is based on a couple of service VMs that get created during deployment.

Nutanix Objects architecture with public and storage networks, two Load Balancers, and three Worker Nodes.
We see Load Balancers and Workers. Load Balancers are just that, VMs that balance incoming connections by S3 clients. We want at least two for redundancy purposes per object store. For Workers, unless you do a 1 node deployment, we want 3.
While Load Balancers are a well-known concept, let us focus on the Worker VM. These VMs are small container hosts that run a couple of Microservices, based on Nutanix MSP (https://portal.nutanix.com/page/documents/details?targetId=Objects-v5_1:top-msp-lifecycle-c.html). Internally, microservices are used to implement the S3 API, handle storage communication with the AOS backend, handle object metadata, etc.
(Just like the Fileserver VMs, these are *managed VMs* and do not have to be managed by yourself. They do show up in your infrastructure tab, but you do not need to interact with them.)
As you can see on the screenshot, we have a public network and a storage network. While we generally recommend the object VMs to be on the CVM storage network, you can separate these. Keep in mind more configuration is needed to make sure all necessary ports are available (https://portal.nutanix.com/page/documents/details?targetId=Objects-v5_1:top-network-configurations-r.html).
For the public network, we define an IP range on which the Load Balancer VMs are reachable for clients. This can be your application network, your client network, etc. (do not confuse *public network* with public IPs 😉).
If our number of Load Balancer and Worker VMs are decided and we have configured the necessary firewall rules, we can deploy an Object Store.
Buckets in Store: What is the Object Store?
An Object Store is a “higher level” grouping of object buckets. Every object store deploys its set of VMs (Load Balancers & Workers) and provides its own S3 API endpoint, as well as object namespace. Within an object store is where users create their buckets.

Nutanix Objects management interface showing a list of Object Stores with details such as version, domain, nodes, usage, buckets, objects, notifications, and public IPs
The Object Store level is where we would scale-out the amount of VMs (for more network throughput or scaling storage resources), manage FQDNs and certificates, as well configure advanced features like object federations or Endpoints for notifications and archiving.

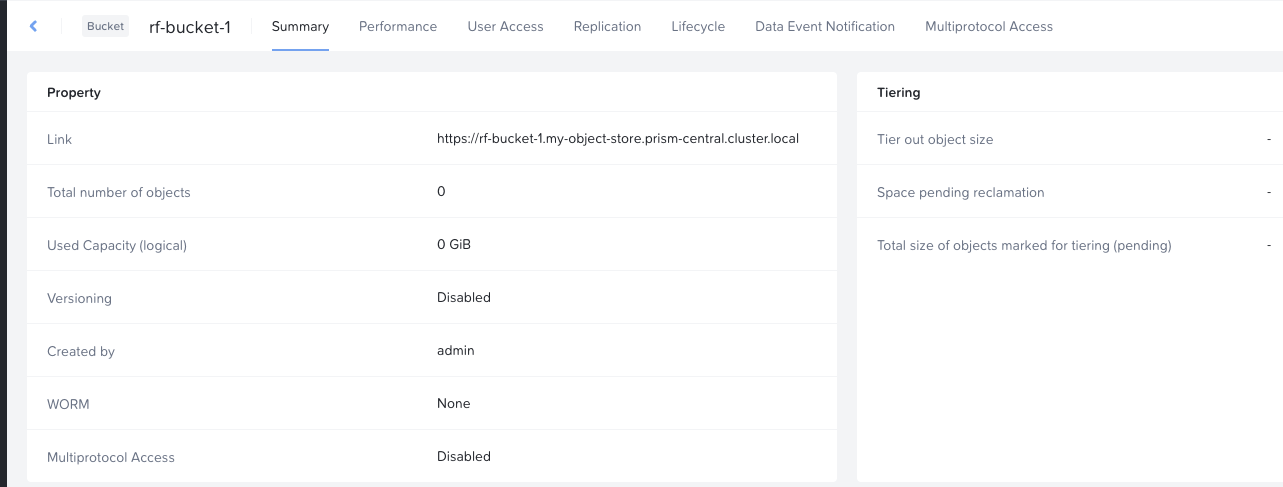
Object Store summary page in Nutanix Objects, displaying configuration details and usage metrics
On that screenshot we see the tab “Buckets” in which we create our object buckets. These buckets have another set of configurable options, like User Access, Replication, etc.

A practical use case for different Object Stores and Object Buckets is tenant abstraction. Each tenant can have their own Object Store. Within their Object Store, they create buckets for various applications, departments, etc.
Abstracting on the Object Store level makes sure that no resources every cross the boundary of a single tenant, including the provisioned VMs.
Data’s Grand Tour: From Requests to Object Buckets
We provisioned an Object Store; we created our buckets – now what?
Now we interact with our S3 API to read and write data, which works as follows:
A client initiates an S3 API request to Nutanix objects (think PUT to write an object or GET to read an object). The API request includes authentication and metadata.
One of the Load Balancers picks up the request and distributes it to one of the Worker VMs (the S3 endpoint microservice really).
The Worker validates the request (request authentication happens here, as well as metadata processing) and executes the GET or PUT operation.
On that same Worker, the next microservice interacts with the AOS layer to retrieve or update the requested object. With that, we also update the metadata of that object.
After that, the Worker prepares the response (e.g. the requested object if the call was GET or a confirmation of a successful write for PUT) and sends that to the Load Balancer.
The Load Balancer forwards the Workers response to the client, completing the communication.

Flow of S3 API requests through Nutanix Objects
Buckets of potential: Real-World Use Cases
After we successfully put an object into a bucket and read from it, why do we care? We had file services for a while, and they do a decent job at handling data.
Scalability beyond believe
File storage works fine until it does not. When you scale to millions and billions of files, traditional file systems reach their limits. Object storage thrives here. With flat namespaces and metadata driven operations, it just keeps going, (almost) regardless of how much data your throw at Nutanix Objects.Metadata is more than a pretty label
File systems have file names, paths, and a timestamp, that is pretty much it. Nutanix Objects lets you add meaningful context to your data by adding key:value style tags to your objects. Objects then become groupable, easier to manage and query. Need to find all objects related to a certain project? No problem, just query for the metadata (e.g. project ID = 1234) and off you go.Cloud-Native or Bust
Modern apps do not want to mess with file paths and hierarchies. Developers want simple APIs and easy accessibility. Object storages power modern, cloud native applications that scale elastically (even across geographies). File systems look like that one friend that still sends letters instead of instant messages.Immutability for peace of mind
Ransomware and compliance don’t pair well with traditional file systems. Object storage offers features like WORM policies (write-once, read-many), making objects tamper-proof after they’re written. This level of immutability makes compliance a breeze and protects data from unauthorized encryption by ransomware at the same time!
Wrapping It Up: Why Nutanix Objects is (Objects)ively Awesome
Object storage isn’t just another way to store data—it’s a game-changer for how we handle modern workloads. Whether you’re managing petabytes of unstructured data, building cloud-native applications, or just looking for a scalable, secure way to keep ransomware at bay, Nutanix Objects has you covered.
From its seamless integration with the Nutanix ecosystem to its scalability, Nutanix Objects proves that it’s not just about storing data—it’s about storing it smarter. Whether you're creating a data lake for analytics, archiving backups, or simply looking for a storage solution that grows with you, Nutanix Objects is ready to take on the challenge. It’s storage, done the modern way.

VMware (by Broadcom) Explore Barcelona Network & Security Sessions 2024
VMware (by Broadcom) Explore EMEA will taken place in Barcelona from 4th of November to 7th of November 2024. It will be the first european conference under the flagship from Broadcom. For this reason there will be additional sessions from other Broadcom business groups like Symnatec, Brocade, DX NetOps, etc. I provide recommendations within this blog post about some technical sessions related to Network & Security topics for the Explore event in US. I have excluded certifications, Hands-on-Labs and Meet the Expert Roundtable sessions from my list. I have focused on none 100 level sessions, only in case of new topics I have done some exceptions.
Pricing
A full event pass for VMware Explore costs 1.675 Euro for the EMEA event. If you register onsite it costs 1.875 Euro. The full event pass has following advantages:
Full Event passes provide the following benefits:
Four days of sessions including the general session, breakout sessions, roundtables and more, with content tailored to both the business and technical audiences
Destinations, lounges and activities such as The Expo and Hands-on Labs
Admittance to official Explore evening events including The Party and events in The Expo
Exclusive Explore swag
Attendee meals
Your full event pass registration allows you to purchase VMware Certified Professional (VCP) and VMware Certified Advanced Professional (VCAP) certification exam vouchers at a 50 percent discount (exams must be taken onsite during Explore Las Vegas).
VMware Explore Session Recommendations
Now I come to my session recommendations which are based on my experience and some very good known speakers from the last years and about topics which I am interested from Network and Security point of view. But first I have to say that every VMware Explore session is worth to join and customers, partners and VMware employees have taken much efforts to prepare some very good content. For me the VMware Explore sessions are the most important source to get technical updates, innovation and training. All sessions can be also watched after VMware Explore. Some hints to the session ID`s, the letter in bracket like VCFB1877BCN stands for VCF = VMware Cloud Foudation (Business Unit) and B = Breakout Session. BCN indicated that it is a session in Barcelona. Sometimes you see also an letter D behind BCN, this means that it is not a in person session, D stands for distributed. Please take into account that VMware by Broadcom has new business units:
VMware Cloud Foundation - VCF
Application Networking & Security - ANS
Modern Application - TNZ
Software-Defined Edge - SDE
And there are also “legacy” Broadcom business units like Agile Operation Division (AOD) or Enterprise Security Group (ESG) which includes Symantec.
General Solution Key Note
Advanced Network & Security (ANS) Solution Key Note
NSX Sessions - Infrastructure related
VMware Cloud Foundation Networking Performance - Deep Dive [VCFB1646BCN]
NSX VPC: The Network Consumption Model for Private Cloud [VCFB1649BCN]
VMware Cloud Foundation Infrastructure Design with VMware NSX [VCFB1260BCN]
Security Sessions
3 Cornerstones to Enable Cyber-Resilent Private Cloud [VCFB1043BCN]
Bootstraping Segmentation and Zero Trust in your VCF Private Cloud [ANSB1214BCN]
Is Your Cloud Obsuring Your Security? Let`s Turn On The Lights With VMware vDefend! [ANSB1216BCN]
Reveal your application flows with Security Intelligence [ANSB1167BCN]
Security Reference Design for VMware Cloud Foundation [ANSB1235BCN]
Demystifying Distributed Securtiy in VMware Cloud Foundation [VCFB1015BCN]
VMwarew AVI Load Balancer related
Deep Dive on VCF Application Troubleshooting with Avi App Analytics [ANSB1181BCN]
VCF Load Balancing with Self-Service: Enable DevOps at the Speed of Apps [ANSB1180BCN]
GenAI-Powered Insights in Avi Load Balancer - A Journey into Next-Gen Observability [INVB1174BCN]
Secure VCF Kubernetes Workloads with Avi Ingress and Gateway API [ANSB1179BCN]
Security Design Guide for VCF Workloads with Avi Web App Firewall [ANSB1386BCN]
Network & Security Cloud Sessions
Why Adopt VMware NSX Network Virtualization for VMware Cloud Foundation? [VCFB1877BCN]
VMware Strategic View: What`s next with VMware Cloud Foundation [VCFB1851BCN]
New to VMware NSX with VMware Cloud Foundation? This Session is For You [VCFB1647BCN]
Hardening and Securing VCF: A Multi-Layered Approach [VCFB1672BCN]
Building End-To-End Networking with Azure VMware Solution [VCFB1604BCNS]
NSX Sessions - Container related
Network Monitoring related
A customers view on What`s New in Aria Operation for Networks [VCFB1648BCN]
Secure Software-Defined Data Center Operations in Dubai Airports [VCFB1448BCN]
Four Ways to Enhance the Network Experience across Hybrid and Multi-Cloud [AOD1880BCN]
DPU (SMARTNICS)
DPUs: Your VMware Cloud Foundatoin`s Secret Weapon for Scale and Security [VCFB1641BCN]
Demystifying DPUs and GPUs in VMware Cloud Foundation [VCFB1677BCN]
Supercharge Your Workloads on VCF: Unleashing the Power of DPUs [VCFB1208BCN]
Symantec and Carbon Black Sessions
Breaking Chains: Transforming Attack Chain Analysis into Defender Strategy [ESGB1142BCN]
Beyond Protection: Moving to Proactive Threat Detection [ESGB1303BCN]
Help Your Developers Shift Left and Codify Data Protection [ESGB1141BCN]
Mastering PCI: How Positive Security Models Simplify Compliance [ESGB1302BCN]
Maximizing Data Protection and Goveranance when Implementing GenAI [ESGB1144BCN]
SD-WAN and SASE
Harness the Power of Edge AI with Edge Compute and VeloCloud SD-WAN and SASE [SDEB1336BCN]
Securing and Safeguarding Sensitive Enterprise Data with VMware VeloCloud SASE [SDEB1339BCN]
Transform Your Network with VeloCloud and Software Defined Edge [SDEB1498BCN]
Real-Life Examples and Best Practices Running SD-WAN on 4G/5G and Starlink [SDEB1326BCN]
VMware VeloCloud Inaugural State of the Edge Study [SDEB1669BCN]
When the Edge Becomes the Mainstream; What`s Next in Software-Defined Edge AI [SDEB1598BCN]
Summary
Please take into account that there are a lot of other interesting VMware by Broadcom Explore sessions, also for many other topics like VCF 9, AI, cloud, Edge, Container, vSphere, etc.
Feel free to add comments below if you see other mandatory sessions in the Network & Security area. I wish you a lot of Fun at VMware by Broadcom Explore 2024 in Barcelona!
File It Away
Why files, why NUS?
A couple of weeks ago I posted a blog about joining Nutanix and the Nutanix Unified Storage (NUS) offering I am working on.
Today I am taking a closer look at one of the core offerings of NUS: Files.
Let’s start by addressing the biggest question first: why bother with file storage specifically?
Well, according to IDC (https://www.idc.com/) we will see hundreds of Zettabytes of data being created and consumed every day. More than 80% of that is likely going to be unstructured data. File- and Object storage is ideal to handle unstructured data, which is why we see tremendous growth in these two areas in the market. To answer the second question (Why NUS?), we refer to a former blog post around what NUS does in a nutshell:

So, you get a solution that serves both file- and object storage, with an option to also handle block storage, all licensed under a single subscription (NUS). That should cover about 100% of the storage services needed to handle the future data growth industry analysts expect!
File Fun-damentals: The Nuts and Bolts of Nutanix Files
Now that we know why we should bother, let us look into what Nutanix Files looks like from a high-level perspective.

Graphical overview of Nutanix Files
From the bottom to the top, we see:
A hypervisor layer at the very bottom (purple).
The hypervisor is where we provision our CVMs (Controller VMs) on top of. All hypervisor nodes have local disks that get added into the storage pool of the CVMs. These CVMs are what is “running AOS”.
The AOS Layer as the second layer (green).
CVMs interconnect with each other and form the distributed storage fabric (DSF) of AOS. DSF delivers high performance, scalable and resilient storage by pooling local storage resources in each node.Next, we got the Fileserver layer (blue).
Here is where we have our File Services nodes / VMs (also called FSVMs), in this example we have 3.
Depending on the configuration and your requirements in scale / performance, we can have 1, 3 or more (up to 32 in current releases). Also, we can have different File Services Namespaces on the same underlying cluster, more on that another time. On this layer we also see the newly created Namespace (filesrv01), which has two file shares configured, one for SMB and one for NFS. In the example we store a couple of files in the SMB share (a word doc, an excel sheet and a PowerPoint presentation), as well as some data in the NFS share (a SQL database file, a log file, and a cat pic).
Nutanix Files scales almost-linearly, as in more fileserver nodes equal more working capacity (concurrent clients, throughput, etc.). So, if we figure out that our 3-Node Cluster serving our filesrv-01 is not sufficiently powerful, we scale out that configuration and add a fourth node. Alternatively, we can scale-up the individual fileserver nodes. So, if a single connection turns out to take up too much resource, we can increase the vCPU and memory assigned to the FSVMs.
(In this example we are seeing an existing environment with a files instance called “leap” not filesrv-01 as in the drawing)
The workflow for both is straightforward in our Files console:

A closer look at the Files Console
We select the fileserver (in this example “leap”) and select “Actions”.
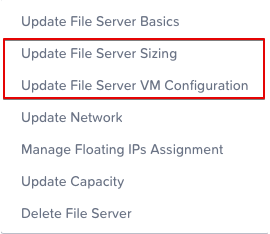
On the drop-down menu we select the action we want to take. For scaling out, we choose “Update File Server Sizing”. For scaling up, we choose “Update File Server VM Configuration”.

Update File Server Sizing Menu
In the “Update File Server Sizing” we can see the slide control to increase the number of nodes from 3 to 4. We are limited to 4 nodes in this case since the underlying cluster only consists of 4 hardware nodes. Move the slider to the right and hit “Update” in the lower right corner to initiate the scale-out operation. We can check the tasks while the platform is adding the node and get an update once it is done. Due to the possible short disruptions, I recommend performing these operations during non-business hours.

Tasks overview when adding a FSVM node
The “update file server configuration” task kicks off a number of additional tasks. We have to create a new VM, new volume groups, new storage attachments to that VM, any so much more. Give it some time, after all you just have to wait and patience is a virtue :).
After waiting for a bit, we can see that the task completed and we now have 4 FSVMs instead of 3:


Edit fileserver configuration completed
Similarly, we do the scale-in from the UI. We select the fileserver, open the fileserver sizing action, and slide the number of nodes back to 3.

If we want to increase the per-node resource configuration, we do so by selecting “Update File Server VM Configuration” and edit the vCPU and memory assignment:

Update FSVM Configuration Menu
We can see the current size of the FSVMs and can change to our liking. Obviously, we need to make sure the resources are available on our cluster and should make sure we are not wasting resources.
Sharing is Caring: File Share Management
Now that we have a fileserver with proper resources, we can create shares that our users access. As laid out above, we can do both NFS and SMB shares from the same fileserver. We can even do both on the same share!
Select the fileserver from our files console to create shares / exports:

This sends us into the management UI of the fileserver, where we select “Shares & Exports” on the top navigation pane.

Fileserver Management
In the “Shares & Exports” menu, we select “New Share or Export” and go through the steps outlined in the UI. We need a name, give a size and configure the “Primary Protocol Access”. In here we can also enable the “multiprotocol access for NFS clients”, which allows access on that share via NFS & SMB:

Create Share or Export Menu
We will work through some of the available options in a later blog post, such as NFS versions, Access Based Enumerations, Continuous Availability, Squash, etc. For now, a simple file share that we can access will do. I created the “Securefever Share” with a whooping 1 GB of storage space!


The Final Byte: Simplifying Storage, One File at a time
As you can see, Nutanix Files is a very mature, easy-to-use Fileserver platform. It uses the core fundamentals of the Nutanix platform to solve an ever-growing business challenge, storing huge amounts of data.
We will be looking at different features and functions of NUS in some upcoming posts. In the meanwhile, I wrote some ramblings around more up2date topics like Kubernetes & AI storage which I will probably also share on here – stay tuned!
Wind of change
Exploring new opportunities
It’s been another 8 months since my last post. During this time, Broadcom acquired VMware, leading to significant changes within the company.
With that going on, my daily business was basically non-existent, and I explored different topics. I dabbled with AWS and GCP, refreshed some Python skills, worked on the CS50X course (which I need to finish still) and looked for a change in career. After a while, a former colleague sent me a job posting from Nutanix. I always liked their products but didn’t get along with some of their older marketing campaigns. However, much time had passed, and I really haven’t checked in with what they were doing in the storage space for a while.
So, I look at the position for the NUS Solution Architect in Central EMEA and decide to dive into what NUS does.
After having a brief intro, I was sold on the idea of managing all my storage needs from the Nutanix platform.
Long story short, I apply, go through some interviews and get accepted as the Portfolio Solution Architect for Nutanix Unified Storage in Central EMEA.
I started this role in May and have written about it on LinkedIn here:
Nutanix Unified Storage
The change in career addressed, let’s look at what Nutanix Unified Storage does briefly. In a nutshell, it combines Nutanix Volumes, Nutanix Files and Nutanix Objects in a single subscription. Customers have a per-TiB subscription across their whole Nutanix install base, not limited to a cluster / site. So, I buy an aggregate capacity for all AOS clusters and use the storage wherever I need it, instead of assigning it fixed to a single cluster.
The function that customers use also does not matter. Whether you provide SMB or NFS file shares, S3 compatible object storage or volumes via iSCSI, we always count the NUS subscriptions against the TiBs used. From a high-level perspective, NUS is visualized like this:

Nutanix Unified Storage (NUS) overview
The NUS components sit on top of AOS and the hypervisor (be that Nutanix AHV or vSphere). For files we deploy managed VMs on the underlying Hypervisor and push the file services bits there. For objects we use our “Microservices Platform” which you can think of as a managed Kubernetes environment, solely to run our object storage components.
In any case, we ultimately send the IO for our data services to the Nutanix Controller VM, which handles the IO the physical layer. I won’t explain the details of the CVM, since we don’t bother much with it on the NUS layer, but there are many articles on the inner workings of it.
Apart from the data services itself (file, block, object), we can see loads of other additional goodness in NUS:

Overview of additional data services in NUS
That’s it for today – I will probably pick different services and explain them each on their own.
Thank you for checking in after a while!
VMware (by Broadcom) Explore US Network & Security Sessions 2024
VMware (by Broadcom) Explore will taken place in Las Vegas from 26th to 29th of August 2024. VMware Explore EMEA in Barcelona is from 5th of November to 7th of November 2024. It will be the first conference under the flagship from Broadcom. For this reason there will be additional sessions from other Broadcom business groups like Symnatec, Brocade, DX NetOps, etc. I provide recommendations within this blog post about some technical sessions related to Network & Security topics for the Explore event in US. I have excluded certifications and Hands-on-Labs and Meet the Expert Roundtable sessions from my list. I have focused on none 100 level sessions, only in case of new topics I have done some exceptions.
Pricing
A full event pass for VMware Explore costs $2,395 for the US event. If you book it before the 15th of July you get the pass $2,195. The full event pass has following advantages:
Full Event passes provide the following benefits:
Four days of sessions including the general session, breakout sessions, roundtables and more, with content tailored to both the business and technical audiences
Destinations, lounges and activities such as The Expo and Hands-on Labs
Focused programming for SpringOne
Admittance to official Explore evening events including The Party and events in The Expo
Exclusive Explore swag
Attendee meals
Your full event pass registration allows you to purchase VMware Certified Professional (VCP) and VMware Certified Advanced Professional (VCAP) certification exam vouchers at a 50 percent discount (exams must be taken onsite during Explore Las Vegas).
VMware Explore Session Recommendations
Now I come to my session recommendations which are based on my experience and some very good known speakers from the last years and about topics which I am interested from Network and Security point of view. But first I have to say that every VMware Explore session is worth to join and customers, partners and VMware employees have taken much efforts to prepare some very good content. For me the VMware Explore sessions are the most important source to get technical updates, innovation and training. All sessions can be also watched after VMware Explore. Some hints to the session ID`s, the letter in bracket like VCFB1499LV stands for VCF = VMware Cloud Foudation (Business Unit) and B = Breakout Session. LV indicated that it is a session in Las Vegas. Sometimes you see also an letter D behind LV, this means that it is not a in person session, D stands for distributed. Please take into account that VMware by Broadcom has new business units:
VMware Cloud Foundation - VCF
Application Networking & Security - ANS
Modern Application - TNZ
Software-Defined Edge - SDE
And there are also “legacy” Broadcom business units like Agile Operation Division (AOD) or Enterprise Security Group (ESG) which includes Symantec.
Advanced Network & Security (ANS) Solution Key Note
NSX Sessions - Infrastructure related
Security Sessions
Is your cloud obscuring your security? Let`s turn on the lights! [ANSB2090LV]
3 Cornerstones to enable Cyber-Resilent Private Cloud [VCFB1201LV]
Bootstraping Segmentation and Zero Trust in your VCF Private Cloud [ANSB2084LV]
Reveal your application flows with Security Intelligence [ANSB1712LV]
Security Reference Design for VMware Cloud Foundation [ANSB2240LV]
Best Practices to reduce the attack surface of your VMware Infrastructure [VCF2148LV]
Elevate your Threat Investigation Workflow wiht the GenAI Security Co-Pilot [ANSB1911LV]
Ransomware Lessons from the field: VCF and VMware vDefend Firewall with ATP [EXPB2119LV]
VMwarew AVI Load Balancer related
Deploy Avi Load Balancer to enhance your VCF Private Cloud [ANSB1703LV]
Load Balancing at the speed of apps with automation and self-service [ANSB1835LV]
Deploy Guide for container ingress security and app security automation [ANSB2048LV]
Securing Ingress and GW API with Avi LB for any Kubernetes environment [ANSB1834LV]
Reimagining Load Balancing capabilities: NSX-T to Avi with Aria Automation [ANSB1187LV]
Best Practices on Troubleshooting and app Analytics with Avi Load Balancer [ANSB1836LV]
GenAI-Powered Insights in Avi LB - A Journey into Next-Gen Observability [INVB1702LV]
Network & Security Cloud Sessions
VMware Strategic View: What`s next with VMware Cloud Foundation [INVP1798LV]
A Vision for integrated Cyber Resiliency with VMware Live Recovery [VCFB2228LV]
Large-Scale Workload and Mobility to VCF - HCX Technical Deep Dive [VCFB1955LV]
Exploring the new capabilities and enhancements of VMware Cloud Foundation [VCFB1704LV]
Hyperlaunch: Preparing your organization for Private Cloud Hyperscaling [VCFB2055LV]
NSX Sessions - Container related
Container Security - Policy Management for Kubernetes Workloads [ANSB2225LV]
Deploy Guide for container ingress security and app security automation [ANSB2048LV]
Securing Ingress and GW API with Avi LB for any Kubernetes environment [ANSB1834LV]
Network Monitoring related
A customers view on What`s New in Aria Operation for networks [VCFB1752LV]
Designing for Network Observability with Google Cloud [AODB1919LV]
How AI-Driven NetOps by Broadcom can reduce alarm noise by 99.99 Percent [AODB2201LV]
Four Ways to Enhance the Network Experience across Hybrid and Multi-Cloud [AOD1894LV]
DPU (SMARTNICS)
Symantec Sessions
Breaking Chains: Transforming Attack Chain Analysis into Defender Strategy [ESGB1513LV]
The 2024 Ransomware Threat Landscape: What`s Fueling the Epidemic? [ESGB2326LV]
The Importance of Data Security in Data Modernization Projects [ESGB2322LV]
Transforming Data Security from Concept to Code [ESGB2178LV]
SD-WAN and SASE
When the Edge becomes the Mainstream - What`s Next in Software-Defined Edge [SDEB2199LV]
Executive Perspective: Deploying SD-WAN when lives are on the line [SDEB2088LV]
Summary
Please take into account that there are a lot of other interesting VMware by Broadcom Explore sessions, also for many other topics like AI, cloud, Edge, Container, vSphere, etc.
Feel free to add comments below if you see other mandatory sessions in the Network & Security area. I wish you a lot of Fun at VMware by Broadcom Explore 2024 in Las Vegas!
How DPU`s accelerate VMware ESXi with NSX - a deeper look to the data path!
With vSphere 8 and NSX 4, VMware has introduced support for DPU`s (Data Process Units), see my blog post How NSX and SmartNICs (DPUs) accelerates the ESXi Hypervisor! as a introduction for this topic. DPU`s are more known from SmartNICS, but there is a slight difference between DPU`s and SmartNICs. DPUs and SmartNICs serve to accelerate and offload tasks in data centre environments. DPUs are more versatile and capable of handling a broader range of data-related workloads, including networking, storage, and security tasks. SmartNICs are more specialised and primarily focus on optimising network-related functions. The choice between the two depends on the specific needs and use cases of the data centre or cloud infrastructure. DPU`s running its own operation system (OS) and is completely managed independently. SmartNICs are integrated and managed from the operation system (OS) running on the CPU.
VMware is using DPU`s with ARM processor. The DPU support with vSphere 8 and NSX 4 is declared from VMware as Distributed Service Engine (DSE). NVIDIA and AMD Pensando currently supporting the DPU with vSphere and NSX. Dell EMC and HPE are supporting the solution from server vendor side. There are other NIC and server vendors on the roadmap. VMware also have plans to support vSAN and Baremetal for DPU`s in the future.
The DPU architecture accelerates the networking and security function in the modern "Software Defined Data Center". NSX networking and security services are offloaded and accelerated to the DPU. DPUs also provide enhanced visibility to show network communications. This helps with troubleshooting, mitigation against hacking attacks and compliance requirements. It enables VMware customers to run NSX services such as routing, switching, firewalling and monitoring directly on the DPU. This is particularly interesting for users who have significant demands in terms of high throughput, low latency and increased security standards.
Due to offloading network and security services to the DPU the x86 frees up compute resources on the host for the applications. As a result, more workloads can be deployed on fewer servers - without compromising the monitoring, manageability and security features offered by vSphere and NSX. DPUs reduce the computational tasks of the main processors, thereby reducing energy consumption and the associated CO2 emissions. In addition, because DPUs distribute power and efficiency across fewer servers, the number of hardware components needed is reduced. This reduces waste and protects the environment.
With DPU`s, the NSX services (routing, switching, firewalling, monitoring) are outsourced from the hypervisor to the DPU (Data Process Unit), see figure 1. An additional modified and specified ESXi image is installed on the DPU for this purpose. The new architecture runs the infrastructure services on the DPU, providing the necessary separation between the application workloads running on the x86 computing platform and the infrastructure services. This is of enormous advantage for customers with high security and compliance requirements. Regulatory authorities such as the BSI (German Federal Office for Information Security) in particular often require separations of productive and management traffic for certain environments.

Figure 1: x86 and DPU (Data Process Unit) architecture
Data-Path Model Evolution from VDS over SR-IOV/EDP to DPU
Before I want to describe the data-path model options of a DPU I want to show how is it currently running with a standard VDS (vSphere Distributed Switch). Afterwards I will have a look to the VMware performance data path models SR-IOV (Single-Root Input/Output Virtualization) and EDP (Enhanced Data Path) which has been designed for performance requirements before DPU. And finally I will come to the DPU data path options VMDirectPath (UPTv2) and Emulated Mode which brings the acceleration in hardware.
VDS Standard Datapath
In figure 2 there is the standard datapath for a VDS visible, it does not matter if a N-VDS or a VDS is in use, it is the same principle. When a packet arrives at the network card of the ESXi server, a short interruption causes a context switch at the CPU. After the routing and firewall rules have been verified in the slow path, the packet will be forwarded. The same process takes place at the VM level, the CPU is also loaded and a context change is brought about. This causes problems especially for applications with a high packet rate.

Figure 2: Standard VDS datapath
Data path models: SR-IOV or EDP
Even before DPUs, VMware introduced the SR-IOV (Single-Root Input/Output Virtualization) and EDP (Enhanced Data Path) data path models (see figure 3) to provide techniques for workloads with high performance requirements. SR-IOV bypasses the virtual switch completely. Traffic is passed directly from the physical network card to the virtual machine. The "Physical Function" (PF) and the "Virtual Function" (VF) map the communication from the physical to the VM. Since there is no virtual switch in the data path, the CPU is not loaded and there is no additional latency. There is a one-to-one relationship between a VF and a VM.
The number of Virtual Functions depends on the network card. SR-IOV must be supported by the PF driver, the ESXi host, the VF driver and the virtual machine operating system. As a virtual machine driver, SR-IOV relies on vendor-specific PMD (Poll Mode Driver) drivers to access the network adapter directly. The disadvantage of SR-IOV is that the hardware dependency means that the HA tools of vSphere such as vMotion1 or DRS2 (Distributed Resource Scheduler) are not supported by VMware.

Figure 3: Performace Data Path models SR-IOV and EDP
A second data path model for improving performance is Enhanced Data Path (EDP). EDP is an NSX-specific function. Dedicated CPU resources are reserved by the cores on the hypervisor for the "process forwarding" of the data packets. When a packet arrives at the ESXi server, a copy is sent to the fast path and the flow cache is checked. If the forwarding information and, in the case of an active firewall, the so-called five-tuples (source IP address, destination IP address, source port, destination port, protocol) are successfully verified, the packet is forwarded to the virtual machine. The flow cache is located at a dedicated storage location and is constantly polled by the CPU. If there are no control layer functions in the flow cache, the network and security configuration of the NSX Manager is verified in the so-called "slow path" in order to send the data packet to the respective destination. The slow path then sends an update to the fast path so that in future the packets are processed directly in the flow cache.
In the slow path, a processor-side load is placed on the hypervisor. The VMXNET3 PMD driver is used on the virtual machine. The clear advantage of this method: With EDP, the vSphere high availability models such as vMotion or DRS are still available.
Data path models for a DPU
DPUs combine the advantages of SR-IOV (Single Root I/O Virtualisation) and EDP (Enhanced Data Path) and map them architecturally (see figure 4). The DPU contains the hardware accelerator component for fast packet forwarding and reserves dedicated CPU resources for packet processing in the fast path.

Figure 4: Performance Data Path models VMDirectPath (UPTv2) and Emulated Mode with a DPU
Thus, the DPU converts packet processing, which is otherwise implemented in software, into hardware pipelines and the processing of NSX software packets moves from the server to the DPU. This in turn conserves the server's CPU consumption and frees up cache and memory resources that are shared with the VM and container workloads.
VMs can use Passthrough Virtual Functions and use the NSX functions. The hardware packet processing pipeline as well as the embedded processors implement the NSX datapath functionalities for this traffic.
The DPU architecture combines the advantages of Passthrough and the current NSX Enhanced Data Path with the VMXNET3 drivers. A dedicated VMDirectPath VF module implements the new UPT (Uniform Passthrough) architecture on the ESXi hypervisor. Virtual Functions based on VMDirectPath (UPTv2) then represent the virtualised instances of the physical network adapter. The VMDirectPath (UPTv"2) can be activated on the vCenter over a checkmark on the VM level.
If emulated mode (default mode) is used, traffic runs through a distributed MUX switch on the ESXi hypervisor. Besides the acceleration in hardware the packet forwording will be processed in software (Fast Path/Slow Path) in case of a HW table miss.
SmartNICs have the advantage that virtual machines can operate in pass-through mode while functionalities such as vSphere vMotion remain intact. In addition, there are no dependencies on the hardware for the VMs' guest drivers as with SR-IOV.
Please check out following YouTube video from my colleague Meghana Badrinath for a data path deep dive DPU-based Acceleration for NSX: Deep Dive
Summary:
Through DPUs with NSX 4 and vSphere 8, VMware improves speed at the hypervisor while taking into account the current network and security requirements of modern applications. Especially in times of increased security requirements due to ransomware and other potential attacks, this is an enormous advantage and the physical isolation of the workload and infrastructure domains as well. Purchases of new dedicated hardware in the form of additional DPU network cards with their own ARM processors must be taken into account and should be considered accordingly in future architecture planning. These investments are offset by savings in energy costs and minimize the total number of servers.
VMware Cloud on AWS - Part 2 - Automated Deployment with Terraform
Welcome back to my next post on Securefever! If you missed our manual deployment guide for VMC on AWS, you can catch up here:
https://www.securefever.com/vmc-aws-manual-deployment
It took a while for the second post because I’ve had the great chance to write a few articles for the renowned German IT magazine “IT Administrator”, develop a new VMware exam, followed by my Take 3 at VMware.
What is “Take 3”? Great question!
The "Take 3" program allows eligible employees to take a break from their current role and explore a different role or project within the company for a duration of roughly three months. The intention behind the program is to foster a culture of continuous learning, enable career development, and encourage cross-functional collaboration within the company.
Read more on that in the dedicated blog here:
https://www.securefever.com/blog/off-topic-take-3
As promised in the previous blog, this post focuses on automating our VMC on AWS deployment using Terraform. Why? Because automation is king in the cloud! It promotes repeatability, scalability, and defining our infrastructure as code, ensures consistency while reducing human error.
I am very much still learning Terraform, so let me know about suggestions to improve the code, structure, etc. Also, since this blog was in the making for quite a while, some screenshots might show outdated versions of providers.
Let's get started!
Why Terraform?
Terraform is a popular Infrastructure as Code (IaC) tool, which allows users to define and provision infrastructure using a declarative configuration language (HCL, Hashicorp Configuration Language). Its interoperability with both AWS and VMC makes it an ideal choice.
Prerequisites
- Familiarity with Terraform. If you're new, check out Terraform's Getting Started Guide (https://learn.hashicorp.com/terraform/getting-started/install.html).
- Terraform installed on your machine.
- Necessary permissions and credentials set up for both AWS and VMC.
Steps to Deploy VMC on AWS using Terraform
1. Setting Up Terraform
I am using MacOS, so I used brew to install terraform on my machine:
Once that is done, we can check the installed terraform version:

“terraform version” output
2. Terraform Files
For the deployment I have set up multiple files.
Splitting terraform deployments into multiple files makes it easier to troubleshoot and also, I wanted to start early with good habits.
Next to main.tf I created “provider.tf”, “variables.tf”, “version.tf”, “sddc.tf” and “vmc_vpc.tf” and “terraform.tfvars” in my project.
Let’s review the different files and what they are used for.
main.tf and module sources

the main.tf file
The main.tf file is the primary entry point for Terraform configurations. It contains the core resources and infrastructure definitions that Terraform will manage. In big projects, main.tf might be split into multiple files. For our use case the single main.tf file is fine.
The first block defines where the Terraform state file will be stored. In our case, it’s on the “local backend”. That means the state will be kept in my local file system, under “../../phase1.tfstate”.
The second block contains a “module” definition. A module in Terraform is like a reusable function for infrastructure code. It groups related resources to better organize our code. Each module has a source showing where its content is found (source = “..”/vmc_vpc”).
This module is used to configure the AWS VPC that we use for our VMC on AWS deployments.
It holds configuration for the region, VPC CIDR and subnet CIDRs, all based on variables found in the module source file:
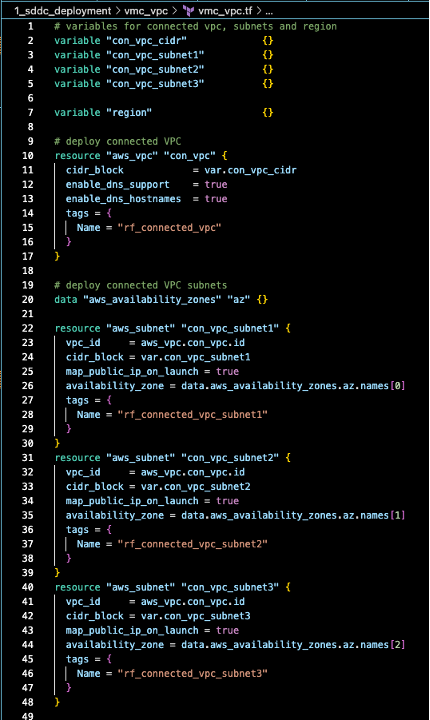
vmc_vpc.tf - the file configuring the AWS VPC module
In this file we define the resources that will be configured in main.tf.
It starts with some variable definitions. That way we can re-use the structure for different deployment by changing the contents of “variables.tf”.
Next, we define an “aws_vpc” and three “aws_subnet” resources.
These reference our connected VPC and the connected VPC subnets.
The module source file pulls the relevant content from “variables.tf”:

image of variables.tf - this is where the module files get their variables content
In the last block we create another module, but this time for the VMC SDDC configuration. The logic remains the same, though this time the variable contents are found in the source “../sddc”:

the module for the sddc creation
This module source also pulls content from variables.tf and configures a few more options. As this is a demo environment again, we are using the single node i3 deployment. That is why we have “host_instance_type” set to “I3_METAL” and the “sddc_type” to “1NODE”.
provider.tf
In provider.tf we specify and configure the Terraform providers we use in our project (AWS, VMC). It centralizes provider configuration, to make our Terraform project more organized.

content of provider.tf
versions.tf
The `versions.tf` file in a Terraform deployment is typically used to specify the versions of Terraform itself and the providers. This ensures consistency and compatibility across different machines – who doesn’t love a good old “works on my machine” error. Our “versions.tf” looks like this:
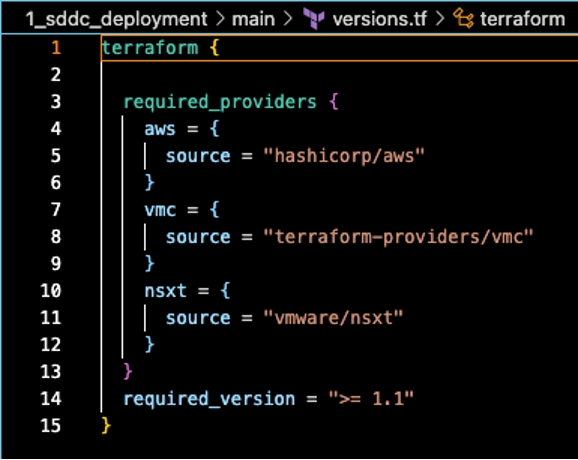
In the future this will be updated to constrain the allowed versions of the used providers.
Tokens, Authentication, Privileges
We have seen all the different configurations that we have Terraform do. However, we did not specify credentials or similar anywhere. So how do we actually “log in” and create these resources? The last file we need to look at is “terraform.tfvars”. This file contains all the secrets and token information that Terraform uses to operate with the configured providers. I do not recommend storing them as plain text on your machine, but I have not yet explored secrets management any further.
So, for this time, this must be good enough. This is sample content of “terraform.tfvars” in my current project:

example output of terraform.tfvars - the file I currently store secrets in
3. Initializing Terraform
Now that we have explored the different parts of our Terraform deployment, we can initialize Terraform with running “terraform init” in the folder with the config files:
rfrankemolle@rfrankemolFV7TR main % terraform init

Initializing the backend...
Initializing modules...

Initializing provider plugins...
- Reusing previous version of terraform-providers/vmc from the dependency lock file
- Reusing previous version of vmware/nsxt from the dependency lock file
- Reusing previous version of hashicorp/aws from the dependency lock file
- Using previously-installed vmware/nsxt v3.3.0
- Using previously-installed hashicorp/aws v4.58.0
- Using previously-installed terraform-providers/vmc v1.13.0

Terraform has been successfully initialized!

You may now begin working with Terraform. Try running "terraform plan" to see
any changes that are required for your infrastructure. All Terraform commands
should now work.

If you ever set or change modules or backend configuration for Terraform,
rerun this command to reinitialize your working directory. If you forget, other
commands will detect it and remind you to do so if necessary.
The command is used to perform several tasks like install provider plugins, setting up modules, initialise the backend (the location where state files are stored) and set up the working directory to run other commands like “plan” or “apply”.
4. Plan and Apply
After initializing, we run “terraform plan”. Terraform will output what it is going to deploy / change in the infrastructure:
rfrankemolle@rfrankemolFV7TR main % terraform plan
module.vmc_vpc.data.aws_availability_zones.az: Reading...
module.vmc_vpc.data.aws_availability_zones.az: Read complete after 0s [id=eu-west-2]
module.sddc.data.vmc_connected_accounts.my_accounts: Reading...
module.sddc.data.vmc_connected_accounts.my_accounts: Read complete after 0s [id=42686b6b-163d-3465-a953-09b3da081d31]

Terraform used the selected providers to generate the following execution plan. Resource actions are indicated with the following symbols:
  + create

Terraform will perform the following actions:

  # module.sddc.vmc_sddc.vmc_sddc1 will be created
  + resource "vmc_sddc" "vmc_sddc1" {
      + account_link_state       = (known after apply)
      + availability_zones       = (known after apply)
      + cloud_password           = (known after apply)
      + cloud_username           = (known after apply)
      + cluster_id               = (known after apply)
      + cluster_info             = (known after apply)
      + created                  = (known after apply)
      + delay_account_link       = false
      + deployment_type          = "SingleAZ"
      + edrs_policy_type         = (known after apply)
      + enable_edrs              = (known after apply)
      + host_instance_type       = "I3_METAL"
      + id                       = (known after apply)
      + intranet_mtu_uplink      = 1500
      + max_hosts                = (known after apply)
      + min_hosts                = (known after apply)
      + nsxt_cloudadmin          = (known after apply)
      + nsxt_cloudadmin_password = (known after apply)
      + nsxt_cloudaudit          = (known after apply)
      + nsxt_cloudaudit_password = (known after apply)
      + nsxt_private_ip          = (known after apply)
      + nsxt_private_url         = (known after apply)
      + nsxt_reverse_proxy_url   = (known after apply)
      + nsxt_ui                  = (known after apply)
      + num_host                 = 1
      + org_id                   = (known after apply)
      + provider_type            = "AWS"
      + region                   = "EU_WEST_2"
      + sddc_access_state        = (known after apply)
      + sddc_name                = "rfrankemolle_tf_test"
      + sddc_size                = (known after apply)
      + sddc_state               = (known after apply)
      + sddc_type                = "1NODE"
      + size                     = "medium"
      + skip_creating_vxlan      = false
      + sso_domain               = "vmc.local"
      + updated                  = (known after apply)
      + updated_by_user_id       = (known after apply)
      + updated_by_user_name     = (known after apply)
      + user_id                  = (known after apply)
      + user_name                = (known after apply)
      + vc_url                   = (known after apply)
      + version                  = (known after apply)
      + vpc_cidr                 = "10.20.0.0/16"
      + vxlan_subnet             = "10.100.100.0/24"

      + account_link_sddc_config {
          + connected_account_id = "42686b6b-163d-3465-a953-09b3da081d31"
          + customer_subnet_ids  = (known after apply)
        }

      + timeouts {
          + create = "300m"
          + delete = "180m"
          + update = "300m"
        }
    }

  # module.vmc_vpc.aws_subnet.con_vpc_subnet1 will be created
  + resource "aws_subnet" "con_vpc_subnet1" {
      + arn                                            = (known after apply)
      + assign_ipv6_address_on_creation                = false
      + availability_zone                              = "eu-west-2a"
      + availability_zone_id                           = (known after apply)
      + cidr_block                                     = "10.10.0.64/26"
      + enable_dns64                                   = false
      + enable_resource_name_dns_a_record_on_launch    = false
      + enable_resource_name_dns_aaaa_record_on_launch = false
      + id                                             = (known after apply)
      + ipv6_cidr_block_association_id                 = (known after apply)
      + ipv6_native                                    = false
      + map_public_ip_on_launch                        = true
      + owner_id                                       = (known after apply)
      + private_dns_hostname_type_on_launch            = (known after apply)
      + tags                                           = {
          + "Name" = "rf_connected_vpc_subnet1"
        }
      + tags_all                                       = {
          + "Name" = "rf_connected_vpc_subnet1"
        }
      + vpc_id                                         = (known after apply)
    }

  # module.vmc_vpc.aws_subnet.con_vpc_subnet2 will be created
  + resource "aws_subnet" "con_vpc_subnet2" {
      + arn                                            = (known after apply)
      + assign_ipv6_address_on_creation                = false
      + availability_zone                              = "eu-west-2b"
      + availability_zone_id                           = (known after apply)
      + cidr_block                                     = "10.10.0.128/26"
      + enable_dns64                                   = false
      + enable_resource_name_dns_a_record_on_launch    = false
      + enable_resource_name_dns_aaaa_record_on_launch = false
      + id                                             = (known after apply)
      + ipv6_cidr_block_association_id                 = (known after apply)
      + ipv6_native                                    = false
      + map_public_ip_on_launch                        = true
      + owner_id                                       = (known after apply)
      + private_dns_hostname_type_on_launch            = (known after apply)
      + tags                                           = {
          + "Name" = "rf_connected_vpc_subnet2"
        }
      + tags_all                                       = {
          + "Name" = "rf_connected_vpc_subnet2"
        }
      + vpc_id                                         = (known after apply)
    }

  # module.vmc_vpc.aws_subnet.con_vpc_subnet3 will be created
  + resource "aws_subnet" "con_vpc_subnet3" {
      + arn                                            = (known after apply)
      + assign_ipv6_address_on_creation                = false
      + availability_zone                              = "eu-west-2c"
      + availability_zone_id                           = (known after apply)
      + cidr_block                                     = "10.10.0.192/26"
      + enable_dns64                                   = false
      + enable_resource_name_dns_a_record_on_launch    = false
      + enable_resource_name_dns_aaaa_record_on_launch = false
      + id                                             = (known after apply)
      + ipv6_cidr_block_association_id                 = (known after apply)
      + ipv6_native                                    = false
      + map_public_ip_on_launch                        = true
      + owner_id                                       = (known after apply)
      + private_dns_hostname_type_on_launch            = (known after apply)
      + tags                                           = {
          + "Name" = "rf_connected_vpc_subnet3"
        }
      + tags_all                                       = {
          + "Name" = "rf_connected_vpc_subnet3"
        }
      + vpc_id                                         = (known after apply)
    }

  # module.vmc_vpc.aws_vpc.con_vpc will be created
  + resource "aws_vpc" "con_vpc" {
      + arn                                  = (known after apply)
      + cidr_block                           = "10.10.0.0/16"
      + default_network_acl_id               = (known after apply)
      + default_route_table_id               = (known after apply)
      + default_security_group_id            = (known after apply)
      + dhcp_options_id                      = (known after apply)
      + enable_classiclink                   = (known after apply)
      + enable_classiclink_dns_support       = (known after apply)
      + enable_dns_hostnames                 = true
      + enable_dns_support                   = true
      + enable_network_address_usage_metrics = (known after apply)
      + id                                   = (known after apply)
      + instance_tenancy                     = "default"
      + ipv6_association_id                  = (known after apply)
      + ipv6_cidr_block                      = (known after apply)
      + ipv6_cidr_block_network_border_group = (known after apply)
      + main_route_table_id                  = (known after apply)
      + owner_id                             = (known after apply)
      + tags                                 = {
          + "Name" = "rf_connected_vpc"
        }
      + tags_all                             = {
          + "Name" = "rf_connected_vpc"
        }
    }

Plan: 5 to add, 0 to change, 0 to destroy.
If we are happy with the output, we run “terraform apply”. This will start the deployment by terraform:
rfrankemolle@rfrankemolFV7TR main % terraform apply
module.vmc_vpc.data.aws_availability_zones.az: Reading...
module.vmc_vpc.data.aws_availability_zones.az: Read complete after 1s [id=eu-west-2]
module.sddc.data.vmc_connected_accounts.my_accounts: Reading...
module.sddc.data.vmc_connected_accounts.my_accounts: Read complete after 1s [id=42686b6b-163d-3465-a953-09b3da081d31]

Terraform used the selected providers to generate the following execution plan. Resource actions are indicated with the following symbols:
  + create

Terraform will perform the following actions:

  # module.sddc.vmc_sddc.vmc_sddc1 will be created
  + resource "vmc_sddc" "vmc_sddc1" {
      + account_link_state       = (known after apply)
      + availability_zones       = (known after apply)
      + cloud_password           = (known after apply)
      + cloud_username           = (known after apply)
      + cluster_id               = (known after apply)
      + cluster_info             = (known after apply)
      + created                  = (known after apply)
      + delay_account_link       = false
      + deployment_type          = "SingleAZ"
      + edrs_policy_type         = (known after apply)
      + enable_edrs              = (known after apply)
      + host_instance_type       = "I3_METAL"
      + id                       = (known after apply)
      + intranet_mtu_uplink      = 1500
      + max_hosts                = (known after apply)
      + min_hosts                = (known after apply)
      + nsxt_cloudadmin          = (known after apply)
      + nsxt_cloudadmin_password = (known after apply)
      + nsxt_cloudaudit          = (known after apply)
      + nsxt_cloudaudit_password = (known after apply)
      + nsxt_private_ip          = (known after apply)
      + nsxt_private_url         = (known after apply)
      + nsxt_reverse_proxy_url   = (known after apply)
      + nsxt_ui                  = (known after apply)
      + num_host                 = 1
      + org_id                   = (known after apply)
      + provider_type            = "AWS"
      + region                   = "EU_WEST_2"
      + sddc_access_state        = (known after apply)
      + sddc_name                = "rfrankemolle_tf_test"
      + sddc_size                = (known after apply)
      + sddc_state               = (known after apply)
      + sddc_type                = "1NODE"
      + size                     = "medium"
      + skip_creating_vxlan      = false
      + sso_domain               = "vmc.local"
      + updated                  = (known after apply)
      + updated_by_user_id       = (known after apply)
      + updated_by_user_name     = (known after apply)
      + user_id                  = (known after apply)
      + user_name                = (known after apply)
      + vc_url                   = (known after apply)
      + version                  = (known after apply)
      + vpc_cidr                 = "10.20.0.0/16"
      + vxlan_subnet             = "10.100.100.0/24"

      + account_link_sddc_config {
          + connected_account_id = "42686b6b-163d-3465-a953-09b3da081d31"
          + customer_subnet_ids  = (known after apply)
        }

      + timeouts {
          + create = "300m"
          + delete = "180m"
          + update = "300m"
        }
    }

  # module.vmc_vpc.aws_subnet.con_vpc_subnet1 will be created
  + resource "aws_subnet" "con_vpc_subnet1" {
      + arn                                            = (known after apply)
      + assign_ipv6_address_on_creation                = false
      + availability_zone                              = "eu-west-2a"
      + availability_zone_id                           = (known after apply)
      + cidr_block                                     = "10.10.0.64/26"
      + enable_dns64                                   = false
      + enable_resource_name_dns_a_record_on_launch    = false
      + enable_resource_name_dns_aaaa_record_on_launch = false
      + id                                             = (known after apply)
      + ipv6_cidr_block_association_id                 = (known after apply)
      + ipv6_native                                    = false
      + map_public_ip_on_launch                        = true
      + owner_id                                       = (known after apply)
      + private_dns_hostname_type_on_launch            = (known after apply)
      + tags                                           = {
          + "Name" = "rf_connected_vpc_subnet1"
        }
      + tags_all                                       = {
          + "Name" = "rf_connected_vpc_subnet1"
        }
      + vpc_id                                         = (known after apply)
    }

  # module.vmc_vpc.aws_subnet.con_vpc_subnet2 will be created
  + resource "aws_subnet" "con_vpc_subnet2" {
      + arn                                            = (known after apply)
      + assign_ipv6_address_on_creation                = false
      + availability_zone                              = "eu-west-2b"
      + availability_zone_id                           = (known after apply)
      + cidr_block                                     = "10.10.0.128/26"
      + enable_dns64                                   = false
      + enable_resource_name_dns_a_record_on_launch    = false
      + enable_resource_name_dns_aaaa_record_on_launch = false
      + id                                             = (known after apply)
      + ipv6_cidr_block_association_id                 = (known after apply)
      + ipv6_native                                    = false
      + map_public_ip_on_launch                        = true
      + owner_id                                       = (known after apply)
      + private_dns_hostname_type_on_launch            = (known after apply)
      + tags                                           = {
          + "Name" = "rf_connected_vpc_subnet2"
        }
      + tags_all                                       = {
          + "Name" = "rf_connected_vpc_subnet2"
        }
      + vpc_id                                         = (known after apply)
    }

  # module.vmc_vpc.aws_subnet.con_vpc_subnet3 will be created
  + resource "aws_subnet" "con_vpc_subnet3" {
      + arn                                            = (known after apply)
      + assign_ipv6_address_on_creation                = false
      + availability_zone                              = "eu-west-2c"
      + availability_zone_id                           = (known after apply)
      + cidr_block                                     = "10.10.0.192/26"
      + enable_dns64                                   = false
      + enable_resource_name_dns_a_record_on_launch    = false
      + enable_resource_name_dns_aaaa_record_on_launch = false
      + id                                             = (known after apply)
      + ipv6_cidr_block_association_id                 = (known after apply)
      + ipv6_native                                    = false
      + map_public_ip_on_launch                        = true
      + owner_id                                       = (known after apply)
      + private_dns_hostname_type_on_launch            = (known after apply)
      + tags                                           = {
          + "Name" = "rf_connected_vpc_subnet3"
        }
      + tags_all                                       = {
          + "Name" = "rf_connected_vpc_subnet3"
        }
      + vpc_id                                         = (known after apply)
    }

  # module.vmc_vpc.aws_vpc.con_vpc will be created
  + resource "aws_vpc" "con_vpc" {
      + arn                                  = (known after apply)
      + cidr_block                           = "10.10.0.0/16"
      + default_network_acl_id               = (known after apply)
      + default_route_table_id               = (known after apply)
      + default_security_group_id            = (known after apply)
      + dhcp_options_id                      = (known after apply)
      + enable_classiclink                   = (known after apply)
      + enable_classiclink_dns_support       = (known after apply)
      + enable_dns_hostnames                 = true
      + enable_dns_support                   = true
      + enable_network_address_usage_metrics = (known after apply)
      + id                                   = (known after apply)
      + instance_tenancy                     = "default"
      + ipv6_association_id                  = (known after apply)
      + ipv6_cidr_block                      = (known after apply)
      + ipv6_cidr_block_network_border_group = (known after apply)
      + main_route_table_id                  = (known after apply)
      + owner_id                             = (known after apply)
      + tags                                 = {
          + "Name" = "rf_connected_vpc"
        }
      + tags_all                             = {
          + "Name" = "rf_connected_vpc"
        }
    }

Plan: 5 to add, 0 to change, 0 to destroy.

Do you want to perform these actions?
  Terraform will perform the actions described above.
  Only 'yes' will be accepted to approve.

  Enter a value: yes
Accept to continue by typing “yes” and watch the magic happen!
5. Patience is a virtue
The process will take a while, as Terraform provisions resources in both AWS and VMware Cloud. Once completed, Terraform will provide an output with a summary.
module.sddc.vmc_sddc.vmc_sddc1: Still creating... [1h46m41s elapsed]
module.sddc.vmc_sddc.vmc_sddc1: Creation complete after 1h46m44s [id=d87b5f5b-6299-4627-839a-c0d83aa57167]

Apply complete! Resources: 5 added, 0 changed, 0 destroyed.
Benefits of Using Terraform for VMC on AWS Deployment
Let’s quickly review the benefits of using Terraform (and IaC in general) for deployments in the cloud.
Consistency: No manual errors. Your infrastructure is now version-controlled and can be deployed repeatedly with the same configurations.
Scalability: Need to deploy multiple SDDCs? Just tweak your Terraform scripts.
Transparency: Your entire infrastructure is visible as code. This is great for team collaboration, auditing and makes for easier configuration reviews.
Conclusion
Automating VMC on AWS deployment using Terraform does not necessarily speed up the process but ensures our infrastructure is consistent and scalable. As we evolve our cloud strategy, using tools like Terraform will be key to staying on top of things.
In my next blogs, I will likely delve deeper into different aspects of VMware Cloud. Stay tuned, and feel free to leave any comments or questions below!
Links:
https://www.securefever.com/vmc-aws-manual-deployment
https://learn.hashicorp.com/terraform/getting-started/install.html
https://registry.terraform.io/providers/vmware/vmc/latest/docs
Off topic: Take 3
Since promising a blog series on VMC on AWS and posting the first blog, around 6 months have passed.
Part of the reason was my recent Take 3 which I will be talking about in this post.
A Closer Look at VMware's "Take 3" Program
Apart from VMware’s top-tier virtualization products, it has a cool approach to employee growth. One standout initiative is their “Take 3” program. Let’s dive in!
What’s “Take 3” and what did I do?
In a nutshell, “Take 3” lets VMware employees switch things up. Eligible employees can take a break from their current role for up to three months and try something totally different within the company.
It’s a change of scene without leaving the building!
Almost 2 years ago I switched to the VMware Cloud Solution Architect role. This is very much a presales role and offers great variety in what I do all the time. However, after a while I wanted to see what Product Management looks like at VMware. Since I do not have Product Management experience and did not want to leave my role altogether, Take 3 came in very handy.
All it took was a quick informal application for a Take 3 opening and some coordination with managers and peers. Shortly after, I started my Take 3 as a Product Manager for VMware Cloud on Equinix Metal (VMC-E).
For those unfamiliar, VMC-E was announced at VMware Explore Barcelona last year:
https://blogs.vmware.com/cloud/2022/11/07/introducing-vmware-cloud-on-equinix-metal/
To make it short (and partially oversimplify): it brings all the fun of managed VMware SDDCs from platforms like AWS to the Equinix Metal platform.
Anyway, back to topic:
In this role, I was now working on different features for VMC-E.,
I was not primarily in front of customers anymore, but rather working in the background.
Working through field feedback, deriving technical requirements from conversations with customers and peers, creating write-ups for PM and engineering teams - undoubtedly a switch from my daily tasks as a Solution Architect.
My time as a PM is coming to an end, but I can honestly say that it was a rewarding experience.
From prioritizing tasks within my own control, over negotiating feature timelines with other PM teams, to discussing possible solutions to challenges on a technical level, it was fun!
My top 3 reasons why Take 3 is awesome
The program is fantastic, and I can probably spend hours talking about it.
To save all of us some time, I broke it down to my top 3 reasons:
1. New Perspectives:
Part of the reason I wanted to see Product Management is the tendency to “complain” about the product team, if you’re customer facing in the field constantly.
It is always that one feature, that one function that is missing, or not working as expected.
This sparked my interest in how hard creating / managing a product is.
Now, close to the end of my Take 3 I can honestly say: it is hard.
2. New / Improved Skills:
I could not rely on my technical experience as much as I had hoped. The single most important thing I found was clear communication – which sometimes involves explaining things to people much less technically versed. While this also happens in presales frequently, it was definitely different from what I am used to.
Apart from that, being inexperienced in the PM role, I tried to please everyone at once. Getting feedback from my (temporarily former) peers, I tried to work them all into our plan for the next weeks and months. Not only was this basically impossible to deliver upon, but it also revealed the next important skill to me: prioritization.
In a nutshell, prioritizing isn't just about ticking boxes—it's about making smart choices that align with our goals. So, next time you're swamped, take a step back, prioritize, and watch the magic happen!
3. Happy Employee(s):
Let’s face it, doing the “same old” all the time can get boring. Take 3 is like hitting a refresh button.
And now that things are coming to an end, I am excited to get back into my former role.
Wrapping it up
Technology moves fast, interests shift, and VMware acknowledges this. The Take 3 program is about staying fresh, learning more, and keeping things exciting. It’s a win for both parties and honestly another reason why VMware is a great place to work.
VMware Explore EMEA Network & Security Sessions 2023
VMware Explore will taken place in Barcelona from 6th to 9th of November 2023. I provide recommendations within this blog post about some technical sessions related to Network & Security topics for the Explore event in Europe. I have excluded certifications and Hands-on-Labs sessions from my list. I have focused on none 100 level sessions, only in case of new topics I have done some exceptions.
Pricing
A full event pass for VMware Explore costs $1,575 for the EMEA event. The full event pass has following advantages:
Full Event passes provide the following benefits:
Four days of sessions including the general session, solution keynotes, breakout sessions, roundtables and more, with content tailored to both the business and technical audience
Destinations, lounges and activities such as The Expo and VMware Hands-on Labs
Focused programming for SpringOne, Partner* and TAM* audiences (These programs will have restricted access.)
Admittance to official VMware Explore evening events: Welcome Reception, Hall Crawl and The Party
Exclusive VMware Explore swag
Attendee meals (Tuesday through Thursday)
Your full event pass purchase also allows you to add on VMware Certified Professional (VCP) and VMware Certified Advanced Professional (VCAP) certification exam vouchers during registration at a 50 percent discount (exams must be taken onsite during VMware Explore Las Vegas).
VMware Explore Session Recommendations
Now I come to my session recommendations which are based on my experience and some very good known speakers from the last years and about topics which I am interested from Network and Security point of view. But first I have to say that every VMware Explore session is worth to join and customers, partners and VMware employees have taken much efforts to prepare some very good content. I am also very proud that I deliver the first time a breakout session myself with my customer BWI and Simer Singh from DPU Engineering [VIB1815BCN]. Thus you will find this session on my recommendation list as well:-)
For me the VMware Explore sessions are the most important source to get technical updates, innovation and training. All sessions can be also watched after VMware Explore. Some hints to the session ID`s, the letter in bracket like NSCB2088LV stands for NSC = Network & Security and B = Breakout Session. BCN indicated that it is a Barcelona session. Sometimes you see also an letter D behind BCN, this means that it is not a in person session, D stands for distributed.
Network & Security Solution Key Note
Solution Keynote: Innovations to Accelerate Your Enterprise Cloud Transformation [CEIK2158BCN]
7 Networking and Security Principles to Deploy Apps at Cloud Speed [NSCB2051BCN]
Simplify and Secure Your Multi-Cloud Environment with NSX [NSCB2085BCN]
Security Sessions
Bulletproof Your Network: Four Steps and Best Practices to Ransomware Defense [NSCB1500BCN]
Detect Advanced Threats with VMware NSX Advanced Threat Prevention [NSCB2047BCN]
Arsenal for the Enterprise: Lateral Security with VMware NSX and Gen AI [NSCB2084BCN]
End-to-End Network Security Design with VMware NSX [NSCB1893BCN]
Project Cypress: a GenAI Powered Assistant to Triage and Remediate Security Alerts [VIB1982BCN]
Simplify Firewall Rule Management with Terraform [CODE1350BCN]
Leveraging XDR to Increase Security and Forensics in the Workplace [NSCB2026BCN]
Security Incident - Day After and Lessons Learned [NSCB1749BCN]
Best Practices for Hardening Your VMware Infrastructure [NSCB1418BCN]
How to Protect Your ESXi and vCenter from Getting Ransomware [NSCB1306BCN]
NSX Sessions - Infrastructure related
Getting Started with NSX on VMware Cloud Foundation [NSCB2048BCN]
Get Started with NSX Automation: Networking & Security Examples with Live Demos [NSCB2103BCN]
Designing a Software-Defined Network for Service Providers with VMware NSX [NSCB1417BCN]
Get Started with HCX+: Transforming Workload Migration and Mobility [NSCB2165BCN]
NSX Sessions - Operation and Monitoring related
NSX Operations and Troubleshooting Best Practices [NSCB2105BCN]
NSX Design - Optimizing NSX Performance Based on Workload and ROI [NSCB1458BCN]
DPU (SmartNICs)
Accelerated Private Cloud with VMware Cloud Foundation over NVIDIA BlueField DPU [NSCB2356BCN]
vSphere and AMD DPUs: A Software-Defined, Hardware-Accelerated Data Center [NSCB1041BCN]
Supercharge Your VDI Workloads: Unleashing the Power of SmartNICs [EUSB1770BCN]
Performance and Security Improvements with DPUs (SmartNICs) [VMTN2241BCN]
NSX Sessions - Advanced Load Balancer (AVI) related
Deploy NSX Advanced Load Balancer to Enhance Your VMware Stacks Now [NSCB1476BCN]
How VMware IT Solved Load Balancer Challenges for 10,000+ Virtual Services [NSCB1586BCN]
Using NSX Advanced Load Balancer for VMware Horizon in a Hybrid Scenario [NSCB1743BCN]
SD-WAN and SASE
VMware SD-WAN and VMware SASE: What`s New and Next? [CEIB1467BCN]
Foritfy Your Branches with Enhanced Firewall Service for VMware SD-WAN [CEIB2578]
Convergence of Network, Security and Compute at the Edge [CEIB1462BCN]
The State of the Art for Securing Internet and SaaS Applications [CEIB1463BCN]
Orange`s Next-Gen SD-WAN Automation from Implementation to Day 2 Operations [NSCB1654BCN]
NSX Customer Stories
Securing Medical Devices and Data with VMware NSX and VMware SD-WAN [CEIB2113BCN]
Migrate F5/Citrix to NSX Advanced Load Balancer - Stories from the Customer [NSCB2104BCN]
Summary
There are a lot interesting VMware Explore sessions, also for many other topics like AI, Multicloud, Edge, Container, End User Computing, vSphere, etc.
Feel free to add comments below if you see other mandatory sessions within the Network & Security area. I wish you a lot of Fun at VMware Explore 2023 and looking forward to see you in person!
VMware Explore US Network & Security Sessions 2023
VMware Explore will taken place in Las Vegas from 21th to 24th of August 2023. VMware Explore EMEA in Barcelona is from 6th of November to 9th of November 2023. I provide recommendations within this blog post about some technical sessions related to Network & Security topics for the Explore event in US. I have excluded certifications and Hands-on-Labs sessions from my list. I have focused on none 100 level sessions, only in case of new topics I have done some exceptions.
Pricing
A full event pass for VMware Explore costs $2,295 for the US event. The full event pass has following advantages:
Full Event passes provide the following benefits:
Four days of sessions including the general session, solution keynotes, breakout sessions, roundtables and more, with content tailored to both the business and technical audience
Destinations, lounges and activities such as The Expo and VMware Hands-on Labs
Focused programming for SpringOne, Partner* and TAM* audiences (These programs will have restricted access.)
Admittance to official VMware Explore evening events: Welcome Reception, Hall Crawl and The Party
Exclusive VMware Explore swag
Attendee meals (Tuesday through Thursday)
Your full event pass purchase also allows you to add on VMware Certified Professional (VCP) and VMware Certified Advanced Professional (VCAP) certification exam vouchers during registration at a 50 percent discount (exams must be taken onsite during VMware Explore Las Vegas).
VMware Explore Session Recommendations
Now I come to my session recommendations which are based on my experience and some very good known speakers from the last years and about topics which I am interested from Network and Security point of view. But first I have to say that every VMware Explore session is worth to join and customers, partners and VMware employees have taken much efforts to prepare some very good content. For me the VMware Explore sessions are the most important source to get technical updates, innovation and training. All sessions can be also watched after VMware Explore. Some hints to the session ID`s, the letter in bracket like NSCB2088LV stands for NSC = Network & Security and B = Breakout Session. LV indicated that it is in Las Vegas session. Sometimes you see also an letter D behind LV, this means that it is not a in person session, D stands for distributed.
Network & Security Solution Key Note
Solution Keynote: Accelerate Innovation and Increase Resiliency across Mulit-cloud [CEIK2755LV]
7 Networking and Security Principles to Deploy Apps at Cloud Speed [NSCB2382]
NSX Innovations to Accelerate the Multi-Cloud Journey [NSCB2088LV]
Network & Security Multi Cloud Sessions
Get Started with HCX+: Transforming Workload Migration and Mobility [NSCB2170LV]
Unlocking NSX+, Multi-Tenancy, Security and Disaster Recovery for VMware Cloud on AWS [NSCB1388LV]
Azure VMware Solution Lessons Learned: Designing, Migrating, and Operating [CEIB3043LVS]
NSX Sessions - Container related
Cloud Native Networking and Security with Antrea and NSX [NSCB1758LV]
A Step-by-Step Demo to Set Up a Test Environment for Modern Apps in 30 Minutes [NSCB2152LV]
Security Sessions
Bulletproof Your Network: 4 Steps and Best Practices to Ransomware Defense [NSCB2730LV]
Elavate your visibility in the SOC with VMware Network Detection and Response [NSCB2909LVD]
Best Practices for Hardening Your VMware Infrastructure [CSXB2105LV]
How to Protect Your ESXi and vCenter from Getting Ransomware [NSCB1121LV]
Speed Up Micro-Segmentation with Data-Driven Insights from NSX Intelligence [NSCB1264]
NSX Sessions - Infrastructure related
Getting Started with NSX on VMware Cloud Foundation [NSCB2240LV]
Get Started with NSX Automation: Networking & Security Examples and Demos [NSCB1770LV]
End-to-End Network Security Design with VMware NSX [NSCB1393LV]
Technical Introduction to the Benefits of Network Virtualization with NSX [NSCB2094LV]
NSX Sessions - Operation and Monitoring related
Mastering NSX Operations for Improved Business Continuity and Resilience [NSCB1524LV]
Optimizing NSX Performance Based on Workload and ROI [NSCB1421LV]
NSX Sessions - Advanced Load Balancer (AVI) related
Deploy NSX Advanced Load Balancer to Enhance Your VMware Stacks Now [NSCB2148LV]
*LIVE* App Security in the Real World: See the Bad Guys and Keep Them Out [NSCB2151LV]
Migrate F5/Citrix to NSX Advanced Load Balancer - Stories from the Customer [NSCB2150LV]
SD-WAN and SASE
VMware SD-WAN and VMware SASE: What`s New and Next? [CEIB2573LV]
Foritfy Your Branches with Enhanced Firewall Service for VMware SD-WAN [CEIB2578]
Convergence of Network, Security and Compute at the Edge [CEIB1276LV]
The State of the Art for Securing Internet and SaaS Applications [CEIB2569]
DPU (SMARTNICS)
NSX Customer Stories
Simplify and Secure your Multi-cloud Environment with NSX - Featuring City of Las Vegas [NSCB2092LV]
Resilient Healthcare Network Security with Micro-Segmentation and Threat Detection [NSCB1235LV]
Summary
There are a lot interesting VMware Explore sessions, also for many other topics like AI, Multicloud, Edge, Container, End User Computing, vSphere, etc.
Feel free to add comments below if you see other mandatory sessions within the Network & Security area. I wish you a lot of Fun at VMware Explore 2023!
VMware Cloud on AWS - Part 1 - Manual Deployment
This is my first blog on Securefever, and you can read my introduction here:
https://www.securefever.com/about
In this blog post, we will cover the basics of a VMC on AWS deployment.
The blog is meant to be accessible to everyone new to VMC.
This blog series will cover requirements at both VMC and AWS levels.
Any requirement listed in this blog will include examples created in our own AWS/VMware demo environment.
My VMC environment is based on a 1-Node deployment. Keep in mind that this is not suitable for production workloads.
The expected blog series will develop over the next couple of months.
Our initial deployment will be conducted manually. We will proceed to a DevOps approach in a follow-up exercise in which we will look at an automated deployment using Terraform.
This blog series will also dive into additional services at a later stage, partially outside of the VMware/AWS ecosphere (external storage).
For those interested, I will also follow up with a series on VMware Cloud on AWS as a disaster recovery solution.
With that being said, let's jump right in!
Requirements - AWS
This series will include details and easy-to-follow instructions. However, I highly recommend acquaintance with the basics/concepts of AWS Virtual Private Clouds (VPC), Regions, and Availability Zones (AZ).
Technical requirements:
AWS Account
A VPC (in the region we want to deploy the SDDC), along with at least one VPC subnet in the AZ where we want to deploy.
Please note that like in all hyperscalers, you pay for what you use. With that in mind, setting up an account, VPCs, and Subnets are free of charge.
I encourage you to keep a cloud mindset and ensure that unused resources are powered off and that you delete all resources post the completion of your testing, as these can generate monthly charges.
I have reserved the following networks for the lab’s AWS resources. Your VPC networks do not need to reflect my selection; however, it may help you to follow along.
AWS VPC: 10.10.0.0/16
VPC Subnet AZ1: 10.10.0.64/26
VPC Subnet AZ2: 10.10.0.128/26
VPC Subnet AZ3: 10.10.0.192/26
This is just an example network that was free in our lab setup, and I use this for many different tests/resources within AWS.
The VPC network scope does not need to be a /16.
Why do I need an AWS account?
The connected VPC has VPC subnets in one or each of the available availability zones within the AWS region.
By selecting one of the VPC subnets in a specific AZ, we determine in which AZ we want the SDDC to be deployed.
Every production VMC on AWS deployment must be permitted to access a customer-owned VPC; this is referred to as a “Connected VPC” and it allows connectivity with AWS native services. The connected VPC enables customers to access services over a low-latency, high-bandwidth, AWS-managed connection. We automatically configure Elastic Network Interfaces for the above-mentioned low latency connectivity between resources in the VMC SDDC and any resources in AWS during the initial deployment. This step is optional only for environments that will be deleted prior to 60 days. Environments hosting workloads have to be connected to a shared VPC of your choice.

The ‘Connected VPC’ can be leveraged for use cases like hosting an application's database in RDS, adding load-balancing, accessing private S3 endpoints, or any of AWS' plethora of services. The ‘connected VPC’ also has the advantage of cost-free traffic to the VPC subnet in the AZ of the SDDC. This feature has the inherent benefit of lowering traffic charges, e.g. for backup costs in AWS.
We will talk about additional use cases in a future blog post.
Implementing VPC + VPC Subnets in the AWS Account
To begin we will start by deploying the VPC in our preferred region (I am using London). Please note that VMC is not available in every region. Use the following link to find an eligible region near you:
https://docs.vmware.com/en/VMware-Cloud-on-AWS/services/com.vmware.vmc-aws.getting-started/GUID-19FB6A08-B1DA-4A6F-88A3-50ED445CFFCF.html

Every VPC must include at least one subnet. I will deploy a subnet in each of the AZs. Creating subnets in all AZs simplifies the deployment and testing process should we need to route traffic into other AZs later.

I repeated the process twice to create "rf_connected_vpc_subnet2" and "rf_connected_vpc_subnet3".
My naming convention combines the letters “RF”, followed by a description.
I encourage you to follow your organizations naming convention if you have one.
If you are building your first cloud, please mind AWS’ naming convention guidelines:
https://docs.aws.amazon.com/mediaconnect/latest/ug/tagging-restrictions.html
Our efforts should deliver a VPC with three subnets.
Now that the hard work is done, let’s proceed to the fun part, the SDDC deployment:

Table of the newly created VPC subnets
Requirements - VMware / VMC
This section assumes you have a VMC organisation.
VMC requires the following information / requirements:
The AWS region we want to deploy in (the same region where we deployed the VPC)
Deployment Type (Stretched Cluster or not)
Host Type
Number of Hosts
AWS Account (‘Shared VPC’ account)
The AZ we want the SDDC to be deployed in (determined by selecting the VPC subnet in that AZ)
Management Subnet (private IP range used to host the SDDC management components, like vCenter, NSX Manager, etc.)
AWS Region:
For this exercise, I will deploy VMC in London.
Deployment Type:
This lab will only contain a 1-Node SDDC. The "Single Host" deployment is a particular deployment only meant for POCs or short testing periods.
(This lab will not demo a stretched cluster. The stretched cluster solutions are meant for businesses that require an SLA of 99,99. Please leave a comment or message me if you're interested in learning more about stretch clustering or VMC HA capabilities.)
Host Type / Number of Hosts:
1 x i3 instance.
I am happy to announce the expanded instance size and offerings now include i3en, and i4n. Follow the link below for an overview of available instance types and their specs:
https://docs.vmware.com/en/VMware-Cloud-on-AWS/services/com.vmware.vmc-aws-operations/GUID-98FD3BA9-8A1B-4500-99FB-C40DF6B3DA95.html
Please work with VMware and / or a partner to determine which host type makes sense for your organisation and workload requirements.
AWS Account:
Let's get started by connect an AWS account to your VMC organisation.
In order to do this, you need to run an AWS Cloud Formation template with an administrative user of the AWS account.
As we have already created the VPC and subnets in a specific account, we want to make sure we link the AWS account with these resources.
AWS VPC + Subnet:
After connecting to an AWS account we can select the VPC and VPC subnet.
Remember that the VPC subnet determines the AZ in which your SDDC will be running.
Management Subnet:
The management subnet is where VMC will run the management components.
For a production setup we recommend a /16 subnet from the private IP space defined in RFC 1918, but a minimum of /20 is required. Moreover, you can not choose the CIDRs 10.0.0.0/15 or 172.31.0.0/16, as these are reserved.
Note that the size of the management subnet influences the scalability of your SDDC and can not be changed after deployment. For an in-depth explanation of the management subnets, have a look at this blog post: https://blogs.vmware.com/cloud/2019/10/03/selecting-ip-subnets-sddc/
The deployment automation expects a /16, /20 or /23 (if non-production). Other ranges will not be accepted (/22 for example).
Putting it all together - deploying the SDDC
Log in to the VMC console (vmc.vmware.com):
Click on “Inventory”
Click on “Create SDDC”

Next, we configure the SDDC properties using the parameters we defined:
Name your SDDC
Select the region in which you created the ‘Connected VPC’
Select the ‘Single Host’ or desired host count.
Select the host type
Please be advised that this configuration is not recommended for operations longer than 60 days
Click on ‘Next’

Please ensure you can access or have credentials to the AWS management console to connect the AWS ‘Connected VPC’ account.
Select "Connect to AWS now," "Connect to a new AWS account"
Press "OPEN AWS CONSOLE WITH CLOUDFORMATION TEMPLATE":

This action will redirect to the AWS management console. Here we will execute the VMware-generated CloudFormation template:
Please click check the ‘I acknowledge that the AWS CloudFormation template might create IAM resources’
Press ‘Create Stack’
For more information on the permissions and or actions please visit the following link. There you will find VMware’s documented actions, roles used by the account linking, as well as the required permissions in the product documentation:

If your template is successful the results should look as follows:

We may now return to the VMC console and continue with the SDDC deployment:

The CloudFormation template allows VMC to connect to the ‘Connected VPC’ account in AWS. Please select the appropriate VPC and subnet from the dropdown:
Select the VPC
Select the subnet
Click ‘Next’

It is a good idea to perform a review and prior to making acknowledgements. If the choices look correct, we can now provide the management CIDR.
I will use 10.20.0.0/16 as the management subnet.
(If you do not provide any input, the deployment assumes the default of 10.2.0.0/16):
Provide you Management Subnet CIDR
Click ‘Next’

We are almost there. The following screen is advising us of costs and the start of the charges. Please ensure that you are ready to launch as costing starts as soon as we complete the “Deploy SDDC” process.
Click on “Charges start once your SDDC has finished deploying. Accrued charges will be billed at the end of the month.’
Click on “Pricing is per hour-hour consumed for each host, from the time a host is launched until it is deleted.’

Completion takes around 100 - 120 minutes.
With this, we conclude the first part of this blog series.
As you see, VMC might sound complicated first, but it quickly implemented with just a bit preparation.
In the next post, we will get dirty with Terraform.
See you soon!
How NSX and SmartNICs (DPUs) accelerates the ESXi Hypervisor!
With vSphere 8 and NSX 4, VMware has introduced support for SmartNICs. SmartNICs are usually referred as DPUs (Data Processing Units). VMware has declared the DPU solution as Distributed Service Engine (DSE) under vSphere 8. There are several different names for the same function. In my blog post, I will primarily use the names DPU (Data Process Unit). The DPU-based acceleration for NSX emerged from the "Monterey" project, an initiative that was started by VMware about 2 years ago and has been steadily developed further.
The DPU architecture accelerates the networking and security function in the modern "Software Defined Data Center". NSX networking and security services are offloaded to DPUs to free up compute resources on the host. DPUs also provide enhanced visibility to show network communications. This helps with troubleshooting, mitigation against hacking attacks and compliance requirements. It enables VMware customers to run NSX services such as routing, switching, firewalling and monitoring directly on the DPU. This is particularly interesting for users who have significant demands in terms of high throughput, low latency and increased security standards.
ESXi SmartNICs Architecture
VMware relies on the ARM processor in the DPU Distributed Services Engine (DSE) solution with vSphere 8 and NSX 4 (see Figure 1).
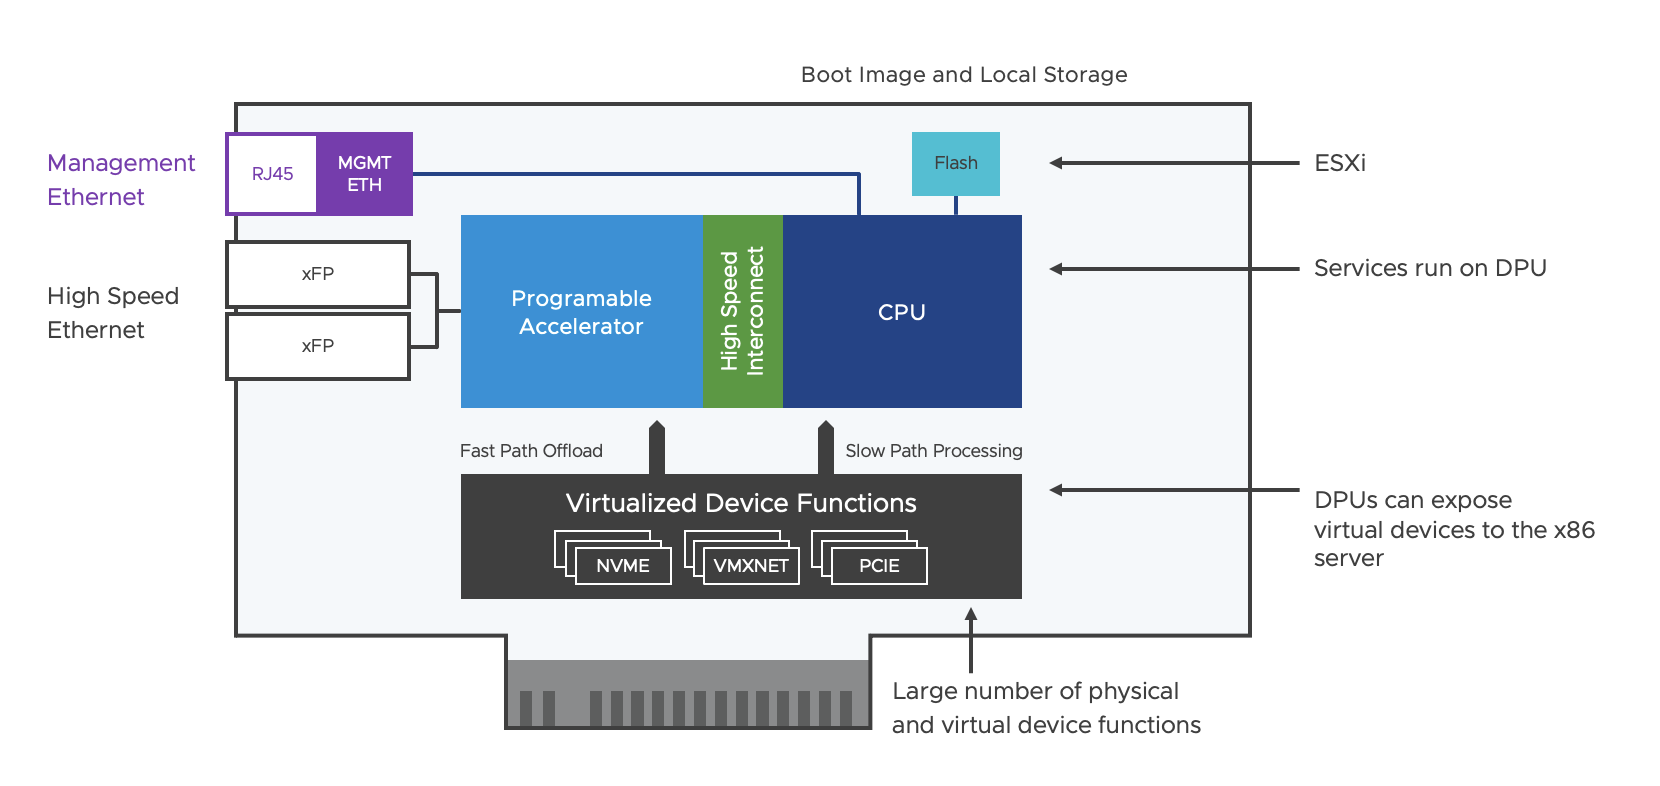
Figure 1: SmartNICs Architecture
There is a local flash memory on the card to roll out the ESXi software via a boot image. A stripped-down version of ESXi is installed on the DPU, which is optimised for I/O requirements, such as packet offloading, external management, etc. For network connectivity, there are two Ethernet ports with SFP (small form-factor pluggable) modules and one RJ-45 copper port for a management connection. Configuration management runs independently of the x86 server and has been greatly simplified for operation. The Programmable Accelerator maps the packet processing function in hardware and ensures that data traffic is offloaded to the DPU and accelerated.
The High Speed Interconnect is the link between the Hardware Programmable Accelerator and the CPU, designed for low latency and high bandwidth.
Virtualised Device Functions (VDFs) enable network and storage devices to be provided as virtual devices. VDFs use Single Root I/O Virtualisation (SR-IOV) technology to connect virtual machines directly to physical devices, improving latency and throughput. They are able to combine the benefits of virtualisation with those of hardware acceleration. There is a one-to-one relationship between a VDF and a virtual machine (VM).
What are the advantages of DPU-based acceleration with NSX?
With SmartNICs, the NSX services (routing, switching, firewalling, monitoring) are outsourced from the hypervisor to the DPU (Data Process Unit), freeing up computing resources on the ESXi host for the applications (see Figure 2). An additional modified and specified ESXi image is installed on the DPU for this purpose. The new architecture runs the infrastructure services on the SmartNIC, providing the necessary separation between the application workloads running on the x86 computing platform and the infrastructure services. This is of enormous advantage for customers with high security and compliance requirements. Regulatory authorities such as the BSI (German Federal Office for Information Security) in particular often require separations of productive and management traffic for certain environments.
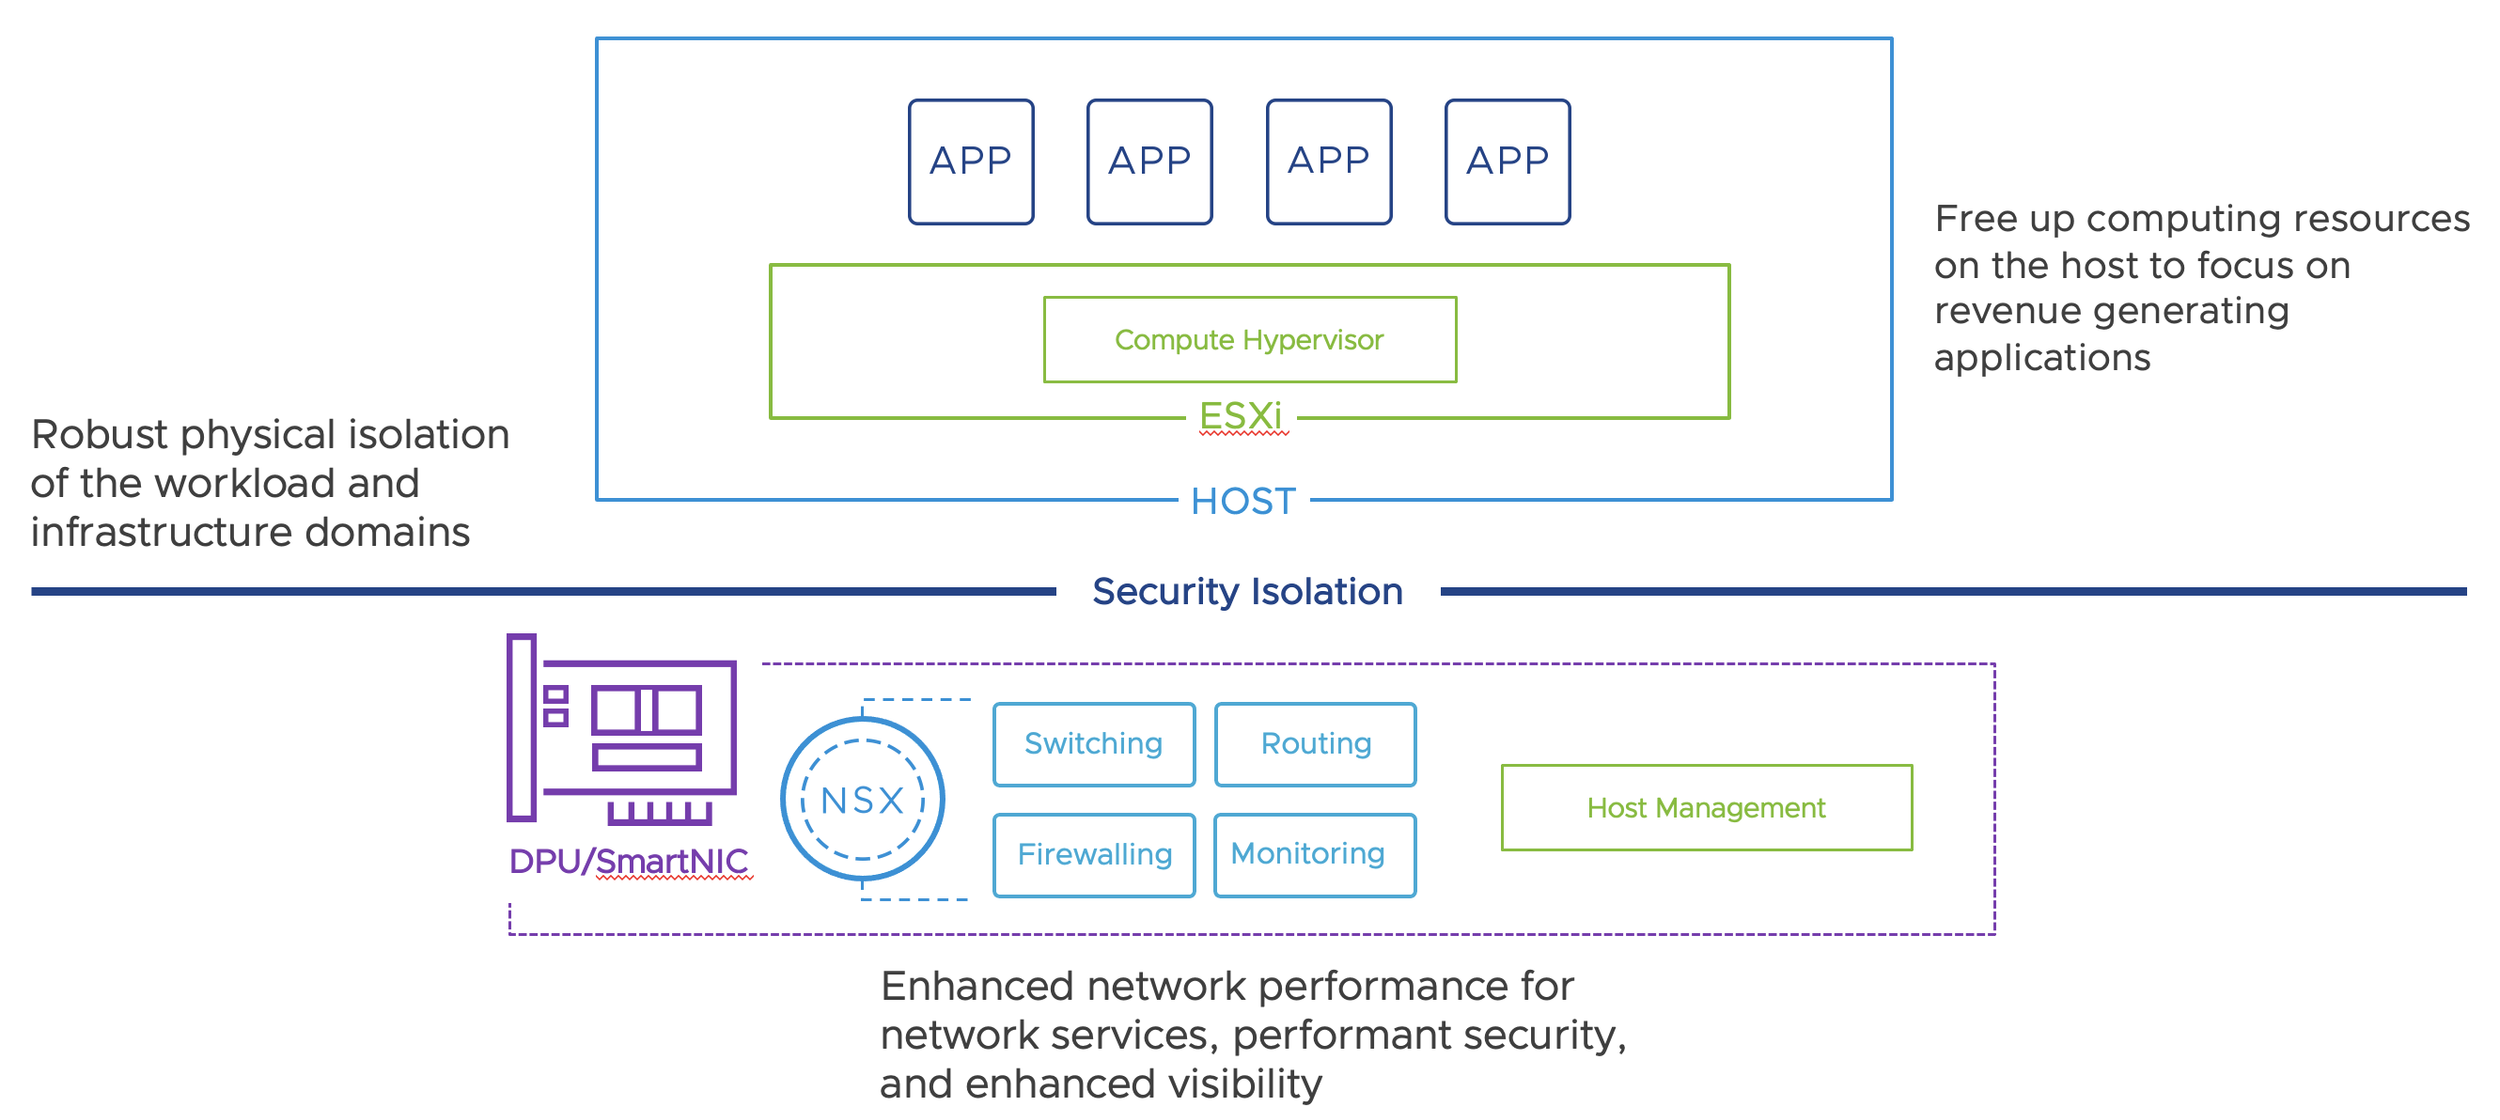
Figure 2: ESXi and SmartNICs
Advantages of DPU technology with NSX
1. Network performance optimization
DPUs are specifically designed for network services, overlay technology (such as VXLAN, GENEVE, etc.), load balancing, NAT (Network Address Translation) and therefore offer better performance than traditional generic CPUs. SmartNICs uses the VMDirectPath/UPTv2 (Uniform Passthrough) data path model with the advantage of passing traffic directly from the NIC to the virtual machine without a virtual switch.
2. Security
Security is one of the most important features of NSX. NSX Distributed Firewalling (Microsegmentation) uses a firewall engine on the ESXi hypervisor to roll out dedicated firewall rules directly to the virtual machines or containers. The NSX Distributed Firewall (DFW) acts in software and is completely independent of IP address ranges, each individual workload gets its dedicated firewall function and this from one management plane (NSX Manager). The DFW acts on layer 7, is stateful and does not require an agent for the ESXi hosts. NSX Intrusion Detection Prevention System (D-IDPS) uses technologies such as signature-based detection, behavioural analysis and machine learning to detect threats. NSX Distributed IDPS follows the same approach as NSX Distributed IDPS which means that the signatures are implemented directly in front of the dedicated workloads, also independently of IP ranges.
SmartNICs completely offload the security functions from the NSX DFW and NSX D-IDPS to the DPU. Running network security services on a DPU provides improved performance and granular security and monitoring of network traffic. This is particularly interesting for the IDPS function, as signatures are used to directly verify the payload of a packet, thereby placing a load on the CPU.
3. Visiblity
The DPU-based NSX solution can monitor all traffic flows directly on the network card. This means you can map full network visibility and observation, including advanced network topology views, flow and packet level capture and analysis, and IPFIX support (see figure 3). No complex port mirroring is required for this, such as so-called network TAPs or SPANs (Switch Port Analyzer).
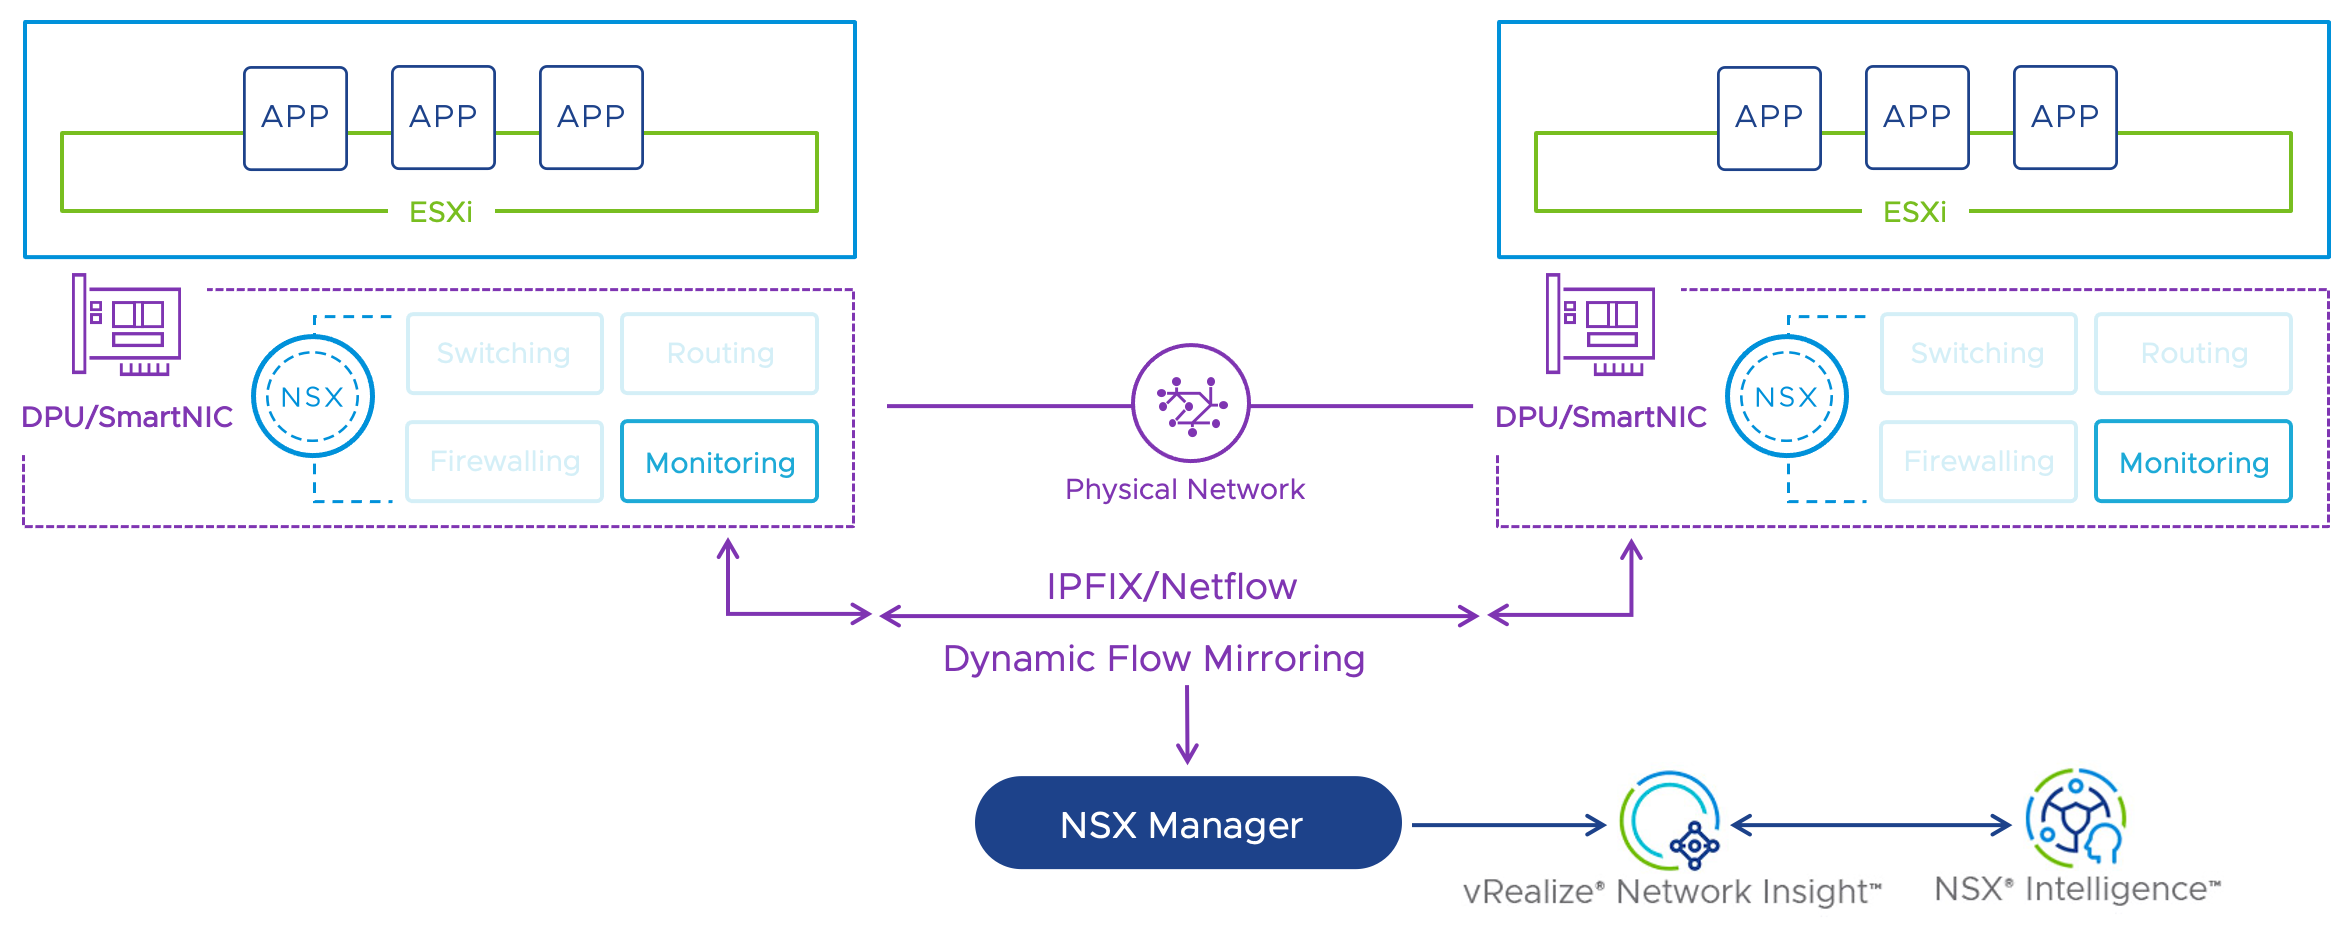
Figure 3: Visibility with SmartNICs
Furthermore, because the network services running on DPUs are isolated from the ESXi components and applications, a DPU-based architecture facilitates the delineation of operational responsibilities between DevOps teams and VI administrators, who can focus on and manage host-level workloads, and NetSecOps teams, who can manage the network infrastructure and services on the SmartNIC.
4. Cost reduction
As mentioned earlier, by offloading networking and security services to the DPUs, more host resources are freed up for workloads. As a result, more workload capacity can be provided on fewer servers without compromising the monitoring, manageability and security features that vSphere and NSX provide.
You also benefit from operational savings by consolidating management across different workload types such as Kubernetes, containers and virtual machines, and simplifying the implementation of micro-segmentation, IDPS features and network monitoring without costly port mirroring.
5. Sustainability and energy savings
By increasing efficiency with SmartNICs, computing tasks are offloaded from the main processors, thereby reducing energy consumption and associated CO2 emissions.
As DPUs distribute power and efficiency to fewer servers, the number of hardware components required is reduced. This increases the lifetime of the devices and reduces the amount of waste, thus protecting the environment.
Which DPU functions are currently supported by VMware?
Currently, the network card manufacturers NVIDIA and Pensando (AMD) support the "Distributed Service Engine" DPU function of VMware with vSphere 8 and NSX 4. The DPU cards are supplied as a complete system by the server manufacturers Dell and HPE. Lenovo will also provide servers with DPUs in the future.
NSX version 4 supports the following DPU functions (Source: https://docs.vmware.com/en/VMware-NSX/4.0.1.1/rn/vmware-nsx-4011-release-notes/index.html and https://docs.vmware.com/en/VMware-NSX/4.1.0/rn/vmware-nsx-410-release-notes/index.html ):
Networking:
Overlay and VLAN based segments
Distributed IPv4 and IPv6 routing
NIC teaming across the SmartNIC / DPU ports
Security
Distributed Firewall
Distributed IDS/IPS (Tech Preview)
Visibility and Operations
Traceflow
IPFIX
Packet Capture
Port Mirroring
Statistics
Supported Vendors
NVIDIA Bluefield-2 (25Gb NIC models)
AMD / Pensando (25Gb and 100Gb NIC models)
Scale
Single DPU is supported per host consumed by single VDS
VMDirectPath (previous name UPTv2 - Uniform Passthrough): DPU-based Acceleration for NSX supports the ability to bypass the host level ESXi hypervisor and allow direct access to the DPU which allows customers to get high level of performance while not sacrificing the features that they leverage from vSphere and NSX.
SmartNIC support for Edge VM: DPDK vmxnet3 driver updates to support DPU-based (SmartNIC) pNICs for datapath interfaces on Edge VM form factor. Traffic through the Edge VM will benefit from this hardware acceleration. It can only be enabled on all datapath interfaces at the same time.
Summary:
Through SmartNICs with NSX 4 and vSphere 8, VMware improves speed at the hypervisor while taking into account the current network and security requirements of modern applications. Especially in times of increased security requirements due to ransomware and other potential attacks, this is an enormous advantage and the physical isolation of the workload and infrastructure domains as well. Purchases of new dedicated hardware in the form of additional DPU network cards with their own processors must be taken into account. This must be considered accordingly in future architecture planning. These investments are offset by savings in energy costs and a minimization of the total number of servers.
VMware Explore US 2022 - Network & Security News?
VMware Explore has taken place in San Francisco from 29th of August until 1st of September 2022. VMware Explore which was formerly known as VMworld has been rebranded. Ragu Raghuram mentioned in the keynote session that VMWorld has been renamed because VMware want to be a Multi-cloud centric and the Explore should be a Multi-cloud community event.
VMware announced a lot of news on the event, here are the most important ones from a high level view:
Announcements of vSphere 8, vSAN 8, NSX 4.0, TANZU Application Platform 1.3, Edge Compute Stack 2.0
Cloud SMART (with the areas App Platform, Cloud Management, Cloud and Edge Infrastructure, Security Networking, Anywhere Workspace)
Cloud Universal commercial model for Cloud Smart
VMware Aria - Centralized views and controls to manage the entire Multi-cloud management.
DPU (SmartNICs) Acceleration
Project Northstar - Provides centralized Network & Security management across Multi-clouds (on-prem, hybrid, public cloud) as SaaS Service
I want to set the focus in the blog post to the Network & Security announcements. As described above the most important ones are Project Northstar and the DPU-based Acceleration for NSX.
Project Northstar
The Network and Security management of a Multi-cloud environment can be complex, costly and time-consuming. VMware has announced the Project Northstar in tech preview. Northstar is a SaaS (Software-as-a-Service) service from the NSX Platform which provides Centralized Policy Management (Policy-aaS), Security Planning and Visibility (NSX Intelligenc-aaS), Network Detection and Response (NDR-aaS), Advanced Load Balancing (NSX ALB-aaS) and Workload Mobility (HCX-aaS).
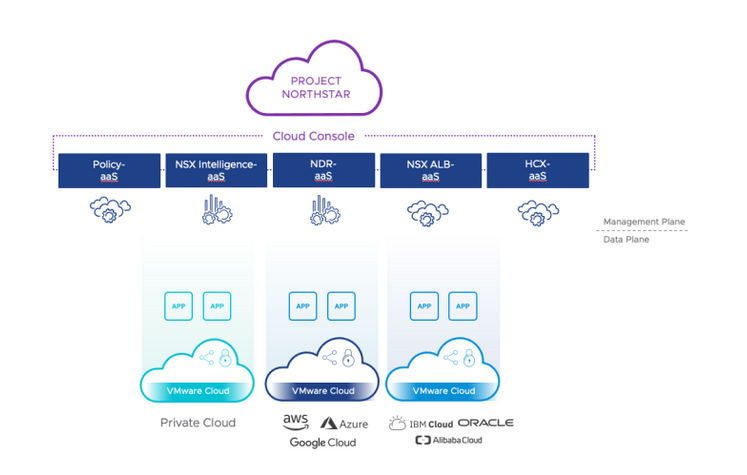
Picture 1: Project Northstar
DPU-based Acceleration for VMware NSX
Modern Applications are driving increased I/O traffic, volume and complexity. Security threats are evolving and infrastructure is getting more distributed with Containers, VM`s, CPUs and GPUs. The IT departments have major challenges for this reason with performance, scaling and complexity. DPU-based Acceleration (also known as SmartNICs) for NSX is addressing this topic (see picture 2).
But what is a DPU or SmartNic?
A SmartNIC is a network interface card with a built-in processor, also known as DPU (Data Process Unit), that can be managed separately from the host CPU. This means that networking, security, and storage services can run directly on the NIC instead of relying on the host CPU. NSX functions Routing, Switching, Firewalling and Monitoring are completely running on the DPU/SmartNIC. There are several advantages and use cases for this solution:
Free up computing resources on the host to focus on applications
Enhanced network performance for network services, security and visibility
Robust physical isolation of the workload and infrastructure domains
Manage and Comprehensive observability for all traffic across heterogeneous workloads (No TAP or SPAN Ports mandatory)

Picture 2: DPU-based Acceleration for NSX
There is a new data-path model implemented named UPTv2 (Uniform Pass Through). This solution takes the advantages from the SR-IOV (Single Root I/O Virtualization) and EDP (Enhanced Data Path) data-path model together. For more details have a look to following video:
For SmartNICs or DPU implementations there are no changes of the NSX key concepts mandatory. Security policies are enforced at the vNIC level and firewall rules, groups, services, etc. still managed as before. The NSX workflows and the API are also unchanged.
There is also an excellent demo video available for DPU-based Acceleration for VMware NSX:
Project Watch
The Project Watch is a new approach to multi-cloud networking and security with enhanced app-to-app policy controls. This solution extends existing security systems for a continuous risk and compliance assessment. Project Watch is available in tech preview and covers compliance and security challenges to continuously observe, assess, and dynamically mitigate risk and compliance problems in multi-cloud environments.
Project Trinidad
This project covers the extension of VMware API security and analytics by deploying sensors on Kubernetes clusters. Machine Learning (ML) with business logic inference is used to detect anomaly traffic of east-west communication between microservices.
Expansion of Network Detection to the VMware Carbon Black Cloud Endpoint
VMware is strengthening its lateral security capabilities by embedding network detection and visibility into Carbon Black Cloud's endpoint protection platform, which is now available to select customers in early access. This extended detection and response (XDR) telemetry adds network detection and visibility to endpoints with no changes to infrastructure or endpoints, providing customers with extended visibility into their environment across endpoints and networks leaving attackers nowhere to hide.
Ransomware Recovery in VMC
VMware announced at VMware Explore also a ransomware recovery-as-a-service solution from VMware Cloud on AWS (VMC). This is a new approach for a safe recovery that prevents reinfection of IT and line-of-business production workloads through an on-demand environment recovery.
Summary
There were also a lot of other announcements and news on the VMware Explore, like new NSX Advanced Load Balancer bot management capabilities, SASE (Secure Access Service Edge) new web proxy-based connectivity to VMware Cloud Web Security or that the NSX Gateway Firewall now offers a new stateful active-active edge scale-out capability that significantly increases network throughput for stateful services.
Feel free to add comments if you have seen other important announcements or technical innovations on VMware Explore US 2022. Hopefully see you on the VMware Explore Europe in Barcelona!!!
VMware Explore (VMworld) Network & Security Sessions 2022
After two remote remote events (VMworld 2020 and 2021) the VMware events is finally back onsite. And there is also a rebrand, VMworld is renamed to VMware Explore. The event is will be taken place in the cities San Francisco (29th of August until 1st of September 2022), Barcelona (7th of November until 10th of November 2022), Sao Paulo (19th of October until 20th of October), Singapore (15th of November until 16th of November 2022), Tokyo (15th of November until 16th of November 2022) and Shanghai (17th of November until 18th of November 2022). I provide recommendations within this blog post about some deep dive sessions related to Network & Security sessions. I have excluded certifications and Hands-on-Labs sessions from my list. I have focused on none 100 level sessions, only in case of new topics I have done some exceptions.
Pricing
A full event pass for VMware Explore will be $2,195 for the US event and €1,475 for the Europe event. The full event pass has following advantages:
Full Event passes provide the following benefits:
Access to The Expo
Participation in hands-on labs
Entry to the welcome reception and hall crawl
Entry to the VMware Explore 2022 Party
Discounts on training and certification
Meals as provided by VMware Explore
VMware Explore-branded promotional item
Networking lounges
Meeting spaces available on demand
Attendance at general session and breakout sessions (Note: Some sessions require valid Partner status)
Please note: Discounts are not applicable (ex: VMUG)
VMworld Session Recommendations
Now I come to my session recommendations which are based on my experience and some very good know speakers from the last years and about topics which are interesting from Network and Security point of view. But first I have to say that every VMware Explore session is worth to join and customers, partners and VMware employees have taken much efforts to prepare some very good content. For me the VMware Explore sessions are the most important source to get technical updates, innovation and training. All sessions can be also watched after VMware Explore. I also have to mentioned at this time that I still can't get used to the new name VMware Explore. I loved the brand VMWorld:-( The recommendation are based on the US content catalog but a lot of session will be also available on the other locations. The letter in bracket like NET2233US stands for NET = Network or SEC = Security. US indicated that it is a USA session. Sometimes you see also an letter D behind US, this means that it is not a in person session, D stands for distributed.
Network & Security Solution Key Note
Network & Security Multi Cloud Sessions
Better Secure Network Connectivity Between Public and Private Clouds [NET2246BUS]
Need to Migrate Thousands of Workloads? No Problem! [MCLB1251US]
Build Global Connectivity for Your Business Using VMware Transit Connect [NETB2470US]
Designing a Secure Multi-Cloud Infrastructure with VMware and Google [SECB2398US]
NSX Sessions - Container related
Connect and Secure Your Multi-Cloud Applications with Project Antrea and NSX [NETB2255US]
Zero Trust Security and Compliance for Modern Apps [SECB2528US]
Security Sessions
Enforcing a Strong Zero-Trust Ransomware Defense [SECB1960US]
Detect Advanced Threats with VMware NSX Network Detection and Response [SECB2382US]
Deploying Full-Stack Security for Workloads with VMware Cloud Foundation [CEIB3019US]
End-to-End Network Security Design with VMware NSX [SECB2998US]
Networking and Security Analytics, and the Evolution of the NSX Platform [NETB2301US]
Defining XDR with Forrester and the XDR Alliance [SECB2360US]
NSX Sessions - Infrastructure related
Understanding Performance of Software-Defined Security [SECB2324USD]
High Availability and Disaster Recovery with Multi-Site/Multi-Cloud Networking [NETB2188US]
NSX Sessions - Operation and Monitoring related
Automated Problem Resolution in Modern Networks with DirecTV [NETB2233US]
Explore Application-Centric Networking and Security with NSX on ACI [NETB2305US]
NSX Sessions - Advanced Load Balancer (AVI) related
SD-WAN and SASE
Modernize and Monetize with VMware Multi-Cloud Edge Solutions [CEIB2432US]
A Light in the Darknet: Stopping Cyberthreats with SASE [CEIB1234US]
Evolve SD-WAN Use Cases for Enterprise, Government, Home, Cloud and Beyond [CEIB1931US]
Upgrade User Experience and Increase Productivity: SASE Powered by AIOps [CEIB1929US]
SMARTNICS - Project Monterey
Next-Gen Networking and Security Services Architecture Using SmartNIC [SECB2397USD]
Project Monterey Behind the Scenes: A Technical Deep Dive [CEIB1576USD]
Redefining the Modern Infrastructure: Evolution of Project Monterey [CEIB2894US]
Summary
There are a lot interesting VMware Explore sessions, also for many other topics like Cloud, Edge, Container, End User Computing, vSphere, Blockchain, etc.
Feel free to add comments below if you see other mandatory sessions within the Network & Security area. I wish you a lot of Fun at VMware Explore 2022!