VMware Carbon Black Cloud Container Security with VMC on AWS
Dec. 22, 2020 VMware Carbon Black Cloud announced the General Availability for Container Security. It will protect your applications and data in a Kubernetes environment wherever it lives. In this blogpost I will explain how to add container security to an existing Kubernetes environment. Keep in mind, I am working in a Demo environment.
If you are interested in securing your Workload you can take a look on my previous blog, here.
For more information about K8s or TKG check out the blog from my buddy Alex, here.
What VMware Carbon Black Container Security provides?
In the first release it will provide you a full visibility and basic protection into all your Kubernetes Clusters wherever your clusters live, public cloud or on-prem. The provided visibility helps you to understand and find misconfigurations. You can create and assign policies to your containerized workload. Old Carbon Black fashion, you are also able to customize it and finally, it enables the security team to analyze and control application risks in the developer lifecycle. Enough of it, let’s jump directly into the action.
Let’s open our Carbon Black Cloud console. We can find in “Inventory” the new Tab “Kubernetes”. With “K8s Clusters” à “Add Cluster” we can add our existing K8s Cluster to Carbon Black.
Carbon Black provides us an easy-to-follow step by step guidance.
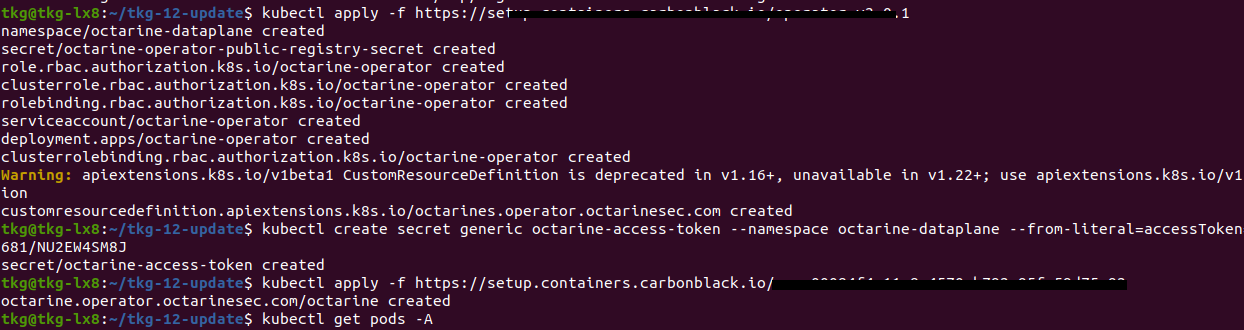
It’s providing us a kubectl command to install the Operator. Operators are Container which are handle all the communication and taking care about your K8s-Cluster.

We are already connected with our K8s-Cluster. We paste the kubectl apply command into the console and press ENTER. We can see with “kubectl get pod -A” command, all necessary components will be created. Meanwhile, we can continue in Carbon Black Cloud.
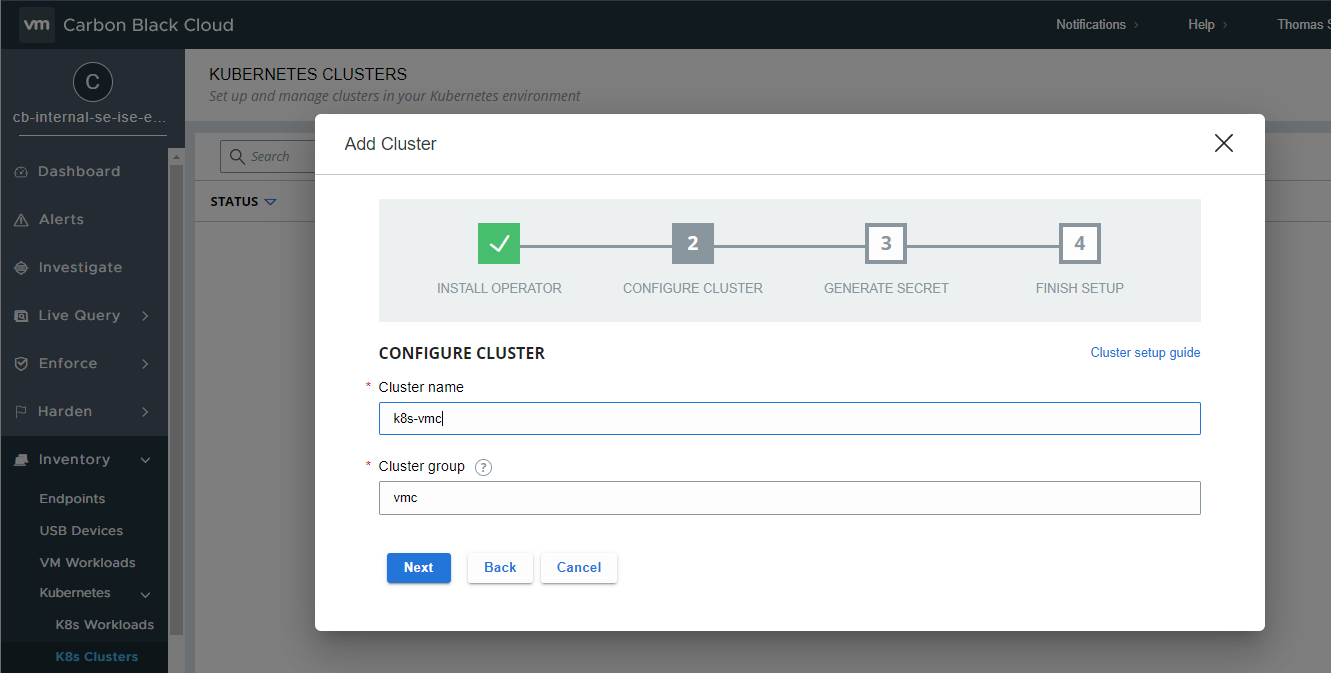
Our next step will be to name our K8s Cluster and add/create a Cluster group. For the Cluster name, we are free to use any name you wish, it just has to be unique. A Cluster group is to organize your multiple Clusters in Carbon Black Console. Cluster groups make it easier to specify resources, apply policies and to manage your Clusters.
Let’s continue, for the next step we need an API token. We have to name it and with “Generate API Key” we are generating one with the needed permissions. After our Key is ready, we can continue to create our Secret for the K8s Components. Copy/paste the command into your kubectl console.
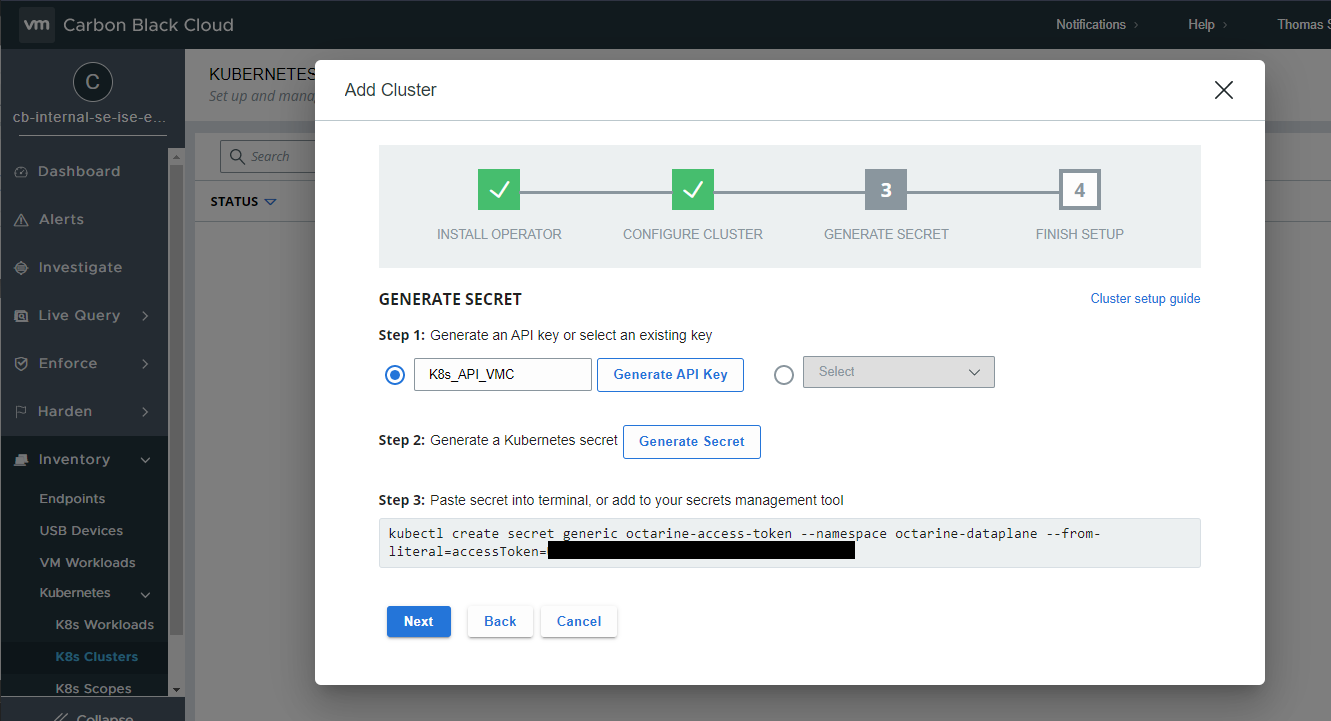
To finish the setup, we need to run another apply command, copy paste, and we are done. Now we will wait 2-3 Minutes, until the installed components will report back to the Carbon Black Console. Simple right?

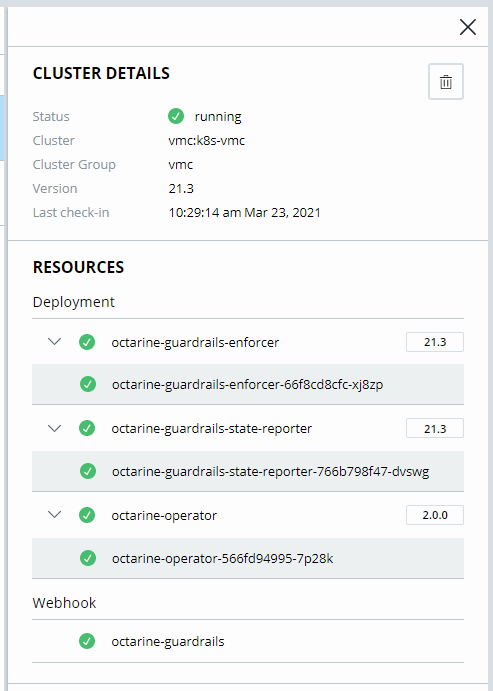
Let’s investigate the details. We can see the status is “running” and green.
Additional information’s like Name, Cluster Group, which Version is used and the last check-in. We also can see all Resources which are deployed, and which Version is used. When we type in our kubectl following command “kubectl get pods -A” we will see the same resources.
octarine-dataplane octarine-guardrails-enforcer-66f8cd8cfc-xj8zp 1/1 Running 0 25m
octarine-dataplane octarine-guardrails-state-reporter-766b798f47-dvswg 1/1 Running 0 25m
octarine-dataplane octarine-operator-566fd94995-7p28k 1/1 Running 0 26m
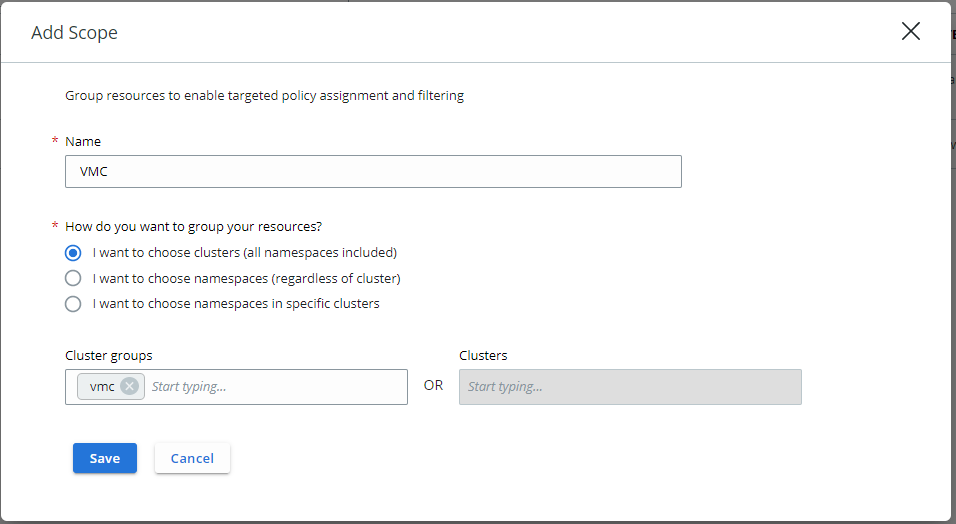
Great, next we can create a Scope, a Scope is important when we start to create Policies. To create a Scope, let’s click in the Carbon Black Console on the left side “K8s Scopes” and with one click on “add scope” we can create a scope.
We will define a very simple scope in our case we name it “VMC”. Next, we can decide how we want to group our resources, we have 3 options
I want to choose clusters (all namespaces included)
I want to choose namespaces (regardless of cluster)
I want to choose namespaces in specific cluster
We are choosing the first option, clusters and simply add our Cluster group to it.
Finally, our next mission will be to create a new Policy for our K8s Cluster. Let’s go to Enforce -> K8s Policies in the Carbon Black Cloud Console. With a click on “add Policy” we can create our first Policy.
As usual we have to name it, I will name it “vmc_basic_hardening”, we select our new created scope, and we are checking “include init containers”.
Next, we can select pre-defined Rules, all pre-defined rules are best practices from the community.
For a basic hardening I would choose following Rules.
Workload Security
Enforce not root – block:
Containers should be prevented from running with a root primary or supplementary GID.
Allow privilege escalation – block:
AllowPrivilegeEscalation controls whether a process can gain more privileges than it parent process.
Writable file system – block:
Allows files to be written to the system, which makes it easier for threats to be introduced and persist in your environment.
Allow privileged container – block:
Runs container in privileged mode. Processes in privileged containers are essentially equivalent to root on the host.
Network
Node Port – alert:
Allow workload to be exposed by a node port.
Load Balancer – alert:
Allow workloads to be exposed by a load balancer
Command
Exec to container – block:
Kubectl exec allows a user to execute a command in a container. Attackers with permissions could run ‘kubectl exec’ to execute malicious code.
In the next screen we can see an overview of all rules and how many violations we would get. It would be recommended to disable the rules if you want to apply on a prod env. with a lot of violations or add it to the exceptions. You should speak before enable the rules with the app-owners.
In the end, we confirm the policy and save it.
In the next screen we can see an overview of all rules and how many violations we would get. It would be recommended to disable the rules if you want to apply on a prod env. with a lot of violations or add it to the exceptions. You should speak before enable the rules with the app-owners.
In the end we confirm the policy and save it.
Now we can look on the Workload and what risk level we have. Let’s get back to Inventory -> Kubernetes -> K8s Workloads. You
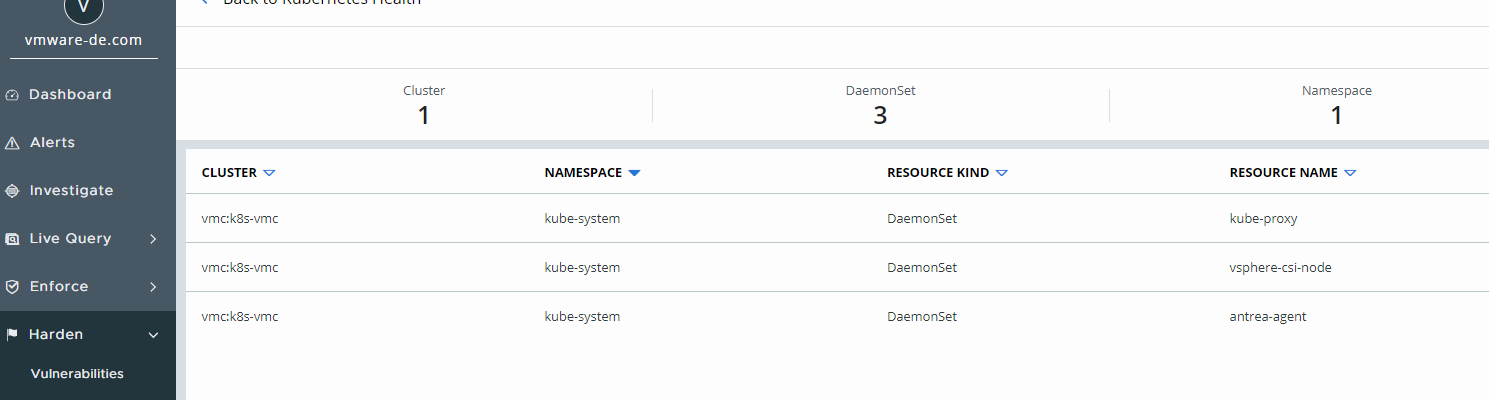
Let’s take a look on the health of our K8s Cluster, to do so, we go to “harden” -> “K8s Health”. We can filter by scope and see a great overview about our workload, network, operations, and volume.

By clicking on a specific topic like, “allow privileged container” you will see an overview about the Resource name, which cluster it is, which namespace and the resource kind.
Another overview can be found on “K8s Violations” you can see the specific Violation, what Resource is impacted, namespace, cluster scope and which Policy is applied.
To roll it up, it doesn’t matter what platform your K8s Cluster are running, but to run your K8s Cluster in a VMC on AWS Environment bringing a lot of benefits like flexibility and less maintenance. Carbon Black Container Security giving Security Teams and Administrators the visibility into the Container World back.