Terraform blueprint for a Horizon7 Ruleset with VMC on AWS
In this blog post I will write about Terraform for VMC on AWS and NSX-T provider. I wrote over 800 lines of code, without any experience in Terraform or programming. Terraform is super nice and easy to learn!
First of all, all my test ran at a lab platform… Use following code at your own risk, I won't be responsible for any issues you may run into. Thanks!
We will use following Solutions:
Terraform Version 0.12.30
VMC on AWS
Terraform NSX-T provider
If you are completely new to Terraform, I highly recommend to read all Blog posts from my colleague Nico Vibert about Terraform with VMC on AWS. He did a awesome job in explaining!
So, what will my code do..?
My code will create several Services, Groups, and distributed firewall rules. All rules are set to "allow", so you shouldn't have any impact when you implement it. It should support you to create a secure Horizon Environment. After you applied it, you can fill all created groups with IPs/Server/IP-Ranges. But details later!
Before we start we need following Software installed:
My Repository can be cloned from here. I will skip the basic installation for git, go and terraform. I will jump directly to my repository and continue there.
First of all we need to clone the repository, open a terminal Window and use following command: git clone https://github.com/vmware-labs/blueprint-for-horizon-with-vmc-on-aws
tsauerer@tsauerer-a01 Blueprint_Horizon % git clone https://github.com/xfirestyle2k/VMC_Terraform_Horizon
Cloning into 'VMC_Terraform_Horizon'...
remote: Enumerating objects: 4538, done.
remote: Counting objects: 100% (4538/4538), done.
remote: Compressing objects: 100% (2935/2935), done.
remote: Total 4538 (delta 1459), reused 4520 (delta 1441), pack-reused 0
Receiving objects: 100% (4538/4538), 23.88 MiB | 5.92 MiB/s, done.
Resolving deltas: 100% (1459/1459), done.
Updating files: 100% (4067/4067), done.
CD to the blueprint-for-horizon-with-vmc-on-aws/dfw-main folder, with following command: cd blueprint-for-horizon-with-vmc-on-aws/dfw-main
tsauerer@tsauerer-a01 VMC_Terraform_Horizon % ls -l
total 88
-rw-r--r--@ 1 tsauerer  staff   1645 Jun 10 10:04 README.md
-rw-r--r--@ 1 tsauerer  staff  30267 Jun  9 10:45 main.tf
-rw-r--r--@ 1 tsauerer  staff    172 May 29 08:35 vars.tf
tsauerer@tsauerer-a01 VMC_Terraform_Horizon %
Let's test if Terraform is installed and working correctly, with "terraform init" we can initialize Terraform and provider plugins.
tsauerer@tsauerer-a01 VMC_Terraform_Horizon % terraform init

Initializing the backend...

Initializing provider plugins...

Terraform has been successfully initialized!

You may now begin working with Terraform. Try running "terraform plan" to see
any changes that are required for your infrastructure. All Terraform commands
should now work.

If you ever set or change modules or backend configuration for Terraform,
rerun this command to reinitialize your working directory. If you forget, other
commands will detect it and remind you to do so if necessary.
Success, Terraform initialized succesfully. Next we need to check if we have the correct nsxt-provider.
tsauerer@tsauerer-a01 VMC_Terraform_Horizon_Backup % t version
Terraform v0.12.24
+ provider.nsxt v2.1.0
Great, we have the nsxt provider applied.

I recommend to use Visual Studio Code or Atom, which I'm using.
I created a new Project in Atom and select the folder which we cloned from github.
3 Files are importent, first "main.tf", here you can find the code or what will be done.

"Vars.tf", a description file for variables.

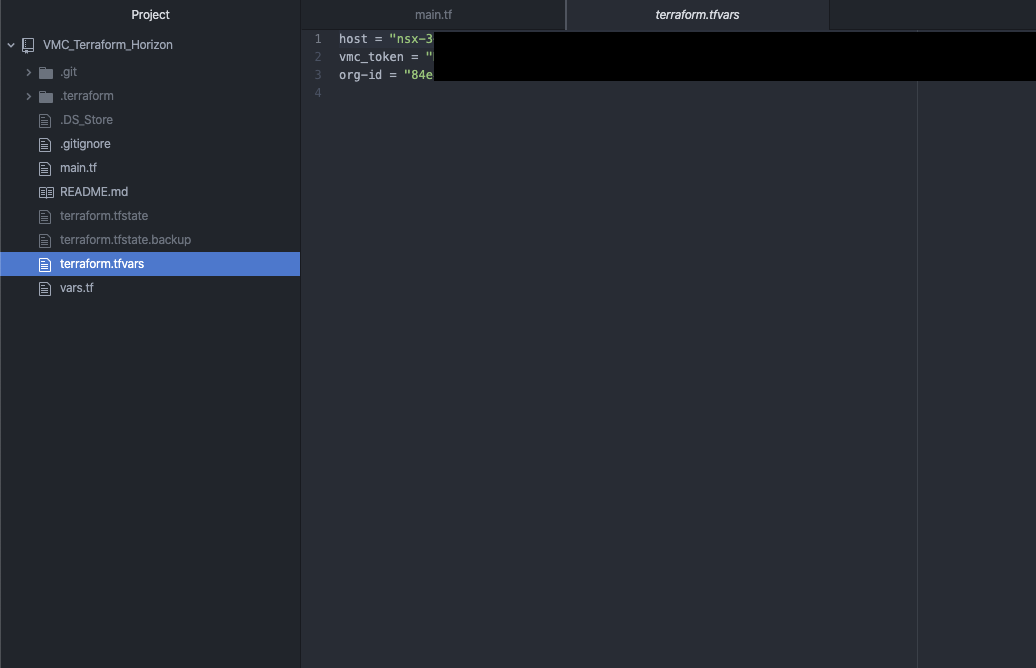
And the most importent file, which we have to create, because there, you will store all your secrets "terraform.tfvars".
So what you have to do now, you need to create a new file and name it "terraform.tfvars". For NSX-T we only need 3 variables, we already saw them in the "vars.tf" file. So let's add
Host = ""
Vmc_token = ""
Org-id = ""
Don’t worry I will guide you where you can find all the informations. Let's find the Host informations. “Host” is kind of missleading in the world of VMware, what we need here is the NSX-T reverse proxy. Let's go to your SDDC and on the left side you can find "Developer Center"

Go to "API Explorer" choose your SDDC which you want to use and go to "NSX VMC Policy API". On the left the "base URL" is your NSX-reverse proxy URL.

Copy the URL and paste it to your "terraform.tfvars" file between the quotation marks. Here a small hint, because it took me some hour troubleshooting, you have to remove the "https://".. So it starts just with "nsx……..”
Host = "nsx-X-XX-X-XX.rp.vmwarevmc.com/vmc/reverse-proxy/api/orgs/84e"

Next we need our API Token. This token is dedicated to your Account, to create one, go to the top right, click on your name and go to "My Account".
On the last tab "API Token", we need to generate a new API Token.

Enter a Name, TTL period and your scope. I guess you only need "VMware Cloud on AWS" "NSX Cloud Admin", but I am not sure. My token had "All Roles". Generate the token, copy your generated token and safe it in a safe place! You will not be able to retrieve this token again.
vmc_token = "XXXXXXXXXXXXXXXXXXXXXXXXXXXXXXX"
Last we need the org-id. Just go to one of your SDDCs and look at the "support" tab, there you can find your org-id.
org-id = "XXXXXXXXX-XXXX-XXXX-XXXX-XXXXXXXXX"
If you working with github, I would recommend to create a .gitignore and add "terraform.tfvars", so it will not be uploaded to your repository. Take care about this file, all your secrets are inside :)! In the end your file should have 3 lines:
Host = "nsx-X-XX-X-XX.rp.vmwarevmc.com/vmc/reverse-proxy/api/orgs/84e"
vmc_token = "XXXXXXXXXXXXXXXXXXXXXXXXXXXXXXX"
org-id = "XXXXXXXXX-XXXX-XXXX-XXXX-XXXXXXXXX"
Perfect, we finished the preparation! We are ready to jump into "main.tf" file.
I creating 24 Services, 16 groups and 11 Distributed Firewall Sections with several Rules, in the end you will need to fill the groups with IPs/Ranges/Server. I only focused on Horizon related services, groups and firewall rules yet, so if you want to have a allowlist firewall enabled, you have to add core Services, Groups and Firewall Rules like DNS, DHCP, AD etc. I will try to keep on working on my code to add all necessary stuff for a allowlist firewall ruleset, but for now it should give you a idea how to do it and support your work.
But lets start to plan and apply the code. If you closed your Terminal window, reopen the terminal window, jump to our location and re-initialize terraform, with “terraform init”.
With the command “terraform plan” you can review everything what terraform wants to do and also you can check if you created your secret file correctly.

you can see terraform wants to create a lot of stuff. With “terraform apply” you will get again everything what terraform wants to create and you need to approve it with “yes”. Afterwards you fired “yes”, you can lean back and watch the magic.. After some seconds you should see: Apply complete! Resources: XX added, 0 changed, 0 destroyed.

Let’s take a look into VMC after we applied our changes. First of all we created groups…. and we got groups!

next we need to check services…. and we got services as well!

Now we come to our Distributed Firewall. Bunch of sections are created with several Rules in each section. I only created allow rules and all groups are empty, so no rule should impact anything!

Success :)! We applied Groups, Services and several Rules including Groups and Services. If you have any trouble or think you want to get rid of everything what Terraform did, you can just simple go back to your terminal and enter “terraform destroy”. It will check your environment what changed or what needs to be deleted, and give you a overview what terraform wants to/will do. Approve it with “yes” and all changes will be destroyed. It take some seconds and you will see: Destroy complete! Resources: XX destroyed.

If you have any questions, problems or suggestions feel free to contact me!
Some ending words about Terraform.. Terraform is a awesome tool in the world of automation.. I had no experience with programming but it took me one or two weeks to get into it and I had so much fun to write this code! It is super easy and super useful! I hope this code will help you, save you work and will provide you as much fun as I had :).
Integration Druva Phoenix Cloud to VMC on AWS
Updated: June 16th 2020
This blog post is ONLY a showcase. I want to show you, how easy a SaaS Backup Solution can be! We will securely implement it and backup a VM.

In this showcase we will use following Solutions:
Druva Phoenix SaaS Backup Solution
VMware Cloud on AWS
Distributed Firewall
About Druva:
Druva is a software company specialized on SaaS-based data protection in one Interface. It is build and born in the AWS Cloud. One of the Product is Phoenix Cloud. Let's talk about some benefits from Phoenix Cloud afterwards we will directly jump in and get deeper into Phoenix Cloud.
Phoenix backup everything in S3
Phoenix automatically archive older Backups to Glacier
You only pay for Storage you consuming after deduplication and compression
One Console for all Backups around the world
Up to over 15 Regions where Phoenix Cloud is available
And that are just a few benefits.
Let's dive in..
After we login to the Phoenix Cloud, the Console, is a very clean overview about your consumption and your environment. Druva provides a secure, multi-tenant environment for customer data, each customer gets a virtual private cloud (tenant). All data will be encrypted using a unique per tenant AES-256 encryption key. Above and beyond all security features what Phoenix Cloud provides, let's not forget about Druva is build in AWS. AWS provide significant protection against network security issues. You will find the full whitepaper about security here!

The first thing what we want to do, create a new Organization. It can be because of separate Departments, Regions etc. By the way Druva got a great permission management, each department can take care about there own Backups.
To create a new Org. we have to go to Organization and on the top left "Add New Organization", Name it and you created your first Org!

Afterwards go to your Org and Druva through you directly into a "Get Started”. We need to select a product, in our case VMware Setup.

Next we need to download the Backup Proxy, because we want to install it on VMC on AWS we need to download the standalone Backup Proxy. Keep on track, there’s something coming soon ;).
While the download is running we need to generate a new activation token for the installation of the proxy. You can set the count how many proxies you want to install and an expire time.

Copy your token, you will need it for the installation.
Now, before we can start to deploy the Proxy we need to check the network on VMC. Let’s go to the Compute Gateway Firewall first.
Druva Proxy needs 443 access to the vCenter and Internet access. So we create following rule on the compute Gateway:
Source: Druva-Proxy -> Destination: vCenter with Port: 443
Source: Druva-Proxy -> Destination: Any with Port: 443 applied to: internet interface

On the Management Gateway we need to open Port 443 as well. In- & Outbound.

Druva only needs access to the internet and to the vCenter, so why we shouldn't not restrict all other communication.
I wrote a Terraform script to automate this step, it will create groups, service and a distributed firewall section with 4 allow rules and 2 disabled deny rules. Repo can be found here. You just have to fill the created groups (Druva_Proxy, Druva_Cache & if needed SQL-Server).
All my test ran at a lab platform… Use above code at your own risk, I won't be responsible for any issues you may run into. Thanks!
If you prefer to do it by your own here are the manual steps:
Let's go to our Distributed Firewall.
My Demo Environment is set to blacklist. So our first Rules are:
Source: Druva-Proxy -> Destination: ANY with Service: ANY -> Reject!
Source: ANY -> Destination: Druva-Proxy with Serivce: ANY -> Reject!

Right now each traffic will be blocked directly on the vNIC of our Druva Proxy.
Perfect! Next we need to allow Internet traffic. This is trickier, because we using our internet gateway and do not using a classic proxy.
So we creating a RFC1918 Group, which includes all private IP Ranges and we need a negate selection. If you have a proxy Server just allow https traffic to your proxy, that should do the trick!
Source: Druva-Proxy -> Destination: is not! RFC1918 with Service 443 -> Allow!

Last Rules, we have to allow vCenter out- and inbound traffic. So we need 2 additional rules:
Source: Druva-Proxy -> Destination: vCenter with Service 443 -> Allow!
Optional you can add ICMP.
Source: vCenter -> Destination: Druva-Proxy with Service 443 -> Allow!

That’s pretty much it, our Application Ruleset! What we could do on the Infrastructure DFW Level, we could allow basic stuff like DNS etc. But Druva do not need anything else!
I will skip the Backup Proxy installation, it is pretty straight forward, choose Public Cloud, VMware Cloud on AWS and do the basic setup, like IP, Token , NTP, vCenter and your VMC credentials.
After the deployment is done, you will see your vCenter & VMs in Phoenix Cloud and also your Backup proxy is gathered in a Proxy Pool. With the latest version of the Backup proxy we are able to deploy new Proxies directly out of our Phoenix Console! Just go to your Backup Proxy Pool and hit deploy Proxies.

Choose your DataCenter & your Backup Proxy Pool, add as much as you want.
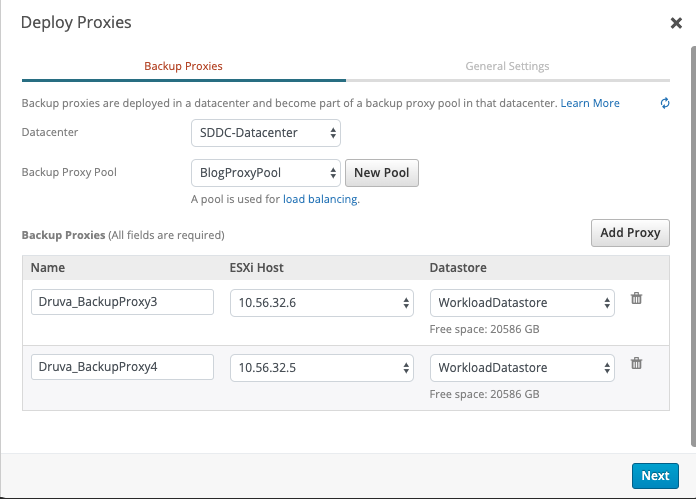
Configure the VM Network, a IP Range, Netmask, gateway and DNS Server. In my case I do not need any Proxy settings, if you using a Proxy just enable "use web proxy" and provide your information. Don't forget to add your newly deployed Proxies to your Firewall Group in VMC!

Now we have to create our first Backup Policy. You can find your Backup Policies via Manage -> Backup Policies. Let's create our own Policy with custom settings.

Create new Backup Policy -> VMware. First of all name it and write a description.

Schedule it, in our case each day at 02:00 am. Duration and your max bandwidth. You can separate weekdays and weekend, like me. On Weekend nobody works, so I extended the duration timer. It makes sense to ignore backup duration for the first backup. But I guess you know your Environment better than me.

Retention, in my case daily for 30 days, weekly for 24 weeks, monthly for 12 months and yearly snapshots for 10 years. Set it depending on your workload. I also enabled LTR (Long Term Retention). LTR automatically move all cold tier backups to Glacier.

Next some specific VMware Settings. Auto-enable CBT, VMware tools quiescing and application-aware processing.

That's it! Meanwhile you should notice in your Phoenix Cloud Console, your Proxy communicates with Druva Phoenix Cloud and you see some Information of your vCenter. Next we need to configure VMs for Backup. Let's go to Protect -> VMware. Here you have an overview of # Total VMs, Configured VMs and your Backup Proxy Pools/# Backup Proxies.

To configure a VM we go to your vCenter/Hypervisor and select 1 or multiple VMs and select Configure VM for Backup.

Choose your Storage, in my case eu-central 1 (Frankfurt DataCenter) a Administrative Group (useful to organize/management purpose) and your Backup Policy what we created earlier. In my case BlogPolicy, if you have more Backup Policys, you always can see the Details after selecting a Backup Policy.

Next, you can exclude disk names, in my case we do not exclude disks, as an example could be useful for Database Server.

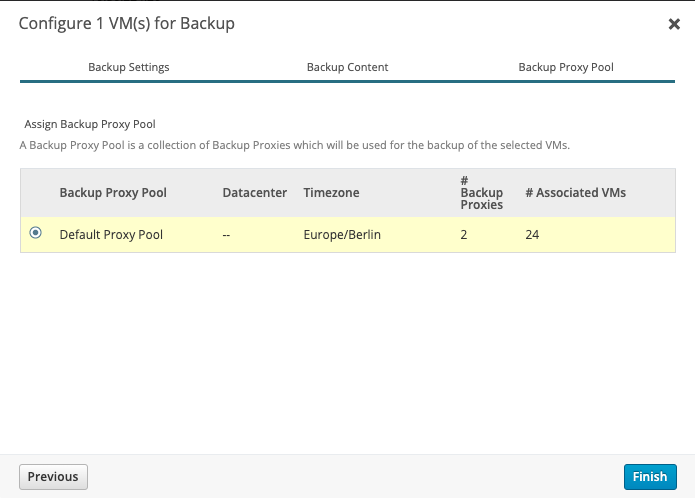
Select your Backup Proxy Pool and you good to go. Your Virtual Machine is now configured!
You will find your VM in "Configured Virtual Machines". To test it lets start a backup now. Select it, hit "Backup Now" and choose yes you really want to start now.

You will find your Job in Jobs -> VMware.

For detailed information you can press the Job ID and you can see a Summary and Progress Log, if something went wrong you can also download detailed logs here.

Above you can see the result! Our first Backup of our VM, we transferred nearly 19GB, with a speed of 196 GB/hr and the Backup Duration was under 10 minutes.
Some closing words, Druva Phoenix Cloud is a great SaaS Backup Solution! It is easy to use and on the other hand very detailed. Druva engineered a next-gen solution, which brings the backup world to the next Level.
I had the chance to get in contact with pre-sales, sales, support, engineering and product management. It was a pleasure for me, you felt in each of them, the love and passion for the product/solution.
Special Thanks to Martin Edwards, Saurabh Sharma, Anukesh Nevatia and the rest of the Druva Team!
VMware Carbon Black Cloud for Endpoint Security
The VMware Carbon Black Cloud is a cloud-native endpoint protection platform (EPP) that provides what you need to secure your endpoints, using a single lightweight agent and an easy to use console.

VMware Carbon Black provides:
Superior Protection
Actionable Visibility
Simplified Operations
We will secure our VMC on AWS Horizon Environment with Carbon Black endpoint protection.
First let's take a look on the Console. It is a web-based Console hosted in a AWS Datacenter (in different GEOs). You can login via SSO or E-Mail and Password, as well as 2FA with DUO Security / Google Authenticator. The Dashboard give you a good overview about what is going on, any events or issues, which can easily filtered per policy or day/weeks.
Carbon Black have a really great community, check it out! https://community.carbonblack.com/


Let's start to get CB rolling and define a policy group. In a policy group you can define all kind of settings, what should happen if something get's detected, or just simple things like, when should the system get scanned. To create a new Policy let's get to enforce -> policy.
Add a new Policy, name it, add a description and copy setting from the standard Policy Group. You are able to customize the message which the User will see, when carbon black blocked anything. In my case a picture of Carbon Black and they should contact me.
<table><tr><td><a href="https://www.carbonblack.com/"><img src="https://media.glassdoor.com/sqll/371798/carbon-black-squarelogo-1528288481334.png" width=32 height=32></a></td> <td> Contact Thomas Sauerer, he is your admin</td>

Let’s go to the next tab “prevention”. We can allow Applications to bypass Carbon Black so the client is able to use it. A common Application is Powershell. So we need to add a new Application path, enter the application path “**\powershell.exe” and select bypass if any operation are performed.

Blocking and Isolation, here we can decide what will happen if any known malware will be detected. In our case we want to terminate the process if it is running or start to run. Keep in mind you always have the ability to Test each single Rule, so you are able to test everything in a secure way without any business impact!
Next we can block Applications who are on the Company blacklist. Here we can be more specific. You are able to deny or terminate the communication over the network or you want block it if it injects any code or modifies memory of other processes. Like I mentioned before, test your rules, use this awesome feature!
Adware or PUP and Unknown application I choose to terminate process if it’s performs any ransomware-like behavior.

You also can change the local scans, On-Access File scan, frequency and more. Keep it in mind if you have to exclude any on-access scans on specific files/folders. You can change your Update Servers for offsite and internal devices. That is important if you have any mobile devices who are not directly connected. For different Regions it would make sense to change it to a local update server. Update-Server are reachable via https as well, just change it to https.

On the last, "Sensor" you can edit the sensor settings of the client. I will deploy CB to our demo and test environment, in this case I allow user to disable protection. Usually you will not allow the User to disable the security! Guess what, if user can disable it most of them will do.. Here you are able to activate the Sensor UI: Detailed message, which we defined earlier.

Next what we need to do is to create an Endpoint Group. In Endpointgroups you can define different policys or criteria to seperate different Workloads and assign them automatically to a policy. To do this, you have to go to "Endpoint" section on the left side and add a new group.

It makes sense to separate different Workloads as Horizon, WebServer etc. You can set different criteria like IP Range or Operating System to automatically add the Server to different Endpoint Groups.
Last step, we need to install the Carbon Black Sensor. Basically it should make sense to add the Sensor directly to the basic Images and also define a Default/general Endpoint Group where all clients are added with a basic ruleset. When you change, as an example, the IP address from the Server it will automatically update the Endpointgroup and add the Server to the new Policy Ruleset. In my case I will just install the Sensor manually.
To download the Sensor we need to go to Endpoints -> All Sensors on the top right you will find Sensor Options -> Download Sensor kits.

Run the installer on the target system, agree the terms and enter the License Key. We are done, the Sensor is installed! Take a look back to the Console "Endpoints", you can see now the VM automatically added to the correct group and policy.
IDS/IPS with NSX-T
VMware has announced a new NSX-T Version 3.0 on 7th of April 2020. This version is a major release with many new features. VMware added several new function in the areas Intrinsic Security, Operations, Multisite (Federation), Containers, Load Balancing Enhancements, VPN Enhancements, Routing, Automation and Cloud connectivity. I want to take a closer look within this blog post to the Intrusion Detection System/Intrusion Prevention System (IDS/IPS) feature.
Most companies are using IDS for the east-west security inside the data centre and IPS for the north-south security. For the release NSX-T 3.0 IDS is available, IPS will be provided with future releases.
What is a IDS/IPS system?
IDS/IPS systems can be implemented in hardware or software. IDS/IPS system protection is against vulnerabilities exploits which can be done as malicious attack to a application or service. Attackers use this to interrupt and gain control of the application. IDS/IPS technology rely on signatures to detect attempts at exploiting vulnerabilities into the applications. This signatures are comparable to regular expressions which compare network traffic with malicious traffic patterns.
IDS (Intrusion Detection System) is like the name already says an monitoring system and IPS (Intrusion Prevention System) is a control system which blocks the traffic in case a attack is detected. This means with IPS you have the risk of false positives.
How IDS runs with NSX?
As already mentioned with NSX-T 3.0 release VMware announced IDS (Intrusion Detection System) with NSX-T 3.0. IPS function will be provided in the next months.
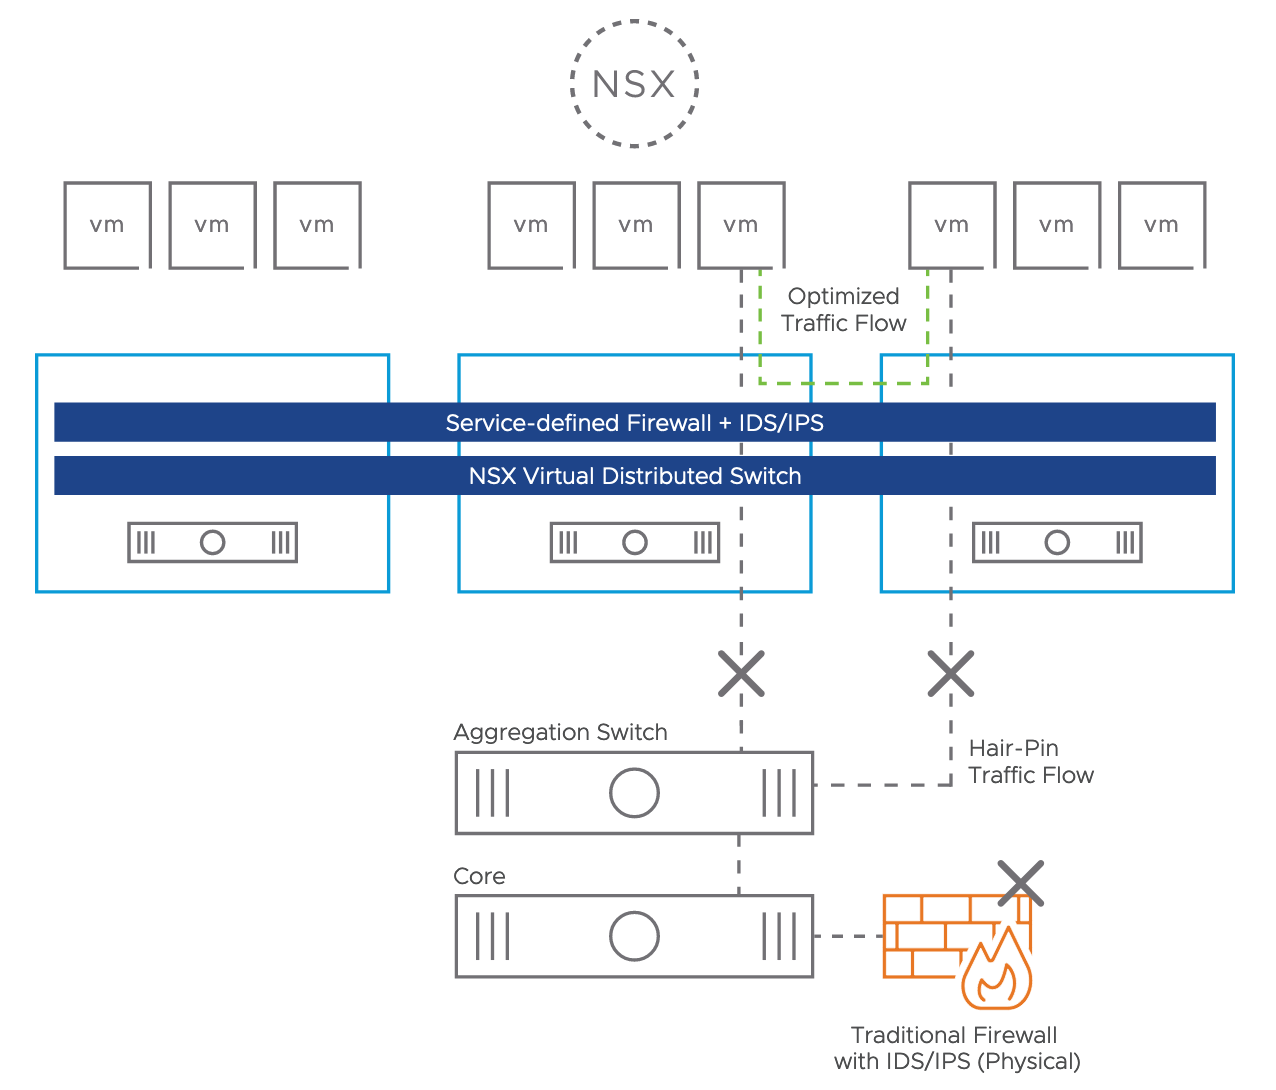
IDS is hypervisor based and is sitting in front of the vNIC on the ESXi host (see picture 1). The design is based on the NSX DFW (Distributed Firewall) concept. No agent is necessary, the communication is realized via VMware tools. A VMware VIB (vSphere Installation Bundle) will be rolled out for the host preparation. With this technic you avoid hair-pin because instead of traditional firewall with IPS/IDS the function is covered directly on the host level without any dependency to the network or any IP address ranges.
The signatures will be provided from the cloud service provider Trustwave directly to the NSX Manager. For this purpose the NSX Manager needs internet access, offline downloads are also supported. The signature updates could be provided immediately, daily or bi-weekly.
Picture 1: IDS System Hypervisor based
What are the use cases for IDS with NSX?
DMZ (Demilitarized Zone)
NSX IDS has the possibility to establish a DMZ (Demilitarized Zone) in software. One approach could be to realize this completely on the virtualization level or another choice could be to use dedicated ESXi Hosts for the DMZ. The NSX Distributed Firewall (DFW) and the Distributed IDS allow customers to run workloads centralized for different tenants.
Detecting Lateral Threat Movement
Usually the initial attack is not the actual objective, the attackers try to move through the environment to reach the real target. The NSX Distributed Firewall (DFW) with Layer-7 App-ID features helps there a lot that the attacker could not exploit the attack. For example the ransomware attack “WannaCry” is based on port 445 and 139 with SMB and could not be avoided with NSX DFW. With IDS technology the attack could be detected and would not be moved to other machines.
Replace physical IDS Systems
Another use case could be to remove the physical firewalls or IDS systems and replace it with NSX.
Meet regulatory compliance
Many data centre workloads have Intrusion Detection System (IDS) requirements for regulatory compliance, i.e. sensitive Health Insurance Portability and Accountability Act (HIPAA) for healthcare, and the Payment Card Industry Data Security Standard (PCI DSS) or the Sarbanes-Oxley Act (SOX) for finance.
How does IDS work with NSX?
The installation effort and the operational overhead is low when NSX is already implemented. There are only a few steps necessary to get the IDS function up and running.
1. Configure IDS Settings
The NSX-T Manager needs internet access to download the signatures, it could be done with auto-updates or manuel. It is also possible to define an Internet Proxy (HTTP/HTTPS). The VIB (VMware Installation Bundle) rollout can be realized via cluster or standalone ESXi Host (see picture 2).

Picture 2: Configure IDS Settings
2. Configure IDS Profile
The second step would be to configure an IDS Profile if you do not want to use the default profile (see picture 3). During this step Severities can be defined from Critical, High, Medium to Low which are based on CVSS (Common Vulnerability Scoring System) score.
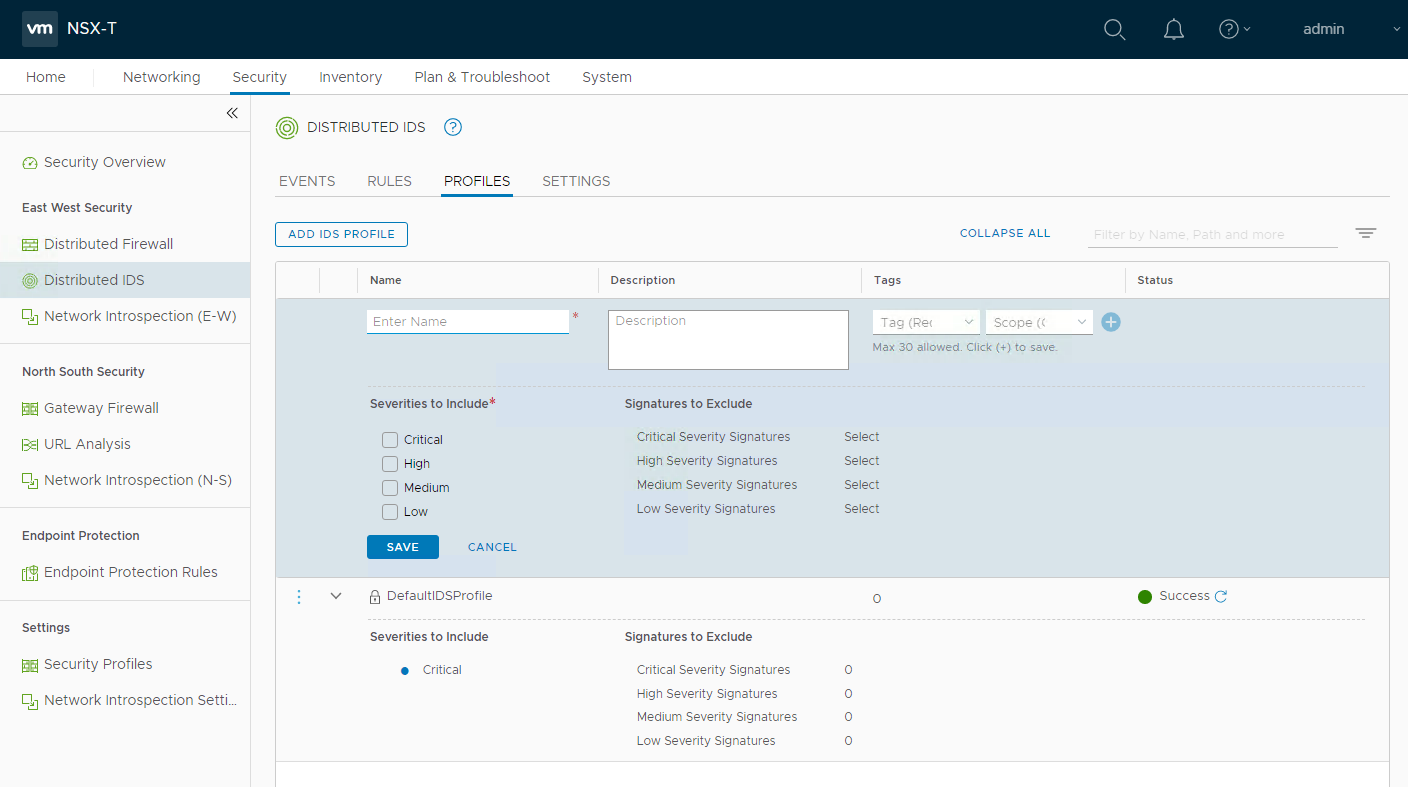
Picture 3: Configure IDS Profile
3. Configure IDS Rules
The last IDS configuration step will be to create an policy with IDS rules (see picture 4). The administration of IDS rules are very similar to the DFW firewall rules. A configuration of a IDS rules includes name, sources, destinations, services, IDS profile and the applied to field.

Picture 4: Configure IDS rules
4. Monitor IDS Events
When IDS is configured the events can be monitored over the dashboard which is visible below in picture 5.

Picture 5: Monitor IDS events
Summary
IDS (Intrusion Detection System) is another major step for NSX within the Intrinsic Security area. IDS in software, Distributed & Built-in Analysis, no hair-pinning traffic, meet regulatory compliance, fits DMZ requirements, no lateral thread movement and simple operations are all arguments to validate this new feature.

5 Security Trends for 2020 you better start following
No 1: Democratization of Security
Security is nothing that belongs to Security Teams exlusively “anymore”. Security must be adapted in every single moment in the infrastructure. The faster we accept it, the faster it wiil speed up your business. Security must be the guardrails that will protect our operations.
Different Topics can be placed to make that real, just to name a few:
Visibility
Assets, Data, Flows, Hashes, Ports&Protocols, Vulnerabilities. Your are building your infrastructure, you are responsible for your application and maybe you are building your software. You should know your infrastructure better than anybody else. And because it’s yours!What is the most important thing on your checklist? Usability, everybody needs Tools that are easy to use, that have acceptance and make fun to work with. Nobody needs one week training to work with a new tool. However you define it, but Usability must be a Topic on your checklist next to all the requirements that the product needs to fullfil.
What is the second most important thing? Look for non-siloed driven solution. The solution has to be consumable from more than one department. For Example: Communication Flows needs to be analyzed by Application Owner, by Security Analysts and Network Experts, of course it is about connectivity, but it is also about needs and guidelines. There is a business to run and that’s why the IT in gneral can enable the business or even make the the business faster and needs to work together. Simple and Secure.
Automation - there are two (at least) things that drives Automation
React fast on new Attack Vectors? Can you easily stop/disable specific Ports&Protocols for parts or the whole datacenter? You need to have automation to make this possible. Sure, in this case it is configuration management and you use automation to make this possible.
Still working with a checklist to add security after the workload was created?
Consider your Security Concept and Guidelines the moment you intantiate your workloads.
Example 1: You need to add another webserver for dedicated application, then you will apply the security settings that are defined for the existing webserver, which is normally the same security group/tag.
Example 2: You need to add a new workload from a template and staging will define the category afterwards. Place your workloads in staging security group, where you have access to install applications, central it-services and to update security tools like Update-Server or Endpoint Security solution (if they need that).
Zero Trust
Zero Trust is a framework that needs to be translated into your organization. From a “trust but verify” to “never trust/,always verify” approach. This model considers all resources to be external and continuously verifies trust before granting only the required access. It should be End-to-End, that’s why your organization should be aware of risk and trust. Have a look at No. 3, as Zero Trust is a main topic.
Security is a Team Sport!
No 2: Real-Time Vulnerability Assessment
Is Software more vulnerable today? This Question came up in March 2018 from the European Union Agency for Cybersecurity (ENISA). Edgescan provided the Vulnerability Statistic Report (2019) where the also looked back in 2018, where 81% Vulnerabilites came from the Network and 19% Vulnerabilities came from Layer 7. The most critical ones are coming from the Application / Layer 7.
Who is responsible for Vulnerability Assessment? Security. Scan the Environment every 10-15 Days and provide a Report to the Infrastructure responsibles and make them patch the systems. The number of vulnerabilites grow faster than ever (more devices/applications) and that’s why we need a new approach.
Real-Time Vulnerability Assessment. Everybody needs to be aware if there are vulnerable version, mostly it’s just patching. Real-Time Assessment is also reducing Performance as a service is running initially and watch out for deltas. A risk score provides informations to patch by priority. Patching can be time consuming, that’s why you need to know what to patch first.
No 3: Zero Trust (Framework)
Zero Trust is one of the most used Buzzwords when it comes to Security right now, as it is used also for almost everything. You can find different sources and the most accurate starting point is John Kindervag of Forrester in 2010, where we need to find model to relies on continuous verification of trust. From the definition on wikipedia: Zero Trust is an information security framework which states that organizations should not trust any entity inside or outside of their perimeter at any time. It provides the visibility and IT controls needed to secure, manage and monitor every device, user, app and network being used to access business data. It also involves on-device detection and remediation of threats.
Especially when we speak about End-to-End Security, it is necessary to consider anything that is involved the communication: Identity (User), Device, Applications, Connections, Accessing Services, Accessing Data and anything that the connection opens for that, as requests to a web server, also open new connections to apps and then databases.
The most challenging point is potentially to consider the framework in your collection of providers to provide secure software + hardware. A handful companies could help you to provide end-to-end visibility and powerful security controls to reach a zero trust / always verifiy model withoud slowing down or stopping the business.
The combination of security controls and security products will provide a better security, which stands also for democratization of security. You need to understand Identity authority and how to manage endpoints to fully secure Users/Devices. The combination of the Unified Endpoint Management “Workspace One” and the Endpoint Security “Endpoint Standard” powered by VMware Carbon Black is a perfect example. The unified device management seems to be unique on the market, as there are features like identity and device trust. Who is trying to authenticate and how, on which device? Company owned, bring your own and how are you connected? Home WiFi, public Hotspot. Whatever it is at the end, all these paraemeters can be used to define the trust.

Let’s take another look into the datacenter. The place where we see anything legacy infrastructure and modern application development or 10-15 years of infrastructure. Whatever it is at the end, does not matter. What matters at the end is? Do not add Security controls at the end. VM Templates based Operting Systems without knowing what the Workload will do at the end?! That’s the reality and stands for: Security rules and sensors will be added almost to the end.
Encryption
Endpoint based Encryption has to be as flexible as the user. Working at home, working in a public cafe or at the beach. Wherever you are, from a usage and connectivity point of view it should feel like you are at the office. But your aren’t. Can somebody spy your screen, should you really access critical data? Your company is using already cloud services? It make sense to make a direct connection to the cloud based services instead of connecting to the company and then to the internet. There are many things to consider if you are “outside”. Secure app data at-rest and in-transit with AES 256-bit encryption.
No. 4 East West Security
East-West Traffic often used to define the communication in the Datacenter, as Application speaks to Applications and Applications access Data. If we speak about Datacenter, then it is on Premises and Cloud. There are different methods that are used to address East-West security:
Microsegmentation / Zoning
Shrinking the attack Surface, stop Lateral Movement, VLAN Security, DMZ Security, Flexibility (your own Firewall, your own Ruleset) for your area, Built your Security concept into the infrastructure - no Permit A38 (Asterix and Obelix) add-on Security - there are different reasons why you need to start working on a flexible Zoning Concept. It’s mostly Automation, Speed and Flexibility. “Workloads needs to be secure the moment they are intantiated” is phrased in Gartner’s Cloud Workload Protection Framework. You don’t what to have an OS Template that needs to be updated first and add security afterwards. You know how do you want to secure your web server, why should you wait and add security in last step, after the machine was days in your infrastructure without any or limited security. You don’t what to be hacked and watch how parts of your datacenter is killed. By the way, if you do it right, it is a good exercise to enable automation and bring more speed into your infrastructure.
Service Mesh
Principles of application development are pushing where to defined/configure connectivity. Service Mesh is a good example how to add sidecars as a dataplane (service proxies) to have a layer between application control plane and the application itself. There are benefits with Service Mesh are not only Security a la Authentication, encryption and authorization, it is also about Visibility = Monioting, Logging & Tracing and Routing = Connectivity and Canary Releasing
Encryption
Compliance Report: TLS based Encryption (1.2 / 1.3) is the standard encpytion for application communication. Is it? Not? Why? We are running for a decade of infrastructure and not every application is capable of using TLS based encryption. You need a solution to make a compliance report to see hat why encryption you are using.
East-West Encryption: You can not change your application and bring the encryption to the newest / highest level? App Encryption is capable to take the data stream before it hits TCP/IP and encrypt traffic and decrypt traffic on the other end. If the application is using already SSL, the App Encryption is using e.g. TLS 1.2 over SSL.
No. 5 XDR
eXtended Detection & Response stands for visibility and the correlation of data that is used end-to-end. A perfect topic to close the 5 Security Trends you better start following, as all four Topics are part to fullfil the security end-to-end:
Security is organization driven, awareness and knowledge, most important: Security controls are adapted in and based on the business
Your assets needs to be secure and needs to be updated whenever necessary. It is more important how vendors react on vulnerable versions than having vulnerabilities.
Zero Trust is not a button to switch, you need to understand how and how to design the framework and adapt it for the business you are running. Consilidation and reducti0n of vendors / security controls is necessary to be more efficient to fullfil that
East-West Security is important right now and it was treated neglectfully over years. Perimter is important, but will not help you with everything. Transport Controls needs to be possible from East-West to North-South.
Keep in mind: XDR could be a Session Recorder, for End-to-End Visibility. A Topic that will be stressed more and more, and here we see how the organization needs to work together to have the big picture and use that to start reacting, learn and/or change prevent controls. Sames as Zero Trust, only a handful companies have potentially the capabilities to deliver it.
vExpert Program
Do you know the vExpert Program? As you use social media, read, post and blog for you and your company, the technology you believe in, you should go for it. This is a community for everybody interested in VMware knowledge. Here is a short overview:
Program Overview
The VMware vExpert program is VMware's global evangelism and advocacy program. The program is designed to put VMware's marketing resources towards your advocacy efforts. Promotion of your articles, exposure at our global events, co-op advertising, traffic analysis, and early access to beta programs and VMware's roadmap. The awards are for individuals, not companies, and last for one year. Employees of both customers and partners can receive the awards. In the application, we consider various community activities from the previous year as well as the current year's (only for 2nd half applications) activities in determining who gets awards. We look to see that not only were you active but are still active in the path you chose to apply for.
Criteria
If you are interested in becoming a vExpert the criteria is simple. We are looking for IT Professionals who are sharing their VMware knowledge and contributing that back to the community. The term "giving back" is defined as going above and beyond your day job. There are several ways to share your knowledge and engage with the community. Some of those activities are blogging, book authoring, magazine articles, CloudCred task writing, active in Facebook groups, forum (VMTN as well as other non VMware) platforms, public speaking, VMUG leadership, videos and so on.
vExpert Program Benefits
Invite to our private #Slack channel
vExpert certificate signed by our CEO Pat Gelsinger.
Private forums on communities.vmware.com.
Permission to use the vExpert logo on cards, website, etc for one year
Access to a private directory for networking, etc.
Exclusive gifts from various VMware partners.
Private webinars with VMware partners as well as NFRs.
Access to private betas (subject to admission by beta teams).
365-day eval licenses for most products for home lab / cloud providers.
Private pre-launch briefings via our blogger briefing pre-VMworld (subject to admission by product teams)
Blogger early access program for vSphere and some other products.
Featured in a public vExpert online directory.
Access to vetted VMware & Virtualization content for your social channels.
Yearly vExpert parties at both VMworld US and VMworld Europe events.
Identification as a vExpert at both VMworld US and VMworld EU.
Visit it here: https://vexpert.vmware.com/
What is NSX Intelligence?
With NSX-T 2.5 VMware has announced NSX Intelligence. What is it and what are the use cases behind it?
NSX Intelligence is a native distributed analytics engine that aims to converge security visibility, granular policy management, analytics and compliance across the datacenter by leveraging deep workload and network context within NSX. Intelligence is feeded from the NSX-T Manager and from the ESXi Hosts, other different sources are also planned, like VMware Carbon Black Cloud.
NSX Intelligence is only available for NSX-T, there is no comparable feature in NSX-V.
VMware has included NSX-T Intelligence version 1.0 within the NSX-T 2.5 version. This feature is available with the NSX Enterprise Plus license. With the initial NSX Intelligence solution you get the capabilities for visualization and policy planning. For future versions VMware is planning to have bundles for security analytics for anomaly analysis of network behaviour and threat detection.
How the current feature set looks like?
As mentioned Visualization and Policy Planning is included in NSX Intelligence Version 1.0. NSX Intelligence provides a user interface via a single management plane within the NSX Manager, and provides the following features:
Close to real-time flow information for workloads in your environment.
NSX Intelligence correlates live or historic flows, user configurations, and workload inventory.
Ability to view past information about flows, user configurations, and workload inventory.
Automated micro-segmentation planning by recommending firewall rules, groups, and services.
What is NSX Intelligence built for?
Many companies do not have Netflow solution in place because it is expensive, needs high operation efforts and is complex to implement. Thus NSX Intelligence is a easy way to get connection flow visiblity without much costs, plannings and operation efforts.
Another use case is the security planning. Especially when security administrator wants to deploy Micro-segmentation rules they need information about every connection stream. It is very difficult to get this information from the application owners because software engineers have other priorities and the application ports are changing from time to time. NSX Intelligence provides security rule and security grouping recommendations (see picture 1). This recommendations are shown directly within the NSX-T manager GUI and can be modified and published from there.

Picture 1: Screenshot from NSX Intelligence security planning view
How does this work?
The NSX Intelligence Data Platform gets the stream from the NSX-T Manager and from the ESXi Hosts which are prepared as NSX-T Transport Nodes. Flows are send with a 5-minute interval. This means that flow and guest information is distributed and optimized directly from the source, no agent is necessary. The NSX Intelligence appliance will be deployed from the NSX-T Manager GUI and is also managed monitored from there.
The Architecture converged security visibility and analytics (see picture 2 below).

Picture 2: NSX Intelligence Architecture
What is the difference between NSX Intelligence and vRealize Network Insight?
vRealize Network Insight should be used for end-to-end network visibility and Day 2 Operations for SD-WAN, cloud, 3rd party, physical and virtual infrastructure. The application modeling micro-segmentation is also a good use case. This means when you start with micro-segmentation and you have no idea how your application is structured, then you get inputs to start with security group and policy planning. The Networking Operations team is the main user group for vRealize Network Insight.
NSX Intelligence is used from the Networking and Application Security team. The core use case is simplify rule recommendation and deployment into NSX.
Summary
From my point of view NSX Intelligence is a game changer because you get all flows directly from the ESXi Host and the NSX-T Manager (and more sources are planned) and it is possible to publish directly the security policy. If you need more information for this topic I can recommend to watch two YouTube Videos from the VMware Technical Product Manager Ray Budavari who has been presented during “Networking Field Day 22”.
VLAN/Subnet Security
A Broadcast Domain, a Subnet, a VLAN, 192.168.1.0/24 - you don’t need to explain it for some, but some forget the basiscs and expect a product that can solve anything.
VLAN/Subnet Security is not difficult - probably if I think of VMware NSX Microsegmentation (and btw you don’t need to run overlay networks with NSX). Otherwise it seems “more” difficult, differs from size to size or the number of VLANs. But hey let’s forget Technology for a while, at the end you need to make it more secure, so do it!
Analogy: Think of it like a subnet is a house. Within a house you have different rooms and people can be in different rooms (close doors). If somebody rings the bells and say “somebody at home”, people open the door and speak to other. Or you scream a specific name, the specific name open the open and they speak… if members of the house finds a service that is interessting they wants to speak like you cook and the people get to the kitchen because it smells good … you got the idea. That means, you can close your door, but as soon as you ask, go or look for something, you are using your house - you can not really stop it moving people around the house if you need to use to natural needs.
So, what is the difference if you have Security within you house in place? You make rules: If somebody says “Someboday at home” just a single person noboday will answer that. If there is a speaking ring tone, you will open the door. if the kids wants to play with each other, you allow child 1 and play with child 2 but just in room 1 or the most practical way which mostly works when you come back to the reality. Do members needs to speak to each other? No, just using the house - isolated and everybody can leave the house to communicates to neighbors or what outside services that are necessary.
Why do i stress that topic? In most cases - a Client within a Subnet normally just speak to the Gateway to reach central Services (Active Directory, DNS, Exchange, etc.) or to each the Internet/Cloud Services. There are more situations and it does not matter (right now) how you size your subnet. There are million reasons how you structure your network, structure ip addresses, or structure your datacenter.
Security for that / EVERY Subnet matter. Why? A Metasploit Attack is using Layer 2 (= MAC Address / Switching) and (most) Ransomware are uying Layer 3 (IP Addresses), as long as you request IP Addresses within the same subnet it will not leave the subnet = can communicate to each other.
Using the example of the Software Defined Datacenter:
VMware is using the Definition of a Management Cluster and a Compute Cluster (which are Areas in a context of a Security Zoning Concept). The Management Cluster is build on the Management Plane = vCenter and the Data Plane = ESXi / Hypervisor. It is very important that you place the vCenter is a different subnet than the ESXis to be able to control the traffic between these Zones. Why? The vCenter is a virtual appliance, but is a part of VLAN/Subnet, that is configured through the physical network infrastructure. The ESXi Farm is using IP addresses of a VLAN/Subnet, also managed by physical infrastructure - anything else on top of that infrastructure could be managed by virtual networks and can use software logic to manage security.
VLAN/Subnet Security is based on Networking and how communication is handled within a VLAN/Subnet. These principles are the core elements to start building your infrastructure.
Action:
- Management - ESXi Traffic (VLAN/Subnet) needs to be controlled by a Firewall. Access to the Management, who is eligable in what form to access the management layer? How is the Management Plane using the Data Plane?
- ESXi Servers are the only participants in a ESXi VLAN/Subnet ? as ESXi Servers has their Firewall and they can be configured to manage the traffic between each others anythis else on top, e.g. PVLAN will not make the VLAN/Subnet more secure)
This might interest you:
Virtual Networks follow the same principles but more options to be managed, e.g. Firewall Rules based on Objects (not IP addresses) within the VLAN/Subnet, which gives you flexibility, can follow Zero Trust guidelines and are the basics to build Automation.
BTW: Even if thing your are using already object based firewall rules, it is just a definiton and at the end the system is using IP Addresses. What if you are changing the IP? What if you are delete or move the system?
Links:
You should use the VMware Validated Designs to understand the principles how to design a Software Defined Datacenter and use Hardening Guides to harden the communication for that.
Design NSX Firewall Policies in a smart way
The main use case for NSX is still security. With NSX we have the possibility to use NSX Edge Firewalling for North-South Traffic and NSX Distributed Firewalling (DFW) for East-West Traffic. Due to two vendor strategy and throughput the most companies are using the NSX DFW Firewalling inside the data centre and a hardware vendor firewall for north-south traffic. This blog entry has the focus to DFW and NSX-T but be aware that the difference regarding Distributed Firewalling between NSX-v and NSX-T is low.
1. Start small and end big!
When starting with NSX DFW you should not start like: “I want to have micro-segmentation between every server with each dedicated port in my whole infrastructure”. Think more like to start small and to end big which means to secure the traffic initially between zones or applications. It is not a good idea to restrict every port and protocol inside the applications from the beginning. If it is mandatory from the start you can activate micro-segmentation only within areas which are really critical.
The other challenge is that it is not easy to get all information about IP`s and Ports from the application owners. There are assistant tools like vRealize Network Insight and NSX Intelligence if you use NSX-T but in any case it would create efforts if you don`t get this input from the application owners.
2. Security Policy Methodology
There are three security methodologies which can be used. Network-centric is the traditional approach, grouping objects can be done via IP addresses or MAC addresses. The infrastructure methodology is based on segments or segments ports, identifying where application VMs are connected.

Picture 1: Micro-segmentation Methodologies
If no dependencies to the physical, network and logical infrastructure exist it is highly recommended to use the application security policy methodology. The application-centric approach is based on the application type, i.e. VM`s tagged as “Database-Servers” or application environment tagged as “Prod-Area”. With this approach you are ready for automation, cloud-native applications and a self-service portal.
3. Rule Ordering
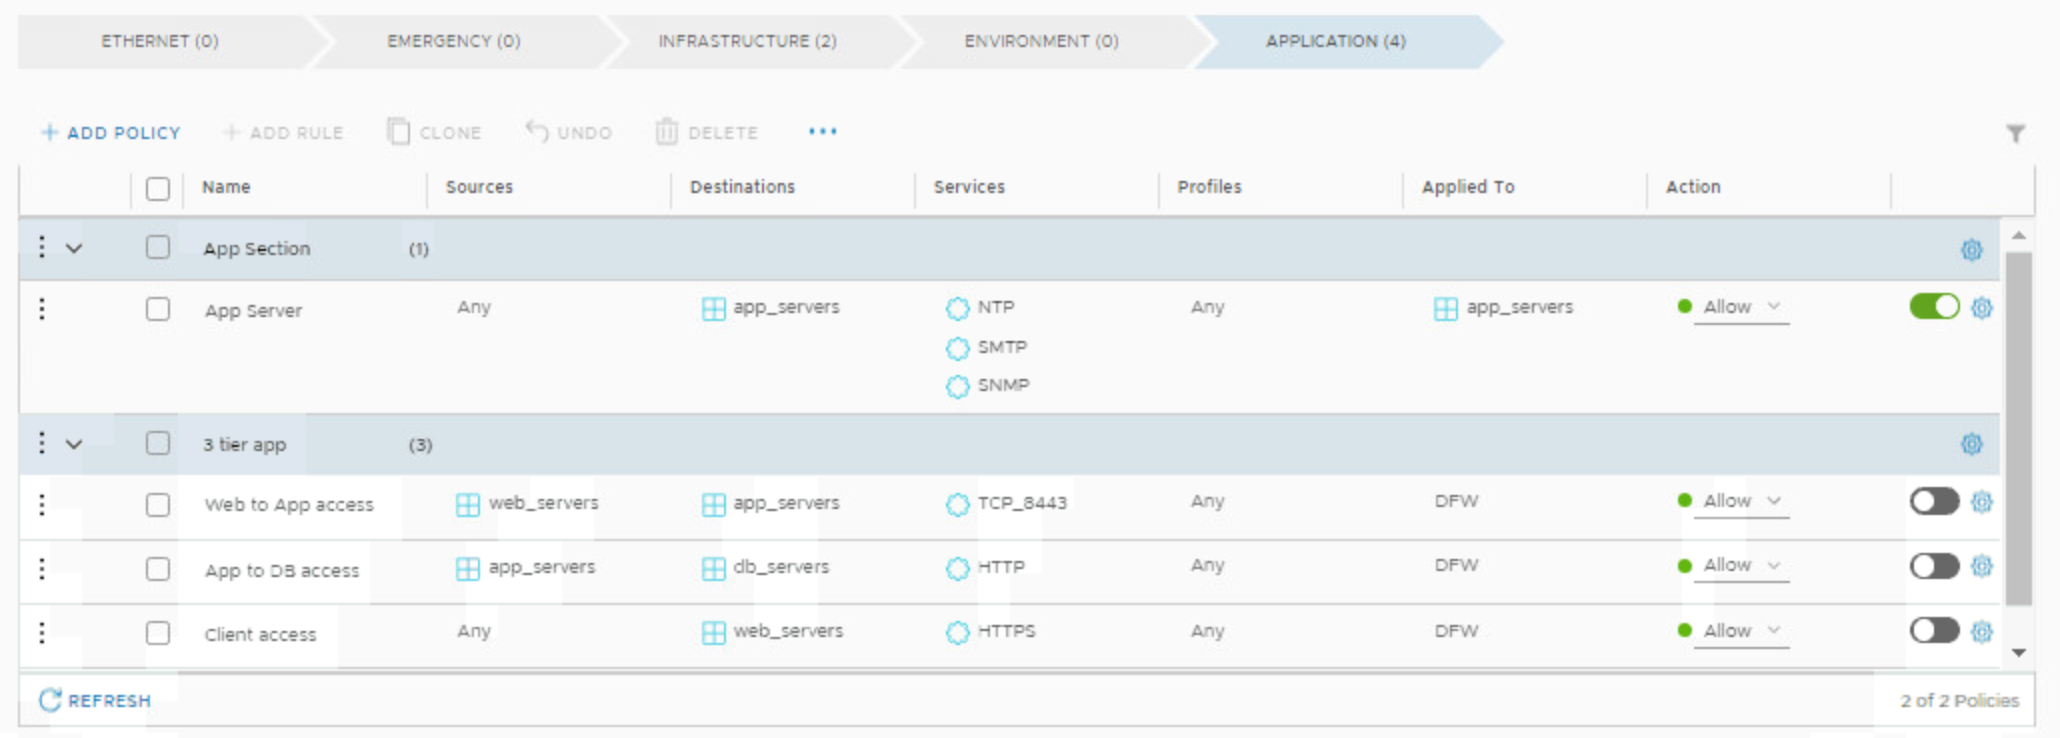
With NSX-T DFW there are 5 pre-defined categories existing:
Ethernet
Emergency
Infrastructure
Environment
Application

Picture 2: Distributed Firewall - Category specific rules
Within each category you can define different sections or policies, in picture 2 you can see the category INFRASTRUCTURE with policy Section1 and rule Rule1. Rules are processed in order from the top down. It is recommended to place the rules which hit most towards the top of the ruleset to reduce the number of rules that need to be processed through the ruleset.
4. Configuration Limits
It is very important to observe the configuration maximums, you can verify it under the link https://configmax.vmware.com . Some of the maximums are hard limits and others are soft limits due to testing regulations. In any case if possible it is not recommended to exceed this. It is also important to check the configmax page for every dedicated version because changes are happing from time to time.
5. Applied To Field
One important point is to use the “Applied To field” in a smart way. When DFW is used there like in Picture 2 the rule is applied to the whole Distributed Firewall which means the rule is published on every vNIC filter of a VM where DFW is configured. Thus use for the “Applied To field” security groups where possible, i.e. app-servers in Picture 3. The risk is high to reach the maximum limit per vNIC if you use everywhere the DFW as applied to parameter. The rules limit per vNIC with the current NSX-T Version 2.5.1 is 4000 rules per vNIC.

Picture 3: Distributed Firewall - Apply To Field
6. Rule Explosion via Services
The rules limit of 4000 rules per vNIC seems to be very high but you have to understand how it is pushed to the ESXi hosts. For every service entry which you create within the NSX-T Manager GUI there is one rule create on the ESXi vNIC filter. In Picture 4 there is a example visible with the rule name App Server. This rule has three different services NTP, SMTP and SNMP configured. In Picture 5 it is shown that the filter for the vNIC creates for the ports 123, 162 and 25 three rule entries.
Picture 4: DFW Rule App Server Example

Picture 5: DFW filter example on the vNIC level
A workaround to avoid this problem is to configure service entries with ports. In Picture 6 it is visible that the ports 123 and 161 are configured with comma separation. Picture 7 shows the service predefined service “UDP Set” in the rule with the name “App Server”. Finally you can see that on the vNIC level there is only one rule created for the ports 123 and 161 of the service entry “UDP Set”.

Picture 6: Set service entries

Picture 7: DFW rule example with customized service “UDP Set”

Picture 8: DFW filter example with customized service “UDP Set”
7. DFW Thresholds
DFW Threshold profiles provide an ability to apply CPU & memory thresholds for DFW on ESXi hosts. The profiles can be applied to NSGroups consisting of ESXi Transport nodes. The transport nodes will then provide alerts when CPU and memory thresholds for DFW has exceeded/fallen below the set threshold values. This only works on ESXi based transport nodes.

Picture 9: DFW Thresholds on ESXi host
The default threshold is configured to 90 % for CPU and memory, it is recommended to change the value to 80 %.
8. DFW Drafts
Another feature which has been released with the new NSX-T 2.5. version is the DFW Draft feature. Rules can be saved as Draft before it has been published. The system allows to have multiple users work on the same draft with a locking mechanism to disable overriding of rules from different users.
After the ruleset has been published the system creates a copy, the configuration can be re-deployed to rollback to an existing state.
9. DFW Exclusion List
One important feature for DFW is the exclusion list option. During troubleshooting or for some VM`s which needs not to be micro-segmented there is the possibility to exclude dedicated VM`s from the DFW without a deactivation of the whole DFW on the ESXi host. With NSX-T it can be configured on NSGroup (Security Group), Logical Switch or Logical Port level.

Picture 10: Exclusion List
10. Stateless Rules
The DFW firewall is from default a stateful firewall. It is possible to change this behaviour on the policy (section) level if mandatory. Stateless rules do not create entries in the connection table and will always need to be evaluated against the rule base. It is recommended to place stateless rules as close to the top of the rule base.

Summary
If you start with Distributed Firewall it is important to have a detail planning to get a good structure of your firewall ruleset. The planning process could be from a high level view like this:
Understand the Application
Define the Methodology
Breakdown Application
Prepare Documentation
Secure the Application
Micro-segmenation is also not only a technical challenge, you need to involve several stakeholders, like security administrators, application owners or security officer, this depends on your company organisation. The NSX Distributed Firewall can work on Layer 3/4, Application Level Gateway (ALG) and Layer 7 with APP-IDs but it could be also taken into account how it works together with other security solutions like AppDefense, IPS/IDS, perimeter firewalls, NSX Third Party Integration on Guest or Network Introspection Level. When you consider all this you have a real great value of NSX Distributed Firewalling!
Lateral Movement
The biggest challenge after attacks using standard protocols/ports is Lateral Movement. You can break it down into a Zoning- and Segmentation Concept. But first things first. Security within a Subnet is not difficult, there are technologies on the market, that make things easy, e.g. VMware NSX. You can write two firewall rules to stop Inter-VLAN communication. One for L3/L4 based on IP/Protocol and one for L2 based on Ethernet (MAC-Adresse). The same can be used for VLAN-VLAN communication. Though, if you start to make your Datacenter secure, start with Inter-VLAN, VLAN-VLAN Security to stop Lateral Movement.
Why? You are loosing more than just one workload if an attack made it through your Datacenter. What do you need to be secure? The possibility and flexibility to zone and segment traffic.
Zoning: Protect a Department, an Application or a Farm
Define rules to realize communications for applications with standard infrastructure services (DNS, NTP, DHCP)
Segment: Protect the Zone traffic
Define rules how to communicate within the zone, e.g. from Web to App and from App to DB
Zoning concepts needs time, in general you can calculate 2-3 years to make your brownfield granular secure. It‘s all about definition, visibility, to understand the business and integrate your concept and the it operations and even more in important in automation processes. A Zoning concept is also mostly used to reach a Zero Trust approach.
There is no way around, you need to start to stop Lateral Movement
Endpoint is not Endpoint
A new Year, a new start. The Endpoint Security Market is OPEN!
Endpoint is not Endpoint. Endpoint is used for Mobile Devices (Laptop, Tablet, etc.) It’s all about Who uses the Devices, what is the devices for and what content do they want to use? Short: Classical North-South Traffic.
Datacenter Endpoints called Workloads: Within the Datacenter we see Applications talk to Applications, Applications talk to Data. Short: Classical East-West Traffic.
Gartner addresses these Topics in Critical Capabilities for Endpoint Protection Platforms, Magic Quadrant available. The Workload is addressed in Market Guide for Cloud Workload Protection Platforms that Enterprises are putting enterprise data and application at risk, if they consider EPP offerings designed soleley for protecting end-user devices for server workload protection.
That does not mean, that a customer needs to choose different Vendors/Products to solve different Security challenges. To understand that Endpoints and Workloads are different and needs to threaten different is easy. It might be, that customers are having different requirements, even if this is the tricky part to get them all and consider different disciplines.
There are a lot more Topics to cover, stay calm, more to come.